# Obot v0.28.0
---
Document: Connect to a vMCP
Version: v0.28.0
Markdown: https://docs.obot.ai/v0.28.0/start-here/connect.md
HTML: https://docs.obot.ai/start-here/connect
# Connect to a vMCP
Use a vMCP to connect your AI client to tools available through Obot. You can connect to one an administrator shared with you or one you created yourself. You do not need to create another endpoint or have access to a shared vMCP's source catalog entries.
## Connect your client
You need your organization's Obot URL, a sign-in account, and access to the vMCP. Use an MCP client that supports Streamable HTTP and OAuth, or follow the [API-key instructions](https://docs.obot.ai/v0.28.0/mcp-gateway/connect-clients.md#obot-doc-clients-using-api-keys). MCP connections do not require model-provider credentials.
1. Sign in to Obot, open **vMCPs**, and select the vMCP you created or that your administrator shared.
2. Select **Connect**. Use the provided client instructions or copy the **Connection URL**. It has the form `https:///mcp-connect/`.
3. Add the URL to your AI client's MCP configuration and complete the Obot sign-in flow. Supply any requested connection values and authorize upstream services when prompted.
4. Refresh the client's tool list and run a read-only tool. Confirm that it returns the expected result.
If an endpoint or tool is missing, ask the administrator to check its selected tools and profile grants. For configuration changes, API keys, or connection errors, see [Connect AI clients](https://docs.obot.ai/v0.28.0/mcp-gateway/connect-clients.md) and [Troubleshooting](https://docs.obot.ai/v0.28.0/mcp-gateway/troubleshooting.md).
## Next steps
- [Check the audit record](https://docs.obot.ai/v0.28.0/mcp-gateway/connect-clients.md#obot-doc-check-the-audit-record) with an administrator or auditor.
- [Create a vMCP](https://docs.obot.ai/v0.28.0/start-here/govern.md) if you want to assemble your own endpoint from catalog servers.
- Browse [Explore Obot](https://docs.obot.ai/v0.28.0/start-here/choose.md) for model access, skills, and device management.
---
Document: What is Obot?
Version: v0.28.0
Markdown: https://docs.obot.ai/v0.28.0/index.md
HTML: https://docs.obot.ai/
# What is Obot?
Obot is an open-source platform for organizations to manage, secure, and govern their AI ecosystems. It provides shared infrastructure for connecting AI clients to models and tools, distributing approved MCP servers and skills, managing client access and credentials, hosting MCP servers, and recording activity across hosted services and user devices.
Obot does not require an organization to standardize on a single AI client, model provider, or tool ecosystem. Desktop agents and tools such as Claude Code, Codex, Cursor, VS Code, and other IDEs and CLIs can use the parts of the platform that apply to them.
## Getting Started
### I need an Obot instance
Pick the option that matches what you want to do:
- **Try it hosted.** [Start an Obot Cloud trial](https://obot.ai/obot-cloud-trial/) to get a hosted instance without running any infrastructure.
- **Run it on your desktop.** [Install locally with Docker](https://docs.obot.ai/v0.28.0/installation/docker-deployment.md) to evaluate Obot on your own machine in a few minutes.
- **Deploy it for production.** [Install on Kubernetes](https://docs.obot.ai/v0.28.0/installation/kubernetes-deployment.md) with the Helm chart. See the [deployment overview](https://docs.obot.ai/v0.28.0/installation/overview.md) for system requirements and cloud reference architectures.
### I have an Obot instance
- **Create a vMCP.** [Create a vMCP](https://docs.obot.ai/v0.28.0/start-here/govern.md) by selecting an MCP server from the catalog, choosing its tools, sharing the endpoint, and connecting your AI client.
- **Connect to a vMCP.** If someone has already shared an endpoint with you, go straight to [Connect to a vMCP](https://docs.obot.ai/v0.28.0/start-here/connect.md).
After your first tool call, [Explore Obot](https://docs.obot.ai/v0.28.0/start-here/choose.md) to learn about model access, skills, and device management.
## Core Capabilities
### MCP Gateway
The [MCP Gateway](https://docs.obot.ai/v0.28.0/concepts/mcp-gateway.md) is a single governed entry point to every MCP server a user is allowed to reach.
- Create [vMCPs](https://docs.obot.ai/v0.28.0/mcp-gateway/server-types.md) from catalog servers and expose the tools your users need.
- [Share vMCPs](https://docs.obot.ai/v0.28.0/mcp-gateway/publish.md) with users and groups through one connection URL.
- Add your own hosted or remote MCP servers when the catalog does not include what you need.
- Control [server and tool access](https://docs.obot.ai/v0.28.0/mcp-gateway/access.md) by user or identity-provider group.
- Manage MCP OAuth, user and shared credentials, and Kubernetes [secret bindings](https://docs.obot.ai/v0.28.0/concepts/mcp-hosting.md#obot-doc-mcp-servers-kubernetes-secret-bindings).
- Inspect, reject, or modify MCP requests and responses with MCP or webhook [filters](https://docs.obot.ai/v0.28.0/functionality/filters.md).
### LLM Gateway
The [LLM Gateway](https://docs.obot.ai/v0.28.0/llm-gateway/how-it-works.md) presents provider-compatible endpoints that AI clients use to reach approved models.
- Connect external AI clients to models from OpenAI, Anthropic, Amazon Bedrock, Azure, Google Vertex AI, Ollama and other providers through the gateway's OpenAI- and Anthropic-compatible endpoints.
- Keep provider credentials in Obot instead of distributing them to individual users or clients.
- Authenticate clients with scoped Obot API keys.
- Restrict the models visible and callable by each user through [Profiles](https://docs.obot.ai/v0.28.0/functionality/model-access-policies.md).
- Record requests and responses, client and session metadata, token usage, and estimated model cost.
### Hosted MCP Servers
Obot can run MCP servers in isolated execution environments outside the main Obot Server process.
- Host `npx`, `uvx`, and containerized [MCP servers](https://docs.obot.ai/v0.28.0/concepts/mcp-hosting.md) as Docker containers or Kubernetes workloads.
- Apply [domain-based egress rules](https://docs.obot.ai/v0.28.0/configuration/mcp-server-egress-control.md) to hosted MCP servers through a configured network-policy provider.
### MCP and Skills Registries
The MCP and Skills Registries centralize the discovery, installation, and management of MCP servers and Agent Skills.
- Curate MCP and Skills catalogs in Obot or index them from [Git-backed repositories](https://docs.obot.ai/v0.28.0/configuration/mcp-server-gitops.md).
- Expose MCP catalogs through the standard [MCP Registry API](https://docs.obot.ai/v0.28.0/functionality/mcp-registry-api.md).
- Publish approved MCP servers and [skills](https://docs.obot.ai/v0.28.0/registries/publish-skills.md) to users and AI clients.
- Control access to individual entries, repositories, or complete catalogs with [MCP](https://docs.obot.ai/v0.28.0/mcp-gateway/access.md) and [skill](https://docs.obot.ai/v0.28.0/registries/publish-skills.md) access policies.
- Reuse centrally managed Git credentials across MCP and Skills catalog sources.
- Integrate with GitHub, GitLab, and other Git providers.
### Obot CLI and Skill
The [Obot CLI](https://docs.obot.ai/v0.28.0/reference/cli-api.md) brings approved MCP servers and skills to users and their local AI clients, and the Obot skill teaches an agent to use the CLI itself.
- Search for and install approved skills.
- Search for approved MCP servers.
- Run and manage skills from the command line.
- Install the Obot skill so an agent can work with Obot on its own.
### Obot Sentry
[Obot Sentry](https://github.com/obot-platform/obot-sentry) extends Obot governance to AI activity occurring directly on user devices. [Device Management](https://docs.obot.ai/v0.28.0/device-management/how-sentry-works.md) is currently beta.
- Enroll devices with the Obot Platform.
- Inventory installed AI clients, MCP servers, skills, and plugins.
- Install hooks for Claude Code, Codex, Cursor, Kiro, and VS Code.
- Record local tool calls alongside activity passing through Obot gateways.
- Support monitoring and enforcement policies for AI activity on managed devices.
- Install manually or deploy through MDMs such as Microsoft Intune.
### Identity and Access Control
Obot governs who can reach each part of the platform, and with which credentials.
- Authenticate users through configured [identity providers](https://docs.obot.ai/v0.28.0/configuration/auth-providers.md).
- Assign platform [roles and permissions](https://docs.obot.ai/v0.28.0/security/policy-coverage.md).
- Control access to MCP servers, MCP tools, skills, models, and administrative APIs.
- Apply policies based on individual users or identity-provider groups.
- Issue scoped credentials for AI clients and automation.
- Restrict sensitive audit content to users with the appropriate role.
### Audit Logs and Visibility
Obot correlates activity across MCP servers, LLM providers, hosted workloads, and user devices.
- Record MCP requests and responses.
- Record LLM Gateway requests, responses, token usage, and model cost.
- Record local AI-client tool calls captured by Obot Sentry.
- Filter activity by user, server, tool, provider, model, client, device, or session.
- Track MCP and LLM usage across users and resources.
- Export [audit data](https://docs.obot.ai/v0.28.0/security/audit-data.md) once or on a schedule.
## Architecture
```mermaid
flowchart LR
C[AI clients] --> M[MCP Gateway]
C --> L[LLM Gateway]
subgraph Obot Server
M --> V[vMCP endpoints]
R[MCP and Skills registries]
I[Identity and access control]
A[Audit logs]
L
end
V --> H[Hosted MCP servers]
V --> E[Remote MCP servers]
L --> P[Model providers]
S[Obot Sentry on user devices] --> A
M --> A
L --> A
```
The Obot Platform connects AI activity on user devices with services managed by or proxied through Obot Server.
On user devices, desktop agents and tools connect to Obot gateways, while Obot Sentry scans, audits, and enforces policy on AI activity taking place on the device. The Obot CLI lets users and AI clients discover, install, and manage approved MCP servers and skills.
Obot Server provides:
- MCP and LLM gateways for controlled access to MCP servers and model providers.
- Isolated execution for hosted MCP servers.
- Platform services for identity and access control, including permissions and secrets.
- Correlated audit logs of AI activity across the platform.
- MCP and Skills registries built on curated Git-backed catalogs.
Obot integrates with remote MCP servers, LLM providers, S3-compatible object storage, Git providers, and [auth providers](https://docs.obot.ai/v0.28.0/configuration/auth-providers.md).
## Next Steps
- [Installation Guide](https://docs.obot.ai/v0.28.0/installation/overview.md)
- [Functionality](https://docs.obot.ai/v0.28.0/security/model.md)
- [User Roles](https://docs.obot.ai/v0.28.0/security/policy-coverage.md)
- [Server Configuration](https://docs.obot.ai/v0.28.0/configuration/server-configuration.md)
---
Document: Create a vMCP
Version: v0.28.0
Markdown: https://docs.obot.ai/v0.28.0/start-here/govern.md
HTML: https://docs.obot.ai/start-here/govern
# Create a vMCP
A virtual MCP (vMCP) gives your AI client one connection URL for selected tools from one or more MCP servers. Start with a server already available in the Obot catalog, choose its tools, and make your first tool call.
**Already have a vMCP?** Follow [Connect to a vMCP](https://docs.obot.ai/v0.28.0/start-here/connect.md). You do not need to create another one or have access to its source catalog entries.
## Before you begin
For this walkthrough, use an **Admin or Owner** account so you can create a vMCP and share it with another user. You need an Obot instance with a server available in **MCP Servers** and any credentials that service requires. Choose a server with a read-only tool you can safely try.
If you need an instance, start with [Docker evaluation](https://docs.obot.ai/v0.28.0/installation/docker-deployment.md). If you are not an administrator, you can [create a personal vMCP](https://docs.obot.ai/v0.28.0/mcp-gateway/server-types.md#obot-doc-virtual-mcps-create-a-personal-vmcp-as-a-user) from catalog entries available to you, or connect to one your administrator shares.
## Create from the catalog
1. Open **vMCPs** and select **Create vMCP**.
2. Browse the **MCP Servers** panel and drag an existing server onto the canvas.
3. Enter a name and description, then select **Create**.
4. Supply any required component configuration. Choose **Preconfigured** for values shared by its users or **Provided at connection** for values each user supplies, such as a personal API token. Complete service authorization if prompted.
5. In **Add Tools**, choose **Managed**, discover the tools, and select a read-only tool for this exercise. Confirm the selection.
Catalog entries provide the server definition; some still require credentials or service configuration. If the server you need is missing, ask an administrator to add it using [Add remote MCP servers](https://docs.obot.ai/v0.28.0/mcp-gateway/register-remote.md) or [Add hosted MCP servers](https://docs.obot.ai/v0.28.0/concepts/mcp-hosting.md).
## Try a tool
1. Open **Inspector** in the vMCP designer, or select **Test vMCP** on its card.
2. If **Start Session** appears, select it and complete the configuration and authorization prompts.
3. Select your read-only tool, enter its arguments, and select **Call**.
4. Confirm that the result shows **Succeeded** and the expected output.
## Share with a user or group
1. Open **Profiles** in the vMCP designer.
2. Grant your intended user or group access to the tool you selected.
3. Copy the vMCP's connection URL and send it to that user with [Connect to a vMCP](https://docs.obot.ai/v0.28.0/start-here/connect.md).
New administrator-created vMCPs include an administrator profile. Keep access limited to the people who need it, and have the recipient test using their own account. See [Control MCP access](https://docs.obot.ai/v0.28.0/mcp-gateway/access.md) for profile behavior and detailed access tests.
## Connect your client
Follow [Connect to a vMCP](https://docs.obot.ai/v0.28.0/start-here/connect.md) to add the connection URL to your AI client, sign in, and call a tool. Share that guide with anyone you grant access to this vMCP.
## Find the audit record
As an administrator or auditor, open **Operations > Audit Logs**, select **MCP**, and find the tool call by vMCP, user, and time. Confirm the caller and outcome. Viewing request and response bodies requires the Auditor role. If you do not have audit access, give the call details to an administrator or auditor.
## Next steps
- [Create vMCPs](https://docs.obot.ai/v0.28.0/mcp-gateway/server-types.md) with multiple servers or a personal scope.
- [Share vMCPs](https://docs.obot.ai/v0.28.0/mcp-gateway/publish.md) and manage updates to their server definitions.
- [Control MCP access](https://docs.obot.ai/v0.28.0/mcp-gateway/access.md) and verify which tools each user can call.
- [Explore Obot](https://docs.obot.ai/v0.28.0/start-here/choose.md), including model access, skills, and device management.
---
Document: Explore Obot
Version: v0.28.0
Markdown: https://docs.obot.ai/v0.28.0/start-here/choose.md
HTML: https://docs.obot.ai/start-here/choose
# Explore Obot
Start with [Connect to a vMCP](https://docs.obot.ai/v0.28.0/start-here/connect.md) to use an existing endpoint, or [Create a vMCP](https://docs.obot.ai/v0.28.0/start-here/govern.md) to assemble one from catalog servers. Then explore the other capabilities below.
| Your task | Start here | Who can help |
| ------------------------------------------------- | ------------------------------------------------------------------------------------------ | -------------------------------------------------------- |
| Connect an AI client to approved tools | [Connect to a vMCP](https://docs.obot.ai/v0.28.0/start-here/connect.md) | Your Obot administrator grants server access |
| Create and share an endpoint from catalog servers | [Create a vMCP](https://docs.obot.ai/v0.28.0/start-here/govern.md) | An administrator creates shared vMCPs and profiles |
| Route model requests through Obot | [Connect LLM clients](https://docs.obot.ai/v0.28.0/llm-gateway/connect-clients.md) | An administrator configures providers and model policies |
| Publish reusable skills | [Publish and distribute skills](https://docs.obot.ai/v0.28.0/registries/publish-skills.md) | An administrator adds sources and access policies |
| Inventory and govern local AI tools | [Enroll devices](https://docs.obot.ai/v0.28.0/device-management/enroll.md) | An administrator configures Obot Sentry |
| Install Obot | [Deployment options](https://docs.obot.ai/v0.28.0/installation/overview.md) | An operator provides infrastructure and authentication |
> **NOTE**
>
> Check [editions and licensing](https://docs.obot.ai/v0.28.0/enterprise/overview.md).
---
Document: Editions and licensing
Version: v0.28.0
Markdown: https://docs.obot.ai/v0.28.0/enterprise/overview.md
HTML: https://docs.obot.ai/enterprise/overview
# Editions and licensing
Obot is fully open source under the [MIT License](https://github.com/obot-platform/obot/blob/main/LICENSE), and that
includes every edition. There is no separate closed-source enterprise build. Obot Community, registered Community, and
Obot Enterprise all run the same open source code from the same container image.
The editions differ only in their license key. The key gates the user and device limits, the enterprise auth
providers, and support. You can add or change it from the **License** page in the admin UI without reinstalling.
## Editions
| | Obot Community | Obot Community, registered | Obot Enterprise | Obot Cloud |
| --------------------------------------------------------------------------------------------------------------------------- | ----------------- | -------------------------- | ----------------------------------------- | ---------------------------------------------------------- |
| Hosting | Self-hosted | Self-hosted | Self-hosted | Hosted by Obot |
| Source code | Open source (MIT) | Open source (MIT) | Open source (MIT) | Open source (MIT) |
| Cost | Free | Free | [Contact us](https://obot.ai/contact-us/) | [Free trial](https://obot.ai/obot-cloud-trial/), then paid |
| Users | Up to 100 | Up to 100 | [Contact us](https://obot.ai/contact-us/) | Determined by plan |
| Devices (Obot Sentry) | Up to 100 | Up to 100 | [Contact us](https://obot.ai/contact-us/) | Determined by plan |
| [Enterprise auth providers](https://docs.obot.ai/v0.28.0/configuration/auth-providers.md#obot-doc-available-auth-providers) | — | ✓ | ✓ | ✓ |
| Support | — | — | ✓ | ✓ |
### Obot Community
Obot Community is what you get when no license key is configured. It is free and
includes the full MCP gateway and registry, LLM gateway, skills registry, and Device Management, with Local, GitHub,
and Google [authentication](https://docs.obot.ai/v0.28.0/configuration/auth-providers.md). It supports up to 100 users and 100 devices.
### Registering Obot Community
Registration is free and unlocks the enterprise [auth providers](https://docs.obot.ai/v0.28.0/configuration/auth-providers.md): Entra, Okta,
OneLogin, JumpCloud, Keycloak, and Auth0. The 100 user and 100 device limits still apply.
To register, an administrator opens the **License** page, or the registration prompt shown when they configure one of
those auth providers, and enters a name, an email address, and optionally a company. Obot sends those details with the
installation ID to `https://upgrade-server.obot.ai`, receives a Community license key, and installs it. You don't need
to copy or keep the key.
### Obot Enterprise
Obot Enterprise is the same open source code as Obot Community, with an Enterprise license key. It includes everything in registered Obot Community, removes the user and device limits (unless your
contract sets specific limits), and adds enterprise support. To get an Enterprise license,
[contact us](https://obot.ai/contact-us/).
## Configuring a license key
Add an Enterprise license key in one of two ways:
- **In the admin UI.** Go to **License**, choose **Add License Key**, and paste the key. Obot validates the key before
saving it, and stores it in the database.
- **With configuration.** Set [`OBOT_SERVER_LICENSE_KEY`](https://docs.obot.ai/v0.28.0/configuration/server-configuration.md). A key set this
way takes precedence over one stored in the database. The **License** page shows it as locked: you can't change,
delete, or register over it in the UI.
Obot keeps a registered Community key when you add an Enterprise key over it. Deleting the Enterprise key from the
**License** page returns the installation to registered Obot Community, or to unregistered Obot Community if it was
never registered. The page has no option to delete a registered Community key: replace it by adding an Enterprise key,
or delete it with `DELETE /api/license`.
## How Obot validates a license
Obot validates license keys with Obot's license service at `https://api.keygen.sh`. Obot needs outbound HTTPS access
to that host to validate a license. See [Network requirements](https://docs.obot.ai/v0.28.0/installation/network-requirements.md) for the other connections Obot makes.
Obot checks the license:
- When the server starts
- Every 24 hours after that
- When an administrator adds or changes the key. Obot checks a new key before saving it.
- When an administrator selects **Recheck License** on the **License** page. The button appears for Enterprise keys.
Manual checks are limited to one every five minutes, and a successful one also tells every other replica to check
again.
The first successful check activates the installation against the license. An installation is identified by an ID
stored in the Obot database, so all replicas that share a database count as one installation. A new database is a new
installation and activates again.
Each check has one of three outcomes:
| Outcome | What Obot does |
| -------------------------------------------------------------- | ------------------------------------------------------------------------------------------------------------------------------------------------------------------------------------------------------------------ |
| The license service accepts the license | Obot applies the license's entitlements and saves them in the database |
| The license service rejects the license | Obot removes the license's entitlements and the installation falls back to unregistered Obot Community. See [License compliance](https://docs.obot.ai/v0.28.0/enterprise/overview.md#obot-doc-license-compliance). |
| The license service can't be reached or doesn't give an answer | Obot keeps using the entitlements saved from the last successful check, until the license's last known expiration date |
### When the license service can't be reached
A check that times out, fails on the network, or gets an error from the license service that isn't about the license
itself doesn't change the license. Obot keeps using the entitlements saved from the last successful check, and tries
again at the next scheduled check.
Obot saves the license's expiration date with the entitlements, and the fallback lasts until that date, however
long the license service is unreachable. A license with no expiration date keeps working for as long as the outage
lasts. Changes made to the license while Obot can't reach the license service, such as a new expiration date, take
effect at the next check that gets through.
Obot compares the expiration date with the server's system clock at each check that fails, so an installation whose
license expires during an outage falls back to unregistered Obot Community at the first failed check after that date.
Once a check reaches the license service again, Obot applies its answer right away.
This is the same whether the check happens at startup or while Obot is running. A failed check at startup doesn't
prevent Obot from starting.
The fallback needs a successful check to fall back on. If a key has never been validated, Obot has no saved
entitlements and treats the installation as unregistered Obot Community until a check succeeds. This happens when:
- `OBOT_SERVER_LICENSE_KEY` is set on a new installation, or on one with a new database, that can't reach
`https://api.keygen.sh`. Air-gapped installations can't validate a license key yet. Support for offline
licensing is coming soon.
- The installation was upgraded from v0.26.3 or earlier, which didn't save entitlements, and the license service
can't be reached at the first startup after the upgrade.
- An administrator adds a key in the admin UI while the license service can't be reached. Obot doesn't save the key
and shows "couldn't reach the license server to check the license key, try again later". The previous key, if any,
stays in effect.
### When the license is no longer valid
The license service rejects a license when the key is invalid, expired, suspended, or revoked, or when the license
has no installations left to activate. Obot acts on the rejection at the next check: within 24 hours, at the next
restart, or when an administrator selects **Recheck License**. There is no grace period after a rejection.
A rejected key stays in effect until an administrator replaces or deletes it, even when the installation has a
registered Community key. Deleting it returns the installation to registered Obot Community.
When an administrator adds a key in the admin UI that the license service rejects, Obot doesn't save it and shows
"license key is invalid". The previous key, if any, stays in effect.
### Checking the license state
The **License** page in the admin UI shows:
- **License Key**: the configured key, partially masked
- **License Status**: for an Enterprise key, **Active** when Obot has entitlements for it and **Invalid** when it
doesn't. Without a key, or with a Community license, it shows **N/A (Open-Source)**.
- **Entitlements**: the capabilities the license grants
- **User Limits** and **Device Limits**: current usage against the limits, without an Enterprise license. With an
Enterprise license the page shows **-**, even when the license sets limits.
From the API, `GET /api/license` returns the key, status, and entitlements, and `POST /api/license` runs a manual
check. Usage and limits come from `GET /api/version`, which reports `userCount`, `deviceCount`, `userLimit`,
`deviceLimit`, `hasValidLicense`, and any `licenseEntitlementViolations`. `userLimit` and `deviceLimit` are omitted when
the license has no limit.
### Recovering
Once the license service is reachable again, or once the license has been renewed, select **Recheck License** on the
**License** page, or restart Obot. Otherwise Obot picks up the change at the next scheduled check, within 24 hours.
Nothing else needs to be done: the entitlements apply as soon as a check succeeds.
To replace a rejected key, add a new key on the **License** page, or update `OBOT_SERVER_LICENSE_KEY` and restart Obot.
## License compliance
Obot compares what you've configured, and how many users and devices you have, against what your current license
allows. When you're over, Obot is out of compliance. Being out of compliance never deletes or disables anything you
already have: no data, users, devices, or configuration. What it blocks depends on what you're over.
| Out of compliance when | What happens | How to fix it |
| ----------------------------------------------------------------------------------------------------------------------------------- | ---------------------------------------------------------------------------------------------------------------------------------------------------------------------------------------------------------------------------------------------- | ----------------------------------------------------------------------------------- |
| An enterprise auth provider (Entra, Okta, OneLogin, JumpCloud, Keycloak, or Auth0) is configured and the license doesn't include it | **Limited functionality.** Obot returns `402 Payment Required` for MCP server connections (including OAuth authorization for MCP servers), the LLM gateway, the skills API, and device scan uploads from Obot Sentry. Users can still sign in. | Register Obot Community, add an Enterprise license key, or deconfigure the provider |
| There are more users than the user limit | Existing users keep working. Obot refuses to create new users, whether they sign in for the first time or are provisioned through SCIM. | Add an Enterprise license key, or delete users |
| There are more enrolled devices than the device limit | Enrolled devices keep working. Obot refuses to enroll new devices. | Add an Enterprise license key, or remove devices |
Without an Enterprise license, the user and device limits are 100 each. Deleted users and the bootstrap user don't count
toward the user limit. Every enrolled device counts toward the device limit.
Obot also won't let you get into the first case through configuration: you can't configure a new enterprise auth
provider without a license that includes it.
### How installations end up out of compliance
- **An Enterprise license expires, or is revoked or suspended.** At the next check, the installation falls back to
unregistered Obot Community. An installation with 250 users is then over the 100-user limit, and any configured
enterprise auth provider is no longer covered.
- **An administrator deletes the license key.** The effect is the same as a license that's no longer valid, unless the
installation was registered first. A registered installation returns to registered Obot Community.
- **The license expires while the license service is unreachable.** See
[When the license service can't be reached](https://docs.obot.ai/v0.28.0/enterprise/overview.md#obot-doc-when-the-license-service-cant-be-reached).
- **A license key was never validated**, for example on an air-gapped installation. See
[When the license service can't be reached](https://docs.obot.ai/v0.28.0/enterprise/overview.md#obot-doc-when-the-license-service-cant-be-reached).
- **The installation grows** past the user or device limit of its license.
> **NOTE**
>
> A license service outage doesn't put an installation out of compliance. Obot keeps the entitlements from the last
> successful check until the license's last known expiration date. See
> [When the license service can't be reached](https://docs.obot.ai/v0.28.0/enterprise/overview.md#obot-doc-when-the-license-service-cant-be-reached).
### What administrators and users see
| Situation | Administrators | Users |
| -------------------------------------------------------------------------------------------- | -------------------------------------------------------------------------------------------------- | ---------------------------------------------------------------------------------------------------------------- |
| An enterprise auth provider isn't covered by the license | A banner that the license is missing or invalid, with a **Resolve** button | "We're sorry, this system is currently operating with limited functionality. Please contact your administrator." |
| 10% or fewer user seats remain, or the user limit is exceeded, without an Enterprise license | A banner about the user limit, with a **Resolve** button | Nothing, until a new user tries to sign in |
| A new user can't be created | — | "Unable to provision your account. Please contact your administrator." |
| A new device can't be enrolled | Nothing. Without an Enterprise license, the **License** page shows device usage against the limit. | Obot Sentry reports "Unable to enroll your device. Please contact your administrator." |
With an Enterprise license that sets user or device limits, Obot enforces those limits but doesn't show a banner or
usage on the **License** page, so new users and devices are refused without warning once a limit is reached.
### Getting back into compliance
Select **Resolve** in the banner, or go to the **License** page, and do one of the following:
- **Register Obot Community.** This covers the enterprise auth providers, but not more than 100 users or devices.
- **Add a valid Enterprise license key**, or contact [Obot](https://obot.ai/contact-us/) to renew one.
- **Switch to an auth provider the license covers**, such as Local, GitHub, or Google. See
[Switching between auth providers](https://docs.obot.ai/v0.28.0/configuration/auth-providers.md#obot-doc-switching-between-auth-providers).
- **Choose Downgrade** to deconfigure the enterprise auth provider. Only one auth provider can be configured at a
time, so no provider is configured afterwards: configure another one before users can sign in again.
- **Delete users or remove devices** until you're within the limits.
Nothing needs to be reconfigured afterwards. Obot applies a new or renewed license as soon as it validates the key,
and lifts the restrictions as soon as you're back within what the license allows.
The MCP server tester's built-in model, which Obot hosts, also requires a valid license of any kind. It isn't affected
by compliance.
---
Document: vMCP overview
Version: v0.28.0
Markdown: https://docs.obot.ai/v0.28.0/concepts/mcp-gateway.md
HTML: https://docs.obot.ai/concepts/mcp-gateway
# vMCP overview
A virtual MCP (vMCP) is a connection endpoint for selected tools from one or more MCP servers. You build it from servers in the Obot catalog, choose which tools to expose, and connect your AI client using one URL.
For example, a team can combine issue-tracking and documentation-search tools in one vMCP. Each team member adds that vMCP to their client instead of configuring a separate connection to each server.
```mermaid
flowchart LR
C[AI client] --> V[vMCP endpoint]
V --> S1[Issue-tracking MCP server]
V --> S2[Documentation-search MCP server]
```
## Shared and personal vMCPs
- **Shared vMCPs** are created by administrators for users and groups. Each recipient can use the tools they have been granted access to.
- **Personal vMCPs** are assembled from catalog servers available to their owner and are accessible only to that owner.
## Where to go next
- [Create a vMCP](https://docs.obot.ai/v0.28.0/start-here/govern.md) from catalog servers, or use the [configuration guide](https://docs.obot.ai/v0.28.0/mcp-gateway/server-types.md) for more options.
- [Share a vMCP](https://docs.obot.ai/v0.28.0/mcp-gateway/publish.md) with your team.
- [Connect to a vMCP](https://docs.obot.ai/v0.28.0/start-here/connect.md) that is ready to use.
## How the gateway fits in
The vMCP defines the endpoint your client connects to. The MCP Gateway handles the requests behind it: authenticating callers, enforcing access, applying filters, and recording activity. See [request flows and trust boundaries](https://docs.obot.ai/v0.28.0/architecture/request-flows.md) for the architecture, [Control MCP access](https://docs.obot.ai/v0.28.0/mcp-gateway/access.md) for permissions, and [Filter MCP traffic](https://docs.obot.ai/v0.28.0/functionality/filters.md) for content checks.
---
Document: Create vMCP
Version: v0.28.0
Markdown: https://docs.obot.ai/v0.28.0/mcp-gateway/server-types.md
HTML: https://docs.obot.ai/mcp-gateway/server-types
# Create vMCP
Build a vMCP from the MCP servers already available in your catalog. Select one or more servers, choose the tools to expose, and connect your AI client through one URL. Administrators can share vMCPs with users and groups; other users can create personal vMCPs for themselves.
For a first walkthrough, follow [Create a vMCP](https://docs.obot.ai/v0.28.0/start-here/govern.md).
## Prerequisites
Choose servers available in **MCP Servers** and have any required service credentials ready. A personal vMCP's owner must have access to the entries they use. If a server is missing, an administrator can [add a remote server](https://docs.obot.ai/v0.28.0/mcp-gateway/register-remote.md) or [add a hosted server](https://docs.obot.ai/v0.28.0/concepts/mcp-hosting.md) first.
## Create a shared vMCP as an administrator
1. Open **vMCPs** and select **Create vMCP**.
2. Drag an MCP server from the **MCP Servers** panel onto the vMCP. Repeat to add more components.
3. Enter a name and description, then select **Create**.
4. For each component, choose how every configuration field is supplied. See [Configuration policies](https://docs.obot.ai/v0.28.0/mcp-gateway/server-types.md#obot-doc-virtual-mcps-configuration-policies).
5. Choose **Managed** in the **Add Tools** dialog to discover and select the component's exposed tools. You can disable tools, rename them, change their descriptions, or add a prefix to avoid name collisions. **As-is** instead passes through the upstream tools and definitions, including future changes, without discovery during setup.
6. Open **Profiles** and replace or refine the default access grant. Assign users, groups, or **All Obot Users**, then choose the tools that profile grants.
7. Connect to or test the vMCP after its components are ready.
> **NOTE**
>
> A new administrator-created shared vMCP includes a default profile that grants all administrators access to every component. Administrators can replace or refine this profile to grant access to other users or groups. A personal vMCP remains accessible only to its owner.
Profiles are grant-only and additive. If a user matches several profiles, Obot combines their tool grants. A narrower profile cannot deny a tool granted by another matching profile, so review broad profiles when troubleshooting unexpected access.
## Create a personal vMCP as a user
1. Open **vMCPs** and select **Create vMCP**.
2. Drag MCP servers available to you from the **MCP Servers** panel onto the vMCP.
3. Enter a name and description, then select **Create**.
4. Choose the configuration policy and exposed tools for each component.
5. Select **Connect** to configure and launch your connection.
The personal vMCP is accessible only by its owner, and the owner has no **Profiles** view. Selecting **Provided at connection** prompts the owner for that value when connecting.
If the owner later loses access to a selected MCP server, Obot removes that component and its component-specific configuration from the personal vMCP. If no components remain, Obot removes the personal vMCP and its instance. Deleting a source catalog entry is different: its existing snapshot can continue to run as described in [Snapshots and updates](https://docs.obot.ai/v0.28.0/mcp-gateway/publish.md#obot-doc-virtual-mcps-snapshots-and-updates).
## How vMCPs work
```mermaid
flowchart LR
C[Catalog entries] -->|snapshot| V[vMCP]
P[Profiles] -->|users, groups, and tools| V
V --> I[Per-user vMCP instance]
I --> R1[Shared component deployment]
I --> R2[Per-user component deployment]
```
The main resources are:
- **Catalog entry**: Defines how an MCP server runs or where a remote server is located.
- **vMCP component**: A snapshot of a catalog entry, plus its configuration policy and exposed tools.
- **vMCP**: One stable connection endpoint containing one or more components.
- **Profile**: An administrator-defined grant that makes a shared vMCP and selected tools available to users or groups.
- **vMCP instance**: A user's connection state, credentials, and optional tool selection for a vMCP.
A vMCP with one component replaces a standalone MCP server connection. A vMCP with several components replaces a composite server and aggregates their tools behind the same endpoint.
## Shared and personal vMCPs
The creator's role determines the scope of a new vMCP.
| | Administrator-created shared vMCP | User-created personal vMCP |
| ----------------------------------- | ----------------------------------------------------------- | -------------------------------------------------------------- |
| Who can use it | Users and groups granted access by profiles | Its author only |
| Source catalog access for consumers | Not required | The owner must have access to every selected catalog entry |
| Access management | Administrators manage profiles and tool grants | Cannot be shared; profiles do not change its owner-only scope |
| Component access changes | Consumer catalog access does not remove components | Losing access to a catalog entry removes that component |
| Typical use | Publish a governed tool endpoint for a team or organization | Assemble a private endpoint from servers available to the user |
Only administrators can create a vMCP that other users can consume. Any user who can access catalog entries can use them in a personal vMCP, but non-administrators cannot publish that vMCP to other users or groups.
## Choose how values are supplied
### Configuration policies
When adding a server to a shared vMCP, configure each field that still needs a value:
| vMCP option | Who supplies the value |
| -------------------------- | ---------------------------------------------------------------------------------------------- |
| **Preconfigured** | The vMCP creator sets the value once. Every connection to that server within the vMCP uses it. |
| **Provided at connection** | Each user supplies their own value when connecting to the vMCP. |
| **Ignore** | No value is supplied for an optional field. |
For example, preconfigure a shared region or service-account credential, and request a personal API token at connection time. You can use both options on different fields of the same server. Required fields must be **Preconfigured** or **Provided at connection**.
After configuring the values, select the exposed tools and use [profiles](https://docs.obot.ai/v0.28.0/mcp-gateway/access.md#obot-doc-virtual-mcps-tools-and-profiles) to grant access. Preconfiguring a value shares it across that vMCP's connections; it does not grant everyone in Obot access to the vMCP.
Optional fields default to **Ignore** in the UI.
For a [Git-managed vMCP](https://docs.obot.ai/v0.28.0/configuration/mcp-server-gitops.md#obot-doc-vmcp-definitions), configuration policies are defined in YAML. A `fixed` field can use a Kubernetes `secretBinding` instead of a clear-text value. This component-level binding is available only through Git catalog sources, requires the Kubernetes backend, and cannot override a static catalog field or accompany a `value`. Required fixed fields must have a value already stored for that component, a value supplied by the source, or a Secret binding before sync can create or update the vMCP.
## How configuration affects deployment
Configuration determines whether a component can share a deployment:
- A component with only fixed or ignored configuration is normally eligible to use a shared deployment.
- User-provided headers remain isolated per connection but do not require separate deployments.
- Any other user-provided value causes Obot to run a separate component deployment for each user.
- **Force single-user** always gives each user a separate deployment when that option is available.
Obot makes this decision independently for every component. One vMCP can therefore use shared and per-user component deployments at the same time.
Existing legacy single-user and multi-user connections remain available during the [vMCP transition](https://docs.obot.ai/v0.28.0/mcp-gateway/publish.md#obot-doc-virtual-mcps-gitops-and-migration). Use vMCPs for new endpoints. Multiple components replace the former composite-server setup; `runtime: composite` is no longer supported in [catalog GitOps](https://docs.obot.ai/v0.28.0/configuration/mcp-server-gitops.md).
## Tool search
The **Tool search** setting is off by default, so clients list and call the selected tools directly. Tool search can be enabled in the vMCP's create or edit dialog to expose two tools instead of the full set:
| Tool | What the client does |
| -------------- | -------------------------------------------------------------------- |
| `search_tools` | Searches available tools by name, description, and input parameters. |
| `call_tool` | Executes a tool discovered by `search_tools`. |
For example, the client can search for “find a customer by email,” then execute the matching tool with an email argument.
Tool search reduces the tool definitions in the model's context, which can help when a vMCP has many tools. Leave it off for a small, precise set of tools so the model can use them directly. Clients using tool search must support the search-then-call workflow.
The same component, profile, and user selections determine which tools can be found and called. Enabling tool search does not grant additional access. For a [Git-managed vMCP](https://docs.obot.ai/v0.28.0/configuration/mcp-server-gitops.md#obot-doc-vmcp-definitions), set top-level `toolSearch: true` in its definition.
---
Document: Share vMCPs
Version: v0.28.0
Markdown: https://docs.obot.ai/v0.28.0/mcp-gateway/publish.md
HTML: https://docs.obot.ai/mcp-gateway/publish
# Share vMCPs
Share a vMCP when users need a governed endpoint with configured tools. Users connect to its URL; they do not need to assemble the underlying server definitions themselves.
To publish reusable server definitions instead, use the [MCP server registry](https://docs.obot.ai/v0.28.0/concepts/mcp-registry.md). See the [registry overview](https://docs.obot.ai/v0.28.0/registries/overview.md) for the distinction between server definitions, vMCP endpoints, and skills.
Administrators create shared vMCPs. A consumer of a shared vMCP does not need independent access to its source catalog entries. Personal vMCPs remain owner-only and depend on their owner's catalog access.
To publish a shared endpoint:
1. Select existing servers from the catalog that provide the tools your users need.
2. [Create a shared vMCP](https://docs.obot.ai/v0.28.0/mcp-gateway/server-types.md#obot-doc-virtual-mcps-create-a-shared-vmcp-as-an-administrator) as an administrator and add those entries.
3. Configure each component's values and select its exposed tools. Choose **Managed** when you need a fixed tool selection.
4. Open **Profiles** and grant the intended users or groups access to the appropriate tools. Review broad and default grants.
5. Test the connection, then send consumers its connection URL and the [Connect to a vMCP](https://docs.obot.ai/v0.28.0/start-here/connect.md).
For catalog publication and programmatic discovery, see [MCP catalogs](https://docs.obot.ai/v0.28.0/concepts/mcp-registry.md), the [Registry API](https://docs.obot.ai/v0.28.0/functionality/mcp-registry-api.md), and [Git-backed configuration](https://docs.obot.ai/v0.28.0/configuration/mcp-server-gitops.md). Git catalogs can also publish vMCP definitions, including their configuration policies, tool selections, and profiles.
## Snapshots and updates
A vMCP keeps its own copy of each server's catalog definition. For a vMCP managed in Obot, editing the catalog entry later does not automatically update its existing components. The owner or administrator applies an available update.
For a **Git-managed vMCP**, a successful catalog sync resolves its component definitions from the source and updates its configuration and profiles. Make changes in Git; the UI and API do not edit these vMCP definitions. Removing the vMCP definition from the source deletes the vMCP. The manual update example below applies to vMCPs managed in Obot.
For example, an administrator changes a catalog entry from container image version 1 to version 2. Existing vMCPs continue to use the version 1 image reference until their owner or administrator applies the available update. Users connecting to a shared vMCP do not need to recreate their client connection; the administrator manages that update.
- Obot indicates when a newer catalog definition is available. The vMCP owner or administrator decides when to apply it.
- Deleting the catalog entry does not automatically stop existing vMCPs that use its saved definition. Delete the affected vMCP when it must no longer run.
- Security fixes to a catalog definition also need to be applied to existing vMCPs.
This saved copy is called a **snapshot**. It preserves the server definition, not everything the server depends on. An image tag can still point to a different image, a remote service can change, and a Kubernetes Secret binding still reads from the referenced Secret. Pin container images by digest when the deployed image must stay fixed.
## GitOps and migration
[Git Catalogs](https://docs.obot.ai/v0.28.0/configuration/mcp-server-gitops.md#obot-doc-vmcp-definitions) synchronize both catalog entries and `type: vmcp` definitions. Keep entry keys and component IDs stable so synchronization preserves identity and stored configuration.
Obot converts existing composite servers to vMCPs during upgrade. A Git-synced composite becomes an orphaned vMCP until its source publishes a matching definition. Use `obot mcp generate-vmcp-catalog` and follow [Migrating Git-synced composites](https://docs.obot.ai/v0.28.0/configuration/mcp-server-gitops.md#obot-doc-migrating-git-synced-composites-to-vmcps) to resume Git management without replacing user connections. Other legacy MCP server connections remain available for compatibility; use vMCPs for new endpoints.
---
Document: Test vMCPs with Inspector
Version: v0.28.0
Markdown: https://docs.obot.ai/v0.28.0/mcp-gateway/inspector.md
HTML: https://docs.obot.ai/mcp-gateway/inspector
# Test vMCPs with Inspector
Inspector is Obot's built-in MCP client. It connects to a vMCP as the signed-in user, so you can
list and call its tools, read its prompts and resources, test it with a chat model, and watch the
MCP messages exchanged. Use it to confirm that a vMCP works before you set up an AI client, or to
separate gateway problems from client problems.
## Open Inspector
1. Open **vMCPs** and open the vMCP.
2. Select **Inspector** in the vMCP designer. Alternatively, select **Test vMCP**, the icon beside
**Connect** on the vMCP's card.
3. If **Start Session** appears, select it. Supply any requested configuration and authorize remote
services if prompted.
**Test vMCP** walks you through connection setup first if you have not connected to the vMCP yet,
then opens Inspector.
Inspector is available for shared vMCPs you can connect to and for personal vMCPs you own.
The header shows the vMCP's status. Inspector opens on the **Tools** tab. The other tabs are
**Prompts**, **Resources**, **Chat**, and **MCP Log**.
### Whose access Inspector tests
Inspector connects using your own vMCP instance and your own grants. It lists only the tools your
profiles grant you, and it uses the configuration and service authorizations saved for your account.
An administrator's successful test does not show what another user can do. To check another user's
experience, have that user open Inspector under their own account. See
[Control MCP access](https://docs.obot.ai/v0.28.0/mcp-gateway/access.md) for how profiles determine the tools each user receives.
## Tools
The **Tools** tab lists the tools the vMCP exposes to you. Use the search box to filter the list.
Select a tool to see its description, **Input schema**, **Output schema**, and **Raw tool
metadata**. To call it:
1. Enter arguments in the **Generated form**, which is built from the tool's input schema. To paste
or edit the arguments as a single object, switch to **Raw JSON**.
2. Select **Call**.
3. Review the result. The call is marked **Succeeded** or **Failed**, or **Cancelled** if you stop
it. Results show rendered content, structured content when the tool returns it, and the **Raw MCP
response**.
Tool calls run against the real upstream service. When testing, start with read-only tools whose
effects you understand.
## Prompts
The **Prompts** tab lists the prompts the vMCP provides. Select a prompt, fill in its arguments, and
select **Get prompt** to preview the resolved messages.
To send a resolved prompt to a chat, select **Use in Chat**. Only prompts with text content up to
100 KiB can be staged.
If the vMCP's servers do not provide prompts, the tab shows **This server does not provide
prompts.**
## Resources
The **Resources** tab lists the resources the vMCP provides. Select a resource to read it and
preview its contents.
Text resources up to 100 KiB can be staged for chat with **Use in Chat**. Binary and unsupported
content can still be inspected, but cannot be staged.
## Chat
The **Chat** tab tests the vMCP with a language model. The model sees the vMCP's tools, as they were
when the chat started, and can request tool calls in response to your messages. Use **Help me test
this MCP Server** or **What tools are available from this MCP Server?** as a starting point, or
write your own message.
Chat works as follows:
- **Every tool call needs your approval.** When the model requests a tool, Inspector shows its name
and arguments. Select **Approve \** to run it or **Reject \** to deny it. While an
approved call runs, you can cancel it. Your browser makes approved calls through your Inspector
session. The model never calls the vMCP directly.
- **Staged prompts and resources** appear above the composer. Nothing staged is sent until you send
a message.
- **Each turn is limited to 10 model rounds.** When a turn reaches this limit, send another message,
such as "Continue", to start a new turn.
- **Conversations are not saved.** **New Chat** clears the conversation, staged context, approvals,
and the tool snapshot. Leaving or refreshing the page also discards the conversation.
### Which model Chat uses
- **With a model provider configured**, Chat uses the default **Language Model (Chat)** model
through Obot's [LLM gateway](https://docs.obot.ai/v0.28.0/llm-gateway/how-it-works.md). You must have access to that model
under a [model access policy](https://docs.obot.ai/v0.28.0/functionality/model-access-policies.md). Requests are subject to
the same policies and [LLM audit logging](https://docs.obot.ai/v0.28.0/llm-gateway/audit.md) as other gateway traffic. If no
default is set, or the default is inactive or not available to you, Chat explains why it cannot
run.
- **With no model provider configured**, Chat can use Obot's hosted model service. This requires a
registered Obot license. Administrators without one see **Unlock MCP Inspector Chat**, which
offers free registration or [adding a model provider to the LLM gateway](https://docs.obot.ai/v0.28.0/configuration/model-providers.md)
instead. Other users are told to contact an administrator.
The hosted model service receives the chat conversation, including the vMCP's tool definitions and
any tool results you approve. To disable this, configure your own model provider, or turn
off **Enable Model Proxy** under **Platform > Settings > Model Proxy**. When no model provider is
configured, that section also shows usage against the service quota. To remove the service
entirely, set `OBOT_SERVER_MODEL_PROXY_URL` to an empty string. See [Server configuration](https://docs.obot.ai/v0.28.0/configuration/server-configuration.md).
## MCP Log
The **MCP Log** tab records the MCP messages exchanged during the session, including calls made from
the **Tools**, **Prompts**, **Resources**, and **Chat** tabs.
- Filter entries by kind: **Requests**, **Responses**, **Notifications**, **Errors**, or
**Transport**.
- Search by method name or request ID.
- Expand an entry to see its payload, or copy it as JSON. Large payloads are collapsed until you
select **Render anyway**.
- **Copy All** copies the listed entries. The output may contain tool arguments, so handle it
accordingly.
The log keeps only this session in your browser. For the persistent record, see the MCP audit logs.
## Auditing
Calls made from Inspector go through the Obot MCP Gateway, like calls from any other client. An
administrator or auditor can find them under **Operations > Audit Logs** by selecting **MCP** and
filtering on the vMCP name, method, and time. See
[Audit data and retention](https://docs.obot.ai/v0.28.0/security/audit-data.md). The
[Connect AI clients](https://docs.obot.ai/v0.28.0/mcp-gateway/connect-clients.md#obot-doc-verify) guide describes a full verification that compares
an Inspector call with the audit record.
## When Inspector cannot connect
Inspector shows one of these messages when it cannot open a session.
- **Start your vMCP to use chat and inspect tools.** You do not have a session for this vMCP yet.
Select **Start Session**.
- **Before you can continue inspecting this vMCP, an update is required.** Your saved configuration
is incomplete or out of date. Select **Update Configuration**.
- **\ requires administrator OAuth setup before this vMCP can start.** A component needs
an OAuth client that has not been configured. Administrators can configure it from this message.
Other users must ask an administrator.
- **Reauthentication required**: A remote service authorization has expired or been revoked. Select
**Manage authentication**.
- **Server setup required**: A component still needs configuration. Select **Launch** to complete
it.
- **Server unavailable**: The deployment is not healthy, so Inspector skipped the connection. Select
**Retry** to force an attempt.
- **Access denied**: You no longer have permission to connect to this vMCP. Check your profile
grants.
For other connection and OAuth failures, see [Troubleshooting](https://docs.obot.ai/v0.28.0/mcp-gateway/troubleshooting.md).
---
Document: Connect AI clients
Version: v0.28.0
Markdown: https://docs.obot.ai/v0.28.0/mcp-gateway/connect-clients.md
HTML: https://docs.obot.ai/mcp-gateway/connect-clients
# Connect AI clients
For new connections, use a [vMCP](https://docs.obot.ai/v0.28.0/mcp-gateway/server-types.md), even when it exposes only one server. Copy its connection URL from Obot rather than constructing one from the catalog entry's ID.
## OAuth clients
### Connect to a vMCP
Paste the vMCP's connection URL into the AI client's MCP server settings. On first connection, sign in to Obot, supply any requested configuration, and authorize any remote services that require OAuth. Obot saves this setup for your user account.
To set up a connection in the UI:
1. Select **Connect** on the vMCP.
2. To finish setup before opening the client, follow **click here** under **Preconfigure**, then select **Continue**. If setup is unnecessary, copy the URL directly.
3. If a configuration form appears, supply the fields requested at connection time and select **Configure**.
4. Complete upstream OAuth authentication if a remote component requires it.
5. Copy the **Connection URL** or use the instructions for a supported client.
Some MCP servers require their OAuth clients to use a localhost callback. If Obot displays an `obot mcp login` command during connection or preconfiguration, run it on a computer with a web browser and complete sign-in. Obot continues the connection automatically. Keep using the vMCP's HTTP connection URL in your AI client. See [MCP localhost OAuth sign-in](https://docs.obot.ai/v0.28.0/reference/cli-api.md#obot-doc-mcp-localhost-oauth-sign-in) for CLI setup and troubleshooting.
The endpoint uses Streamable HTTP and has this form:
```text
https://your-obot-instance/mcp-connect/{vmcp-id}
```
When the same user reconnects to this vMCP, Obot uses their saved setup. To change a requested value, open **Connect** again. Under **Preconfigure**, follow the **click here** link to edit configuration, change the values, and select **Update**. This link appears when the vMCP has user-configurable fields. Other users sign in and supply their own requested values; each receives the tools their access grants allow.
To test the connection inside Obot before setting up an AI client, follow the verification steps below.
## Clients using API keys
Create an [agent authorization scope](https://docs.obot.ai/v0.28.0/functionality/agent-auth-scopes.md) with only the MCP capabilities the integration needs. Configure the client's HTTP transport with the copied connection URL and an `Authorization: Bearer ` header. The scope cannot exceed its owner's access.
The authorization-scope guide includes [VS Code](https://docs.obot.ai/v0.28.0/functionality/agent-auth-scopes.md#obot-doc-vs-code), [Agno](https://docs.obot.ai/v0.28.0/functionality/agent-auth-scopes.md#obot-doc-agno), and [LangChain](https://docs.obot.ai/v0.28.0/functionality/agent-auth-scopes.md#obot-doc-langchain) examples. Keep keys in client-supported secret storage rather than source control.
## Verify
### Test a tool in Obot
1. Open **vMCPs**, open the vMCP, and select **Inspector**. Alternatively, select **Test vMCP** using the icon beside **Connect** on its card.
2. If **Start Session** appears, select it and complete the connection prompts. Supply any requested fields and authorize remote services if prompted.
3. Inspect the displayed tool list. Select a read-only tool whose effect you understand, fill in its arguments, and select **Call**.
4. Confirm that the result shows **Succeeded** and the expected output. Record the vMCP name, tool name, and time of the call.
Inspector tests access as the signed-in user. An administrator's successful test does not verify another user's grants. To check a user's experience, that user should repeat the test under their own account. See [Test vMCPs with Inspector](https://docs.obot.ai/v0.28.0/mcp-gateway/inspector.md) for everything else Inspector can do.
### Check the audit record
An administrator or auditor can open **Operations > Audit Logs**, select **MCP**, and locate the recent `tools/call` record using the vMCP name, tool name, and timestamp. Check the user attribution and outcome. Users without audit access can give those details to an administrator or auditor to check for them.
### Test the AI client
After adding the copied connection URL to the AI client, open its MCP tools list and run the same read-only tool. Have an administrator or auditor check the new audit record. This verifies the client's connection as well as the vMCP's configuration.
If tools are missing, ask the vMCP administrator to check the component's selected tools and the user's profile grants. For connection or OAuth errors, see [Troubleshooting](https://docs.obot.ai/v0.28.0/mcp-gateway/troubleshooting.md).
---
Document: Control MCP access
Version: v0.28.0
Markdown: https://docs.obot.ai/v0.28.0/mcp-gateway/access.md
HTML: https://docs.obot.ai/mcp-gateway/access
# Control MCP access
Review access in layers. A catalog entry being visible is not the same as a shared vMCP granting all of its tools.
Choose **Managed** tool setup when you need to discover, capture, and select specific tools. **As-is** passes through the upstream tool set and definitions, including future changes; do not treat it as a fixed tool allowlist.
1. [MCP Access Policies](https://docs.obot.ai/v0.28.0/mcp-gateway/access.md#obot-doc-mcp-access-policies-overview) grant access to catalog servers.
2. A [vMCP component](https://docs.obot.ai/v0.28.0/mcp-gateway/access.md#obot-doc-virtual-mcps-tools-and-profiles) defines the maximum exposed tool set.
3. Matching profiles grant subsets of those tools to users and groups. Grants are additive: a narrow profile does not deny a tool granted by a broader profile.
4. The user's instance can narrow tool selection further.
5. An [authorization scope](https://docs.obot.ai/v0.28.0/functionality/agent-auth-scopes.md) restricts programmatic credentials within their owner's permissions.
Test both an allowed and an ungranted tool using the intended user's account. Also inspect broad profiles, including default administrator grants, when a tool remains accessible unexpectedly.
Catalog `unsupportedTools` metadata is a usability hint, not an access restriction. Use vMCP tool selection and profiles to control what clients can discover and call.
See [Roles, permissions, and policy coverage](https://docs.obot.ai/v0.28.0/security/policy-coverage.md) for how MCP controls differ from model, skill, message, and device policies.
## Tools and profiles
Tool controls apply in layers:
1. The component configuration defines the tools the vMCP can expose. Disabling a tool here prevents every profile and user from using it.
2. Each matching profile grants all or a subset of those component tools.
3. A user's vMCP instance may narrow its selection further, but it cannot enable a tool outside the combined profile grant.
When several components expose the same tool name, configure a component prefix or rename a tool so clients receive unique names. Refreshing tool information may require the component's fixed configuration and OAuth authentication.
## Catalog access policies
MCP Access Policies control which MCP servers are available to which users. Administrators use access policies to map server entries from the MCP Servers page to specific users and groups, ensuring each team has access to the tools they need.
To manage access policies, go to **MCP Servers > Access Policies** in the MCP Platform.
## Default Access
The **All Obot Users** selection grants a policy's server access to anyone signed in to Obot. Review policies with this selection before adding narrower team policies: a narrower grant does not cancel an existing broad grant.
To restrict catalog access, edit or remove the broad policy and assign the intended users or groups. Catalog access controls which entries users can select for personal vMCPs. Shared vMCP consumers receive access through profiles instead.
## Creating an Access Policy
To create a new access policy:
1. Click the **Add Access Policy** button in the MCP Access Policies section
2. Give your access policy a name
3. Assign users and groups to the access policy
4. Add the MCP servers that this access policy should include
## Example: Marketing Team Access Policy
For instance, if you were creating an access policy for a marketing team:
1. Create a new access policy named "Marketing Team"
2. Assign your marketing team members, either individually or through an existing group
3. Add relevant MCP servers such as:
- Email tools
- Google Calendar
- Google Sheets
- CRM systems
- Other tools your marketing team needs for their day-to-day work
Review other matching policies as well: their grants combine with this policy. Use vMCP component tool selection and profiles to restrict individual tools.
## Related
For programmatic discovery of available servers and how to contribute servers to Obot's default set, see [MCP Registry API](https://docs.obot.ai/v0.28.0/functionality/mcp-registry-api.md).
---
Document: Add remote MCP servers
Version: v0.28.0
Markdown: https://docs.obot.ai/v0.28.0/mcp-gateway/register-remote.md
HTML: https://docs.obot.ai/mcp-gateway/register-remote
# Add remote MCP servers
Register an existing HTTP MCP endpoint when the server runs outside Obot. Obot proxies the connection; it does not deploy or sandbox that remote service.
1. Open **MCP Servers**, select **Add MCP Server**, and choose **Remote Server**.
2. Enter a name, short description, and the server's MCP URL.
3. Configure required headers or user-supplied values. A remote service must be reachable from Obot, or through a configured [MCP tunnel](https://docs.obot.ai/v0.28.0/mcp-gateway/filters-tunnels.md#obot-doc-mcp-tunnels-create-an-mcp-tunnel).
4. If the provider requires a pre-registered OAuth application, enable **Static OAuth** and configure its client credentials using [MCP Server OAuth Configuration](https://docs.obot.ai/v0.28.0/configuration/mcp-server-oauth-configuration.md).
5. Save the entry and review catalog access policies.
6. Add the entry to a [vMCP](https://docs.obot.ai/v0.28.0/mcp-gateway/server-types.md), configure its tools and profiles, and test the resulting connection.
For a complete provider-specific setup, see the [Slack MCP tutorial](https://docs.obot.ai/v0.28.0/configuration/tutorials/slack-mcp-server.md).
Obot blocks localhost, private-IP, and link-local remote destinations by default. Use a tunnel for private services when appropriate. Do not disable these protections globally just to make an arbitrary endpoint connect. See [Network isolation](https://docs.obot.ai/v0.28.0/security/isolation.md) for the separate gateway and workload boundaries. A remote server's URL is refused when it resolves to such an address; set `OBOT_SERVER_DISALLOW_PRIVATE_IPMCP=false` (or the `LOCALHOST` and `LINK_LOCAL` equivalents) only when that is intended. Guardrail services are different: they may be on a private network, as described in [Guardrails](https://docs.obot.ai/v0.28.0/functionality/guardrails.md).
## Remote server
MCP Servers that are HTTP Streaming compatible should be configured this way. These servers can be provided by trusted 3rd party vendors. Remote servers also work for MCP servers deployed through existing CI/CD pipeline within the organization.
Choose this type when:
- You have MCP services deployed through traditional application deployment mechanisms
- External partners provide MCP endpoints and you just want to integrate
- You are building MCP servers through existing CI/CD workflows or SaaS services
Remote MCP servers that conform to the MCP spec authentication schema will work out of the box. Servers that do not conform to the spec may not work within the gateway. Please open a GitHub issue if you run into issues with remote servers.
**Configuration**: Specify the remote URL endpoint. Additional options include connection restrictions for unconventional configurations, custom HTTP headers, and configuration values to send to the remote server.
If Obot cannot directly reach a remote server, use an [MCP tunnel](https://docs.obot.ai/v0.28.0/mcp-gateway/filters-tunnels.md#obot-doc-mcp-tunnels-create-an-mcp-tunnel) to route requests through a machine on the server's network. Keep the remote server's real HTTP or HTTPS URL and select the tunnel separately in **Advanced Configuration**.
## Caller attribution headers
Remote MCP servers support [caller attribution headers](https://docs.obot.ai/v0.28.0/mcp-gateway/server-configuration.md#obot-doc-caller-attribution-headers). Use them to send selected information about the caller authenticated by Obot to the backend. See the shared configuration guide for setup, available headers, and limits.
## Localhost OAuth callbacks
Some MCP servers require their OAuth clients to use a localhost callback. For these servers, enable **Localhost OAuth callback** in **Advanced Configuration** when adding or editing the remote server.
Leave **Callback path** blank to use `/oauth/callback`, or enter the path required by the server. The path must start with `/` and contain no query string or fragment. `/oauth/obot/callback` is reserved for Obot to notify the CLI that sign-in has finished; it cannot be used for the provider callback. The server must accept an available callback port; fixed ports are not supported.
During authentication, Obot displays an [`obot mcp login` command](https://docs.obot.ai/v0.28.0/reference/cli-api.md#obot-doc-mcp-localhost-oauth-sign-in) to run on a computer with a web browser. MCP clients continue using their normal Obot HTTP connection URL.
---
Document: Add hosted MCP servers
Version: v0.28.0
Markdown: https://docs.obot.ai/v0.28.0/concepts/mcp-hosting.md
HTML: https://docs.obot.ai/concepts/mcp-hosting
# Add hosted MCP servers
Obot deploys and manages hosted MCP server workloads on Kubernetes or Docker. For production workloads, prefer a container image that packages the server and its dependencies together. Pin the image by digest to deploy the same artifact consistently across environments; rebuild and update it deliberately when dependencies change.
See [MCP image maintenance](https://docs.obot.ai/v0.28.0/security/mcp-images.md) for how Obot maintains its catalog images.
## Runtime Types
- **[Node.js (npx)](https://docs.obot.ai/v0.28.0/concepts/mcp-hosting.md#obot-doc-mcp-servers-npx-nodetypescript-based-mcp-servers)**: Run npm-packaged MCP servers via STDIO
- **[Python (uvx)](https://docs.obot.ai/v0.28.0/concepts/mcp-hosting.md#obot-doc-mcp-servers-uvx-for-python-based-packages)**: Run PyPI-packaged MCP servers via STDIO
- **[Containerized](https://docs.obot.ai/v0.28.0/concepts/mcp-hosting.md#obot-doc-mcp-servers-containerized-for-docker-based-deployments)**: Run OCI container images with Streamable HTTP (recommended for production)
- **[OpenAPI](https://docs.obot.ai/v0.28.0/concepts/mcp-hosting.md#obot-doc-openapi-import-an-http-api)**: Import an API schema and let Obot host an MCP server for its operations
## Adding a server
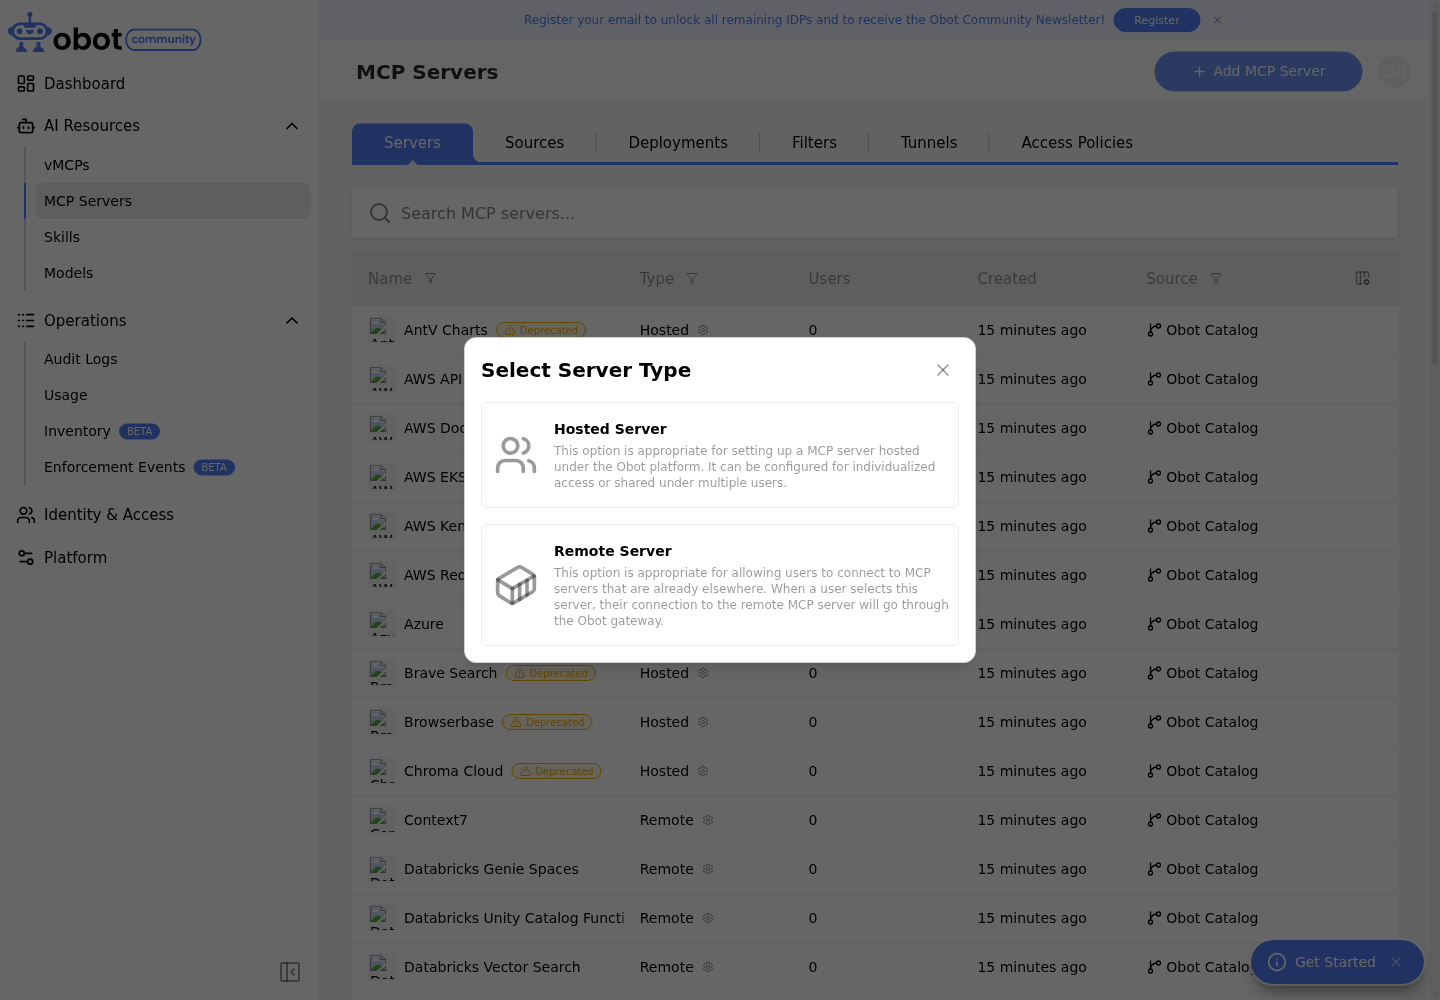
Open **MCP Servers**, then select **Add MCP Server**.
Choose **Hosted Server**, then select its runtime and launch settings. To expose an HTTP API from its OpenAPI schema, administrators can choose **OpenAPI** instead. Define the configuration fields, save the catalog entry, then add it to a vMCP to choose how the values are supplied.
## Basic configuration
Hosted server entries require the same basic identifying information:
- **Name and description**: Provide a clear name and description to help users understand the server's purpose
- **Icon URL**: Optionally specify an icon URL to improve visual identification in the user interface
- **Categories/tags**: Add optional categorization to facilitate server discovery and filtering
## Runtime selection
Hosted servers require a runtime and launch settings.
Select the appropriate runtime environment based on your server's requirements:
### NPX: Node/Typescript Based MCP Servers
If you found an MCP server like Firecrawl and want to add it to the MCP Gateway you would do the following.
From the README.md:
```json
{
"mcpServers": {
"firecrawl-mcp": {
"command": "npx",
"args": ["-y", "firecrawl-mcp"],
"env": {
"FIRECRAWL_API_KEY": "YOUR-API-KEY"
}
}
}
}
```
In the MCP Gateway
- You would select NPX from the drop down.
- Then put `firecrawl-mcp` in the package text box.
Declare a configuration field with these settings:
- Name: Firecrawl API Key
- Description: The API key for Firecrawl
- Key: `FIRECRAWL_API_KEY`
- Enable **Required** and **Sensitive**.
After saving the entry, add it to a vMCP. Choose **Preconfigured** to share one API key with that vMCP's connections, or **Provided at connection** to ask each user for their own key.
### UVX: For Python-based packages
If you found an MCP server like Duckduckgo and want it added to the gateway you would do the following.
From the README.md:
```json
{
"mcpServers": {
"ddg-search": {
"command": "uvx",
"args": ["duckduckgo-mcp-server"]
}
}
}
```
In the gateway you would:
- Select UVX from the drop down
- In the package field put in `duckduckgo-mcp-server`
Declare any environment variables as configuration fields. Choose how their values are supplied when adding the entry to a vMCP.
### Containerized: Recommended for production
Use a container image for production servers, regardless of implementation language. Packaging dependencies into a tested image makes the runtime predictable and avoids resolving npm or PyPI packages at startup. Use an immutable image digest rather than a mutable tag when repeatable deployments are required. Containerized servers run on either the Docker or Kubernetes backend.
Configure the server to expose **Streamable HTTP**. Legacy **HTTP+SSE** is [deprecated in the MCP specification](https://modelcontextprotocol.io/specification/2025-03-26/basic/transports#backwards-compatibility). This deprecation concerns the older transport with separate SSE and POST endpoints; Streamable HTTP can still use SSE for streaming responses. Use the Streamable HTTP endpoint for hosted servers in a vMCP; a legacy SSE-only endpoint is not sufficient for this workflow.
Select the container runtime and provide:
- **Image**: The OCI image reference, preferably including its digest.
- **Port**: The port the MCP server listens on inside the container.
- **Path**: The server's Streamable HTTP endpoint, commonly `/mcp`. Use the actual path implemented by the server.
- **Command and arguments**: Any overrides needed to start the server.
Declare environment variables and other required configuration fields, then choose how unresolved values are supplied when adding the entry to a vMCP.
#### Caller attribution headers
Containerized MCP servers support [caller attribution headers](https://docs.obot.ai/v0.28.0/mcp-gateway/server-configuration.md#obot-doc-caller-attribution-headers) on both Docker and Kubernetes. See the shared configuration guide for setup, available headers, and limits.
### OpenAPI: Import an HTTP API
Use **OpenAPI** when you have an HTTP API and an OpenAPI schema, without writing a separate MCP server. Obot runs a hosted wrapper on Docker or Kubernetes that generates tools from the schema's API operations under `paths`.
#### Import and configure
1. As an administrator, open **MCP Servers**, select **Add MCP Server**, then **OpenAPI**.
2. Choose **URL** and enter the schema URL, or choose **Upload file** and select a JSON or YAML file. The schema must be no larger than **1 MiB (1,048,576 bytes)** for either import method. Select **Import schema**.
3. Review the suggested name, description, and credential headers. Importing suggests configuration fields; it does not obtain API credentials or test API calls.
4. Review **API request base URL**, which controls where tool calls are sent. Leave it blank to use the first usable absolute HTTP(S) URL in the schema's top-level `servers`. If the schema has no usable destination, or the destination fails validation, enter a valid override before saving.
5. For an authenticated API, review the credential headers.
6. Save the entry and [add it to a vMCP](https://docs.obot.ai/v0.28.0/mcp-gateway/server-types.md).
Supported credentials are header API keys and pre-issued bearer tokens. The runtime does not perform OAuth flows; OAuth declarations can be imported but do not create credential inputs. Query or cookie API keys and HTTP Basic authentication are unsupported.
#### Schema requirements and updates
Schemas must use OpenAPI version >= 3.0.0, fit within 1 MiB, and be self-contained: external references are unsupported. Callbacks and referenced path items are also unsupported. Webhook declarations are retained, but the runtime does not receive webhook events.
Schema URLs and API destinations must use HTTPS and pass Obot's configured localhost, private-IP, and link-local restrictions. Schema downloads do not follow redirects or receive API credentials. If a schema requires authentication to download, upload a self-contained copy instead.
Running servers use a stored schema snapshot. Select **Replace schema** when editing an entry to import a replacement, then review and save the configuration. Replacing a schema preserves the entry's existing name, descriptions, and icon. Components in vMCPs managed in Obot need an explicit [catalog update](https://docs.obot.ai/v0.28.0/mcp-gateway/publish.md#obot-doc-virtual-mcps-snapshots-and-updates) to adopt the changed entry. For Git-managed entries, change the schema source in Git and synchronize it; see [OpenAPI schemas in Git Catalogs](https://docs.obot.ai/v0.28.0/configuration/mcp-server-gitops.md#obot-doc-openapi-schemas).
## Kubernetes Secret Bindings
Kubernetes Secret bindings let administrators supply a catalog configuration field from a Secret managed outside Obot. A vMCP inherits that binding when the catalog entry is added as a component.
Secret bindings are available only when Obot is using the Kubernetes MCP runtime backend.
### Required Kubernetes Secret Label
The Kubernetes Secret must be in the Obot server's namespace and carry the configured allowed secret-binding label, `obot.obot.ai/allow-secret-binding` by default. See [Server configuration](https://docs.obot.ai/v0.28.0/configuration/server-configuration.md) to change the required label key.
The label controls whether a Secret can be discovered and selected in the admin UI, and Obot also checks the label when resolving the binding at runtime. If the label is removed after an MCP server is already bound to that Secret, the binding is treated as unavailable. Required fields then appear as missing configuration until the label is restored or the binding is changed.
Secrets without data keys are not shown as bindable targets.
### Configure a Binding in the Admin UI
#### New Catalog Entry
1. Open **MCP Servers**.
2. Select **Add MCP Server**, then **Hosted Server**.
3. Add a configuration value or header.
4. Set the field's **Value** to **Static** to expose the value-source controls.
5. In **Value Source**, select **Kubernetes Secret**.
6. Select the Secret name and key.
7. Save the MCP server.
This binds the catalog field to an existing Secret. The vMCP's **Preconfigured** and **Provided at connection** choices apply only to fields that do not already have a static value or Secret binding.
#### Using a Git-managed catalog entry
For an entry synchronized from Git, define its `secretBinding` in the source catalog and synchronize the entry. See the [catalog schema](https://docs.obot.ai/v0.28.0/configuration/mcp-server-gitops.md) for configuration fields. Create the referenced Secret in the Obot namespace and apply the required label before using the entry.
Add the entry to a vMCP as a component. The saved component includes the Secret name and key, and Obot resolves the value from Kubernetes when preparing the server configuration. Users connecting to the vMCP are not prompted for that field, and the vMCP configuration dialog does not offer a replacement value for it. The binding works with shared or per-user component deployments; it is not a separate server type.
For a vMCP managed in Obot, changing the Secret reference in the catalog requires an explicit [vMCP update](https://docs.obot.ai/v0.28.0/mcp-gateway/publish.md#obot-doc-virtual-mcps-snapshots-and-updates) before existing components use that reference. The component stores a reference, not a frozen copy of the Secret's value. Do not assume an already-running process immediately reloads a rotated environment variable; verify the workload after rotating its credentials.
For a Git-managed vMCP, catalog sync refreshes the component definition. Its YAML can also put a `secretBinding` on a `fixed` component configuration policy when the catalog field is not static. This vMCP-level binding is configured in Git, not the UI. See [vMCP definitions](https://docs.obot.ai/v0.28.0/configuration/mcp-server-gitops.md#obot-doc-vmcp-definitions) for the constraints and an example.
## Configuration and sharing
Add a **Hosted Server** catalog entry to define its runtime and configuration fields. When you add the entry to a vMCP, choose **Preconfigured** for values shared by its connections or **Provided at connection** for values each user supplies. Obot determines shared or per-user deployment behavior from that component configuration.
See [Configure servers in a vMCP](https://docs.obot.ai/v0.28.0/mcp-gateway/server-types.md) for the workflow. A **[Remote Server](https://docs.obot.ai/v0.28.0/mcp-gateway/register-remote.md#obot-doc-mcp-servers-remote-server)** catalog entry instead describes an existing HTTP endpoint; Obot does not host that server.
## Virtual MCPs (vMCPs)
Clients connect to new MCP endpoints through a virtual MCP (vMCP), which exposes tools from one or more catalog components through a single endpoint. A vMCP controls which tools users can access, while its backing servers use shared or per-user runtimes according to the component configuration.
vMCPs replace the legacy standalone connection and composite server models. Obot migrates existing composite servers during upgrade. Other legacy endpoints remain available for compatibility. See [Virtual MCPs](https://docs.obot.ai/v0.28.0/mcp-gateway/server-types.md) for creation, access, configuration, and migration guidance.
## Deployment Environments
### Docker
When running Obot with Docker, MCP servers are deployed as sibling containers:
- Obot communicates with the Docker daemon to manage containers
- Servers run alongside the Obot container
- Suitable for development and small deployments
- See [Docker Deployment](https://docs.obot.ai/v0.28.0/installation/docker-deployment.md) for setup details
### Kubernetes
For production deployments, Obot can deploy MCP servers to Kubernetes:
- Servers run as pods in the cluster
- Supports resource limits, network policies, and scaling
- See [MCP Deployments in Kubernetes](https://docs.obot.ai/v0.28.0/configuration/mcp-deployments-in-kubernetes.md) for configuration details
## Security and Isolation
Adding an MCP server causes Obot to run code on the hosting backend: `npx` and `uvx` servers execute the requested npm/PyPI package, and **containerized** servers run an arbitrary OCI image with a user-supplied command. The [Power User and Power User+ roles](https://docs.obot.ai/v0.28.0/security/policy-coverage.md#obot-doc-user-roles-security-model) can deploy servers, so granting those roles is, by design, granting the ability to run code on your infrastructure.
How well that code is contained depends on the deployment environment:
- **Docker** runs MCP servers as sibling containers through the host Docker socket, which provides little isolation from the host. Use it for development or single-tenant, trusted use only.
- **Kubernetes** runs each MCP server in its own pod and supports the restricted Pod Security Admission policy, a NetworkPolicy, and sandboxed container runtimes (gVisor, Kata Containers) for stronger isolation. Use it for multi-tenant or untrusted workloads.
See [User Roles — Security Model](https://docs.obot.ai/v0.28.0/security/policy-coverage.md#obot-doc-user-roles-security-model) and [MCP Deployments in Kubernetes](https://docs.obot.ai/v0.28.0/configuration/mcp-deployments-in-kubernetes.md) for details.
## Learn More
- [Legacy MCP server reference](https://docs.obot.ai/v0.28.0/functionality/mcp-servers.md) - Existing standalone deployments and compatibility terminology
- [Installation](https://docs.obot.ai/v0.28.0/installation/overview.md) - Deployment environments and setup
---
Document: MCP server configuration
Version: v0.28.0
Markdown: https://docs.obot.ai/v0.28.0/mcp-gateway/server-configuration.md
HTML: https://docs.obot.ai/mcp-gateway/server-configuration
# MCP server configuration
Use this page for configuration shared by multiple MCP server runtimes. Start with [Add remote MCP servers](https://docs.obot.ai/v0.28.0/mcp-gateway/register-remote.md) or [Add hosted MCP servers](https://docs.obot.ai/v0.28.0/concepts/mcp-hosting.md) to create a catalog entry. Each setting below describes which runtimes support it.
## Caller attribution headers
Remote and containerized MCP servers can receive selected information about the caller authenticated by Obot. This is useful when a backend uses shared credentials but needs to record who performed an action.
For containerized servers, injection works on both Docker and Kubernetes. NPX, UVX, and OpenAPI runtimes do not support this setting.
For entries managed in Obot, edit the catalog entry or server, open **Advanced Configuration**, enable **Inject Obot headers**, turn on the individual headers to share, and save. For Git-managed entries, configure [`injectObotHeaders`](https://docs.obot.ai/v0.28.0/configuration/mcp-server-gitops.md#obot-doc-caller-attribution-headers) in the catalog file. All selections are optional and disabled by default.
| Header | Value |
| --------------------- | -------------------------------------------------------------------------------------------------------------------------------------------------------------------- |
| `X-Obot-Api-Key-Name` | Name of the Obot API key used for the request. Omitted for unnamed keys and callers without an API key. |
| `X-Obot-Api-Key-Id` | API-key ID within this Obot installation. Omitted for callers without an API key. |
| `X-Obot-User-Id` | Authenticated caller's Obot account ID. For API keys, identifies the owning account. |
| `X-Obot-User-Name` | Account username, which can change over time. This is not the display name. |
| `X-Obot-User-Email` | Email carried by the authenticated account, when available. This does not guarantee that the address is verified. |
| `X-Obot-IDP-User-Id` | User ID assigned by the authentication provider. Omitted when unavailable or ambiguous across linked identities. |
| `X-Obot-IDP-Groups` | Comma-separated list of stored IdP group IDs, including provider prefixes, sorted and deduplicated. Excludes Obot roles and group display names. Omitted when empty. |
For API-key requests, the user and IdP fields describe the key owner, not an autonomous agent. Group memberships reflect Obot's stored provider or SCIM data. They are not a live query to the identity provider. Names, email addresses, and group memberships can disclose internal information, so select only what the destination needs.
For example, the groups header might contain:
```http
X-Obot-IDP-Groups: okta:admins,okta:engineering
```
Group IDs containing commas or quotes use CSV quoting. For example, the two IDs `okta:team,west` and `okta:users` are sent as `"okta:team,west",okta:users`. Backends should use a CSV parser if group IDs can contain these characters.
Obot removes incoming copies of all seven headers and supplies only the selected values. These names are reserved and cannot be configured as static or per-user headers. Unavailable values, values containing invalid HTTP header characters, and values exceeding 512 Unicode characters are omitted. An oversized groups list is omitted in full rather than truncated.
Backends should accept attribution only through trusted Obot gateway traffic. API-key names are mutable and not necessarily unique; use IDs when you need stable attribution.
---
Document: Slack MCP Server
Version: v0.28.0
Markdown: https://docs.obot.ai/v0.28.0/configuration/tutorials/slack-mcp-server.md
HTML: https://docs.obot.ai/configuration/tutorials/slack-mcp-server
# Slack MCP Server
Slack has an [official remote MCP server](https://docs.slack.dev/ai/slack-mcp-server/) that Obot can connect to. This guide explains how to set that up.
### 1. Configure a Slack app
1. Go to [https://api.slack.com/apps](https://api.slack.com/apps) and click Create New App.
2. Select `From a manifest`
3. Select your Slack workspace
4. Switch to the YAML tab and paste in the following manifest, then fill in the `` and `` placeholders with the name you want for this Slack app, and the host where your Obot instance is running
```yaml
display_information:
name:
oauth_config:
redirect_urls:
- https:///oauth/mcp/callback
scopes:
user:
- search:read.mpim
- search:read.private
- search:read.public
- search:read.im
- search:read.files
- files:read
- emoji:read
- search:read.users
- chat:write
- channels:history
- groups:history
- mpim:history
- im:history
- channels:write
- groups:write
- im:write
- mpim:write
- reactions:write
- canvases:read
- canvases:write
- users:read
- users:read.email
- channels:read
- groups:read
- mpim:read
- reactions:read
pkce_enabled: true
settings:
org_deploy_enabled: false
socket_mode_enabled: false
token_rotation_enabled: false
is_mcp_enabled: true
```
5. Take a look at the User Scopes if you would like (these are the permissions that the Slack MCP server will use on behalf of users that connect to it), then click `Create`
6. Note the Client ID and Client Secret for your app, as these will be needed next
7. In the sidebar, under `Settings`, click `Install App`
8. Click the green button to install your app into your workspace, then click `Allow`
### 2. Configure the server in Obot
> **NOTE**
>
> Obot's default MCP catalog includes a catalog entry for Slack. You can use that instead of creating your own, if you are using the default catalog.
1. On Obot's MCP Catalog page, click the `Add Catalog Entry` button and select `Remote Server`
2. Name the server and write a description if you would like
3. In the URL field, enter `https://mcp.slack.com/mcp`
4. Click on `Advanced Configuration` and enable Static OAuth
5. Click `Save`
6. In the Configure Static OAuth box, enter the Client ID and Client Secret from your Slack app, and click `Save`
After this, you will see the connection URL. Your users can now connect to the Slack MCP server. Note that this server will only work with the Slack workspace that you installed the Slack app into.
---
Document: Vercel MCP Server
Version: v0.28.0
Markdown: https://docs.obot.ai/v0.28.0/configuration/tutorials/vercel-mcp-server.md
HTML: https://docs.obot.ai/configuration/tutorials/vercel-mcp-server
# Vercel MCP Server
Obot's MCP Catalog includes an entry for [Vercel's official MCP server](https://vercel.com/docs/agent-resources/vercel-mcp). It is ready to use: there is no Vercel app to create and no credentials to configure.
### Why Vercel sign-in uses the Obot CLI
Vercel's OAuth server only accepts approved clients or redirects to `localhost`. Obot can't receive a `localhost` redirect itself, so the Vercel entry uses a [localhost OAuth callback](https://docs.obot.ai/v0.28.0/mcp-gateway/register-remote.md#obot-doc-localhost-oauth-callbacks): you run a short `obot mcp login` command on your own computer, it receives the redirect from Vercel, and it hands the sign-in back to Obot. You only do this once; after that, your MCP client connects to Obot as usual.
### Connect to Vercel
1. Add the Vercel catalog entry to a [vMCP](https://docs.obot.ai/v0.28.0/mcp-gateway/server-types.md), or use a vMCP that already includes it.
2. Install the [Obot CLI](https://docs.obot.ai/v0.28.0/reference/cli-api.md) on a computer with a web browser.
3. Connect to the vMCP. When Obot asks you to sign in to Vercel, select **Authenticate**.
4. Copy the displayed `obot mcp login` command and run it. Sign in to Vercel in the browser that opens, and grant access to the teams you want to use.
5. Return to Obot. The connection continues once sign-in finishes.
The command expires after ten minutes. See [MCP localhost OAuth sign-in](https://docs.obot.ai/v0.28.0/reference/cli-api.md#obot-doc-mcp-localhost-oauth-sign-in) if it expires or the CLI cannot open a local port.
Vercel tools act with your existing Vercel permissions, including changes to projects, domains, and environment variables. To give users read-only access, disable the write tools in the vMCP or grant only read tools in its profiles.
---
Document: Filter MCP traffic
Version: v0.28.0
Markdown: https://docs.obot.ai/v0.28.0/functionality/filters.md
HTML: https://docs.obot.ai/functionality/filters
# Filter MCP traffic
Filters inspect MCP requests and responses. Configure a filter to accept, reject, or modify matching traffic; use [private-network tunnels](https://docs.obot.ai/v0.28.0/functionality/mcp-tunnels.md) when the problem is reaching a remote server.
## Overview
Filters inspect MCP messages and apply validation, logging, or other checks to tool calls and results.
Filters can be implemented in three ways:
- **Guardrail filters**: Checks that Obot runs itself, with [guardrails](https://docs.obot.ai/v0.28.0/functionality/guardrails.md) such as secrets detection, PII detection, an LLM judge or an external content safety service. They block or redact what the guardrails find. No server, container or deployment is involved.
- **MCP filter servers**: Hosted or remote MCP servers that expose a filter tool. Hosted filters run as separate Docker containers or Kubernetes workloads. Remote filters run at an external MCP endpoint. Obot calls the configured tool when matching MCP traffic is processed. Obot's [built-in filters](https://docs.obot.ai/v0.28.0/functionality/filters.md#obot-doc-built-in-filters) are MCP filter servers.
- **HTTP webhook filters**: HTTP endpoints that receive MCP messages and return a decision to allow or reject them.
When you configure a filter, you can narrow when it runs using selectors that target particular tool calls or MCP (Model Context Protocol) tool functions.
Guardrail filters run inside the Obot process. Other filter implementations run outside it: Obot handles proxying, calls the filter, and enforces its response. In both cases the target MCP server does not host or enforce the filter. See the [request flows and trust boundaries](https://docs.obot.ai/v0.28.0/architecture/request-flows.md).
## How Filters Work
1. **MCP Request Interception**: When a request is made to an MCP server, the gateway intercepts it and sends the details to your configured filter
2. **Payload Inspection**: The filter server or webhook receives the payload and performs its validation. A guardrail filter is checked by Obot itself.
3. **Response Decision**: Your filter returns one of the following decisions:
- Accept: Allow the tool call to proceed
- Reject: Block execution and return an error to the user
- Mutate: Return a modified MCP message, if mutation is allowed for the filter
4. **Enforcement**: Obot applies the filter response before forwarding the request or returning the response to the client.
When several filters apply to a server, they run as a chain, ordered by the filter's ID. Each filter sees the message as the filters before it left it, so a mutation by one filter is what the next one checks. A rejection by any filter blocks the message. Responses pass through the chain in the same order.
Filters don't apply to Obot's own system MCP servers, such as filter servers themselves, or to the component servers of a composite server, whose traffic is filtered on the composite server.
Each filter that runs on a message is recorded with the message in the MCP audit log, under the filter's name, with its outcome (`ok`, `mutated` or `rejected`) and reason. For a filter server, the audit log also names the filter tool that was called. For a guardrail filter, it says `guardrail`.
## Gateway Configuration
Open **MCP Servers > Filters** and use **Add New Filter** to configure a guardrail filter, a custom filter (an HTTP webhook or an MCP filter server), or a built-in filter. Choose selectors for the traffic it should process, then test both an accepted and a rejected request. The list of filters shows each filter's type. See the [filter contracts and examples](https://docs.obot.ai/v0.28.0/reference/filter-schemas.md) when implementing the filter service.
### Selectors
All filter types support selectors to control when your filter is triggered:
- **Specific MCP Tool Call Methods**: Target particular tools or functions
- **MCP Tool Names, URIS**: Choose which MCP servers the filter applies to
## Guardrail Filters
A guardrail filter checks MCP traffic with [guardrails](https://docs.obot.ai/v0.28.0/functionality/guardrails.md#obot-doc-guardrail-types), the same guardrails that check LLM gateway traffic. Obot runs it in-process, in the filter chain with any other filters, so there is no filter server to deploy, configure, launch or restart, and no server details, logs or usage to show. Its detail page shows only its configuration. Its result on each message is recorded on the [MCP audit log](https://docs.obot.ai/v0.28.0/security/audit-data.md) entries of the servers it filters.
To create one, select **Add New Filter > Create From Guardrail** under **MCP Servers > Filters**, then configure:
- **Name**: A descriptive name. It names the filter in block messages and the MCP audit log.
- **MCP servers and selectors**: Which servers and which methods, tools, prompts or resources the filter applies to, as for any filter.
- **Guardrails**: One or more guardrails. Create or test them on the **Guardrails** tab of **LLM Gateway**, or create one from the picker.
- **Action**:
- **Block** rejects the message with an error naming the filter and what was found. You can replace that message with your own.
- **Redact** replaces what was found with a label such as `[REDACTED:EMAIL]` and lets the rest through. Some guardrails can only tell that content is a problem, not where it is. A redacting filter blocks when one of those finds something.
- **Direction**: Whether to check requests to the MCP server, its responses, or both.
- **Fail closed**: Whether to block when a guardrail or the condition can't be evaluated, for example because an external service is down or one of its guardrails is missing. By default, the message passes, and the MCP audit log records which guardrail failed and why. If Obot can't load guardrails at all, for example because its database is unreachable, guardrail filters block regardless of this setting, as any filter that errors does.
- **Sampling rate**: The percentage of matching messages to check, for expensive guardrails.
- **Users & Groups**: The users and groups the filter applies to, or **All Obot Users** for everyone. A filter with none applies to everyone.
- **Condition** (optional): A [CEL](https://github.com/google/cel-spec) expression that must be true for the filter to apply. It can use `mcp_method`, `mcp_tool` (the tool or prompt name, or the resource URI), `mcp_arguments` (the tool call's or prompt's arguments), `mcp_server` (the server's display name), `headers` (the request's headers, without credentials), and `user.id` and `user.groups`. `user.groups` holds the IDs of the user's auth provider groups, the same IDs that group subjects use, not group names or Obot roles. For example: `mcp_tool.startsWith("create_") && !("" in user.groups)`. Reading a header or argument that isn't there is an error, so test for it first: `"path" in mcp_arguments`.
### What a guardrail filter checks
| Method | Request | Response |
| ---------------- | -------------------------------------- | ------------------------------------------------------------------------- |
| `tools/call` | Every string in the tool's arguments | The result's text content, embedded text resources and structured content |
| `resources/read` | Nothing | The text contents of the resource |
| `prompts/get` | Every string in the prompt's arguments | The text of the prompt's messages, including embedded text resources |
Images and other binary content are not checked. Other methods carry no content to check and pass through a guardrail filter unchanged.
A blocked request never reaches the MCP server, and a blocked response is replaced by a JSON-RPC error. Responses are checked whichever stream they arrive on, including a GET stream when a client resumes a stream or uses the legacy SSE transport. While any filter applies to a server, JSON-RPC batches sent to it are refused, since filters check one message at a time. A guardrail filter blocks a request whose parameters it can't read.
Guardrail filters can block or redact, but not log only. The MCP audit log entry of each checked message has a status for the filter, under its name: `rejected` with the block message, `mutated` for a redaction, or `ok`. When a guardrail fails and the filter fails open, the `ok` status's message names the guardrail and the error. The MCP audit log records both the original and the redacted message.
A guardrail filter is shown as not configured while one of its guardrails is missing or can't be used, for example because it lacks a required credential. It still runs, and fails as described under **Fail closed**.
## MCP Filter Servers
MCP filters can be deployed as MCP servers. Their deployment configuration is similar to other MCP servers in Obot: choose a runtime such as `remote`, `containerized`, `npx`, or `uvx`, then provide the runtime-specific configuration and any required environment variables.
With `remote`, Obot connects to the configured endpoint and does not deploy the filter implementation. The other runtimes deploy a separate workload; a hosted filter does not run inside Obot or inside the target MCP server.
The additional requirement for an MCP filter server is a filter tool name. Obot needs this value so it knows which tool to call when the filter runs.
### Filter Tool Contract
When you write an MCP server that acts as a filter, implement the tool called by `filterConfig.toolName` with this contract:
1. Obot calls one tool on the MCP server for filtering.
2. The tool accepts the full MCP message as an argument.
3. The tool returns a response with these fields:
| Field | Description |
| --------- | ------------------------------------------------------------------------------------------------------------------------------------------- |
| `accept` | Whether the MCP message should be allowed to continue. |
| `mutated` | Whether the filter returned a modified MCP message. Use this only when the filter is allowed to mutate traffic. |
| `message` | The MCP message to use after filtering. For non-mutating filters, return the original message. |
| `reason` | Human-readable explanation for the decision. Include this when rejecting or mutating a message so administrators can understand the result. |
See the [obot-platform/pii-filter](https://github.com/obot-platform/pii-filter) repository for an example MCP filter server.
## Built-in Filters
Obot ships with a default set of built-in filters. These are MCP filter servers that are already configured for deployment in Obot through the system MCP catalog.
The default built-in filter catalog is maintained in the [obot-platform/system-mcp-catalog](https://github.com/obot-platform/system-mcp-catalog) repository.
A built-in filter can require a minimum or maximum Obot version. Filters that the running Obot version does not support are not listed. If a built-in filter you expect is missing, check whether it requires a newer Obot version. See [Obot version range](https://docs.obot.ai/v0.28.0/configuration/mcp-server-gitops.md#obot-doc-obot-version-range).
## HTTP-based Filters
Deploy a webhook service that accepts MCP messages over HTTP. Configure its URL in Obot, which sends matching messages to the webhook and uses its response to allow or reject them.
Provide the following information to Obot:
### Required Configuration
- **Name**: A descriptive name for your filter
- **URL**: The webhook endpoint that receives MCP messages
- **Secret** (optional): A shared secret with the webhook receiver for payload signature verification
### Security with Secrets
Configure the same shared secret in Obot and your webhook service. When a secret is configured, webhook requests include a signature in the `X-Obot-Signature-256` header. Your service should verify this signature before processing the request.
### Webhook Receiver
Your webhook endpoint must accept HTTP POST requests containing MCP messages.
### Payload Structure
The webhook will receive a payload with this data structure:
```python
# Pydantic Model
class WebhookMessage(BaseModel):
"""JSON-RPC message structure for webhook payloads."""
jsonrpc: str
id: Optional[Union[str, int]] = None
method: Optional[str] = None
params: Optional[Dict[str, Any]] = None
result: Optional[Dict[str, Any]] = None
error: Optional[Dict[str, Any]] = None
```
- **Signature Header**: Used for verifying the payload authenticity (when secrets are configured)
`X-Obot-Signature-256`
### Response Codes
Your webhook service should respond with:
- **HTTP 200**: Accept the tool call - allows execution to proceed
- **Non-200 codes**: Reject the tool call - blocks execution and may return an error to the user
### Example
This Python example inspects the search tools query param in the DuckDuckGo MCP Server.
To run this example, execute the following once you have saved the script in `simple_webhook_example.py`:
```bash
uv add fastapi uvicorn pydantic
PORT=8000 WEBHOOK_SECRET=somethingsecret uv run simple_webhook_example.py
```
The filter target url will be `http://:8000/webhook`
Set the Webhook Secret in Obot to the same value as `WEBHOOK_SECRET` in this example.
```python
#!/usr/bin/env python3
"""
Simple webhook endpoint with signature validation
Usage:
uv run simple_webhook_example.py
Environment Variables:
WEBHOOK_SECRET: Secret for webhook signature validation (default: "test_secret")
PORT: Port to run the server on (default: 8000)
"""
import hmac
import hashlib
import os
import logging
from typing import Dict, Any, List, Optional, Union
from fastapi import FastAPI, Request, HTTPException, Header
from pydantic import BaseModel
# Configure logging
logging.basicConfig(
level=logging.INFO,
format='%(asctime)s - %(levelname)s - %(message)s'
)
logger = logging.getLogger(__name__)
def validate_signature(body: bytes, signature: str, secret: str) -> bool:
"""
Validate HMAC-SHA256 signature for webhook security.
Args:
body: Raw request payload
signature: Signature from X-Obot-Signature-256 header
secret: Shared secret for validation
Returns:
True if signature is valid, False otherwise
"""
# Remove "sha256=" prefix if present
if signature.startswith("sha256="):
signature = signature[7:]
# Calculate expected signature
expected = hmac.new(
secret.encode('utf-8'),
body,
hashlib.sha256
).hexdigest()
# Secure comparison
return hmac.compare_digest(signature, expected)
class WebhookMessage(BaseModel):
"""JSON-RPC message structure for webhook payloads."""
jsonrpc: str
id: Optional[Union[str, int]] = None
method: Optional[str] = None
params: Optional[Dict[str, Any]] = None
result: Optional[Dict[str, Any]] = None
error: Optional[Dict[str, Any]] = None
# Initialize app
app = FastAPI(title="Simple Webhook with Filtering")
# Configuration
SECRET = os.getenv("WEBHOOK_SECRET", "test_secret")
PORT = int(os.getenv("PORT", "8000"))
@app.post("/webhook")
async def webhook_endpoint(
request: Request,
x_obot_signature_256: str = Header(alias="X-Obot-Signature-256")
):
"""
Main webhook endpoint that validates signatures and processes messages.
"""
body = await request.body()
# Log the incoming request
logger.info(f"📥 Webhook called - Method: {request.method}, URL: {request.url}")
logger.info(f"📄 Request body: {body.decode('utf-8', errors='replace')}")
logger.info(f"🔐 Signature header: {x_obot_signature_256}")
# Validate signature
if not validate_signature(body, x_obot_signature_256, SECRET):
logger.error("❌ Invalid webhook signature")
raise HTTPException(status_code=401, detail="Invalid signature")
try:
# Parse message
message = WebhookMessage.model_validate_json(body)
logger.info(f"✅ Processing {message.method} message")
# Check all requests for suspicious content
check_message_for_threats(message)
logger.info(f"🎉 Webhook processed successfully: {message.method}")
return {"status": "accepted", "message": "Webhook processed successfully"}
except HTTPException:
# Re-raise HTTP exceptions (like 403 from threat detection)
raise
except Exception as e:
logger.error(f"Error processing webhook: {e}")
raise HTTPException(status_code=400, detail=f"Invalid payload: {str(e)}")
def check_message_for_threats(message: WebhookMessage) -> None:
"""
Check DuckDuckGo search requests for unsafe query content.
This example specifically looks for DuckDuckGo search tool usage
and filters based on the search query content.
Args:
message: JSON-RPC message to check
Raises:
HTTPException: 403 status if unsafe search query detected
"""
logger.info(f"Checking message for threats: {message.method}")
# Look for DuckDuckGo search tool calls
if message.method == "tools/call" and message.params:
tool_name = message.params.get("name")
arguments = message.params.get("arguments", {})
if tool_name == "search" and "query" in arguments:
query = arguments["query"]
logger.info(f"🔍 Checking DuckDuckGo search query: '{query}'")
if is_unsafe_search_query(query):
logger.error(f"🚫 UNSAFE SEARCH QUERY BLOCKED: '{query}'")
raise HTTPException(
status_code=403,
detail="Search query rejected due to content policy"
)
else:
logger.info(f"✅ Safe search query: '{query}'")
logger.debug(f"✅ Clean message: {message.method}")
def is_unsafe_search_query(query: str) -> bool:
"""
Check if a DuckDuckGo search query contains unsafe content.
Args:
query: The search query string
Returns:
True if query should be blocked, False if safe
"""
if not query or not isinstance(query, str):
return False
query_lower = query.lower()
# Simple list of terms we don't want to allow in searches
unsafe_terms = [
"how to hack",
"how to exploit",
"malware download",
"virus download",
"illegal drugs",
"how to make bomb",
"assassination",
"terrorist",
]
for term in unsafe_terms:
if term in query_lower:
logger.warning(f"Found unsafe search term: '{term}'")
return True
# Block excessively long queries (potential injection attempts)
if len(query) > 200:
logger.warning(f"Query too long: {len(query)} chars")
return True
return False
@app.get("/health")
async def health_check():
"""Simple health check endpoint."""
return {"status": "healthy", "filter": "ready"}
@app.get("/")
async def root():
"""Root endpoint with basic information."""
return {
"message": "Simple Webhook with Tool Filtering",
"endpoints": {
"/webhook": "Main webhook endpoint (POST)",
"/health": "Health check (GET)",
"/": "This information (GET)"
},
"note": "Send JSON-RPC messages to /webhook with proper signatures. Suspicious content will result in 403 responses."
}
def main():
"""Start the webhook server."""
import uvicorn
logger.info("🚀 Starting Simple Webhook Server with Content Filtering")
logger.info(f"🌐 Host: 0.0.0.0")
logger.info(f"🔌 Port: {PORT}")
logger.info(f"🔐 Secret configured: {'Yes' if SECRET != 'test_secret' else 'Using default (change WEBHOOK_SECRET)'}")
logger.info(f"📋 Available endpoints:")
logger.info(f" POST /webhook - Main webhook endpoint")
logger.info(f" GET /health - Health check")
logger.info(f" GET / - Server information")
uvicorn.run(
app,
host="0.0.0.0",
port=PORT,
log_level="info"
)
if __name__ == "__main__":
main()
```
## Credential filter
The built-in Credential Filter uses a default action (Block, Redact, or Allow)
and optional exceptions for exact credential rules. Block is the default. Search
by provider, credential name, or rule ID to add an override. Changing the default
preserves explicit overrides; removing an override restores inheritance.
Any blocking match rejects the entire message. Allow affects only its rule;
another matching rule can still block the same credential. Redaction enables
gateway mutation automatically and replaces detected text with
`[REDACTED_CREDENTIAL]`. It may also replace surrounding context or an entire
field value. Redact findings in object keys or JSON-RPC identifiers block instead.
Select both request and response directions where both need protection. Configure
the gateway's existing failure setting to reject on filter transport or execution
failures. Saving configuration does not establish protection until the managed
filter deployment successfully initializes.
Detection is pattern-based, without live credential validation or confidence
thresholds. It can produce false positives and does not recognize every secret.
Allow passes credentials unchanged; it does not create findings history. Policy
is deployment configuration and cannot be overridden by tool arguments.
---
Document: Connect private-network servers
Version: v0.28.0
Markdown: https://docs.obot.ai/v0.28.0/functionality/mcp-tunnels.md
HTML: https://docs.obot.ai/functionality/mcp-tunnels
# Connect private-network servers
## Overview
MCP tunnels let the Obot gateway reach remote HTTP or HTTPS MCP servers that are not directly accessible from the Obot network. An admin deploys and operates the `obot tunnel` client externally, on a machine or pod that can reach both the private MCP server and Obot. The client opens an outbound, authenticated WebSocket connection to Obot's built-in receiving endpoint. Creating a tunnel record in Obot does not deploy the client or the MCP server. See [Deployment topologies](https://docs.obot.ai/v0.28.0/architecture/topologies.md) for Docker and Kubernetes placement examples.
Traffic follows this path:
1. The Obot gateway receives a request for a remote MCP server.
2. The remote MCP catalog entry selects an MCP tunnel by its generated ID.
3. Obot sends the HTTP request over that tunnel.
4. The `obot tunnel` process forwards the request to the real MCP server URL and returns its response.
The remote MCP server continues to use its ordinary URL, such as `http://mcp.internal.example:8080/mcp`. MCP tunnels proxy HTTP requests and streaming responses; they are not general-purpose TCP tunnels or VPNs.
## Prerequisites
- An Admin or Owner must create and configure the tunnel.
- A Docker container or the `obot` CLI must run on a long-lived machine that can reach both Obot and the remote MCP server.
- The tunnel machine must be allowed to make outbound WebSocket connections to Obot. It does not need an inbound port.
- A reverse proxy in front of Obot must allow WebSocket upgrades and long-lived connections on `/tunnel/connect`.
- The remote catalog entry must use an exact URL or hostname. URL templates are not supported with tunnels.
## Create an MCP tunnel
1. Open **MCP Servers > Tunnels**.
2. Select **Create MCP Tunnel**.
3. Enter a required **Display Name** and an optional **Description**.
4. Add one or more **Allowed URLs** that describe the destinations this tunnel may reach.
5. Select **Create Tunnel**.
6. Copy the tunnel secret and either the generated Docker or CLI command before closing the dialog.
Obot generates the tunnel ID and a bearer secret containing 64 random bytes. The complete secret is shown only when the tunnel is created or rotated. All other responses return only a shortened preview.
> **WARNING**
>
> Store the complete secret in a secure secret manager when it is created. The preview cannot be used to connect, and the existing secret cannot be retrieved later.
## Configure allowed URLs
Allowed URLs are the tunnel's network boundary. An empty list permits no destinations. Each rule can be an exact value or contain one `*` at the beginning or end.
| Pattern | Allows |
| ------------------------------------- | --------------------------------------------------------------------------------------- |
| `https://mcp.internal.example/mcp` | Only that complete URL |
| `https://services.internal.example/*` | URLs beginning with that URL prefix |
| `mcp.internal.example` | Any HTTP or HTTPS URL with that exact hostname |
| `*.internal.example` | Hostnames ending in `.internal.example`, excluding the bare `internal.example` hostname |
| `build-*` | Hostnames beginning with `build-` |
| `*` | Every HTTP or HTTPS destination |
Hostname rules are case-insensitive and do not restrict the scheme, port, path, or query. Use a complete URL rule when those details must be constrained. Complete URL rules normalize the scheme, hostname, and default ports, while paths and queries remain significant.
A prefix rule is usually preferable to one exact URL when an MCP transport uses multiple paths or adds session query parameters.
> **WARNING**
>
> Use the narrowest rules practical. In particular, `*` allows the tunnel process to make requests to any HTTP or HTTPS destination it can reach.
Obot checks the allowlist when a tunneled remote catalog entry or server is saved and again for every forwarded request. Updating the allowlist therefore affects new requests immediately, including requests from existing catalog entries.
## Connect the tunnel
The Docker tab is selected by default after creating or rotating a tunnel. Run the displayed command on a machine with network access to the remote MCP server:
```bash
docker run --rm ghcr.io/obot-platform/obot:v0.26.0 \
tunnel \
--obot-base-url https://obot.example.com/api \
--token YOUR_TUNNEL_SECRET
```
The UI reads the running Obot version from `/api/version` and uses it as the image tag when it is a valid release or prerelease semantic version. Semantic-version build metadata is omitted because it is not valid in a Docker tag. Development, dirty, missing, or invalid versions use the `main` image tag.
Select the CLI tab to run an installed `obot` binary instead:
```bash
obot tunnel \
--obot-base-url https://obot.example.com/api \
--token YOUR_TUNNEL_SECRET
```
The secret identifies the MCP tunnel, so there is no tunnel name argument. Both forms invoke the same tunnel command. It converts the Obot URL to the WebSocket endpoint automatically; for example, `https://obot.example.com/api` connects to `wss://obot.example.com/tunnel/connect` on the normal Obot server port.
You can also set the Obot base URL with `OBOT_BASE_URL`:
```bash
export OBOT_BASE_URL=https://obot.example.com/api
obot tunnel --token YOUR_TUNNEL_SECRET
```
The tunnel command retries failed connection attempts and lost connections indefinitely, using exponential backoff from 1 second up to 30 seconds. Run it under a service manager or another supervisor for production use.
Multiple tunnel clients can connect with the same MCP tunnel secret, including
clients connected to different Obot replicas. Each connection multiplexes
concurrent requests. Obot routes a request through an available connection;
connections for the same tunnel are failover options rather than a guaranteed
load-balancing pool.
### Multiple Obot replicas
Helm deployments with `replicaCount` greater than `1` automatically form an internal tunnel peer mesh. The tunnel CLI still opens one WebSocket to one Obot replica, but every replica learns which tunnel is connected and can route gateway requests through the owning replica. The CLI does not need one connection per replica.
Every replica runs a non-leader-elected controller for the existing gateway
Service's Kubernetes EndpointSlices. The controller watches only the Service's
namespace and label, then connects directly to ready endpoint addresses on the
`http` port. EndpointSlice names are generated and a Service can have more than
one, so each event reconciles the complete set. The chart uses a dedicated
shared peer secret and grants read access only to EndpointSlices.
More than one client for the same tunnel can connect through the peer mesh at
once. The connected-tunnels API still reports the tunnel ID once, regardless of
how many clients are connected with its secret.
For normal Helm installs, the generated peer token is preserved across upgrades. For GitOps systems that render charts without access to the live cluster, set `tunnelPeer.token` to a stable secret value or provide a Secret containing `OBOT_SERVER_TUNNEL_PEER_TOKEN` with `tunnelPeer.existingSecret`.
Changing the peer token triggers a normal rolling update. During that rollout,
replicas using different tokens cannot peer, so tunneled requests can fail until
every replica uses the new value. Rotate the peer token during a maintenance
window and verify that the rollout completes. The same restriction applies to
externally managed peer secrets.
`/tunnel/peer` is authenticated separately from user-facing APIs. Because it is served by the gateway API mux, an ingress that forwards all paths to Obot also makes this endpoint reachable; the shared peer secret still prevents non-peer access. No separate public ingress route is required.
If a replica or peer connection is lost, new requests can use the tunnel again after the peer mesh or CLI reconnects. An in-flight request is failed rather than replayed because MCP requests may not be safe to repeat.
### CLI logs
The tunnel command logs connection changes and each forwarded request. Request and response entries share a `request_id`, making them easy to correlate. Request logs include the tunnel ID, HTTP method, target URL without its query or fragment, whether a query was present, and content length. Response logs add the status, response content length, and duration.
Headers, query values, and URL fragments are not logged. URL paths are logged, so do not place secrets in paths.
## Configure a remote MCP catalog entry
1. Open **MCP Servers**.
2. Create or edit a remote MCP catalog entry.
3. Configure the real MCP endpoint using **Exact URL** or **Hostname**.
4. Open **Advanced Configuration**.
5. Select the MCP tunnel from the **Tunnel** dropdown and save the entry.
The dropdown displays the tunnel's display name and falls back to its generated ID. Obot stores the generated ID in `remoteConfig.tunnelName`.
The configured endpoint must match one of the selected tunnel's allowed URL rules. URL templates and interpolated URLs cannot be combined with a tunnel. System MCP servers also do not support tunnels.
> **NOTE**
>
> Tunnel selection is available only for catalog entries managed directly in Obot. Entries synchronized from a catalog source cannot set `remoteConfig.tunnelName`.
## Operate MCP tunnels
### Check live connections
`GET /api/tunnels` returns tunnels connected anywhere in the Obot installation:
```json
{
"items": [
{
"name": "mt1example"
}
]
}
```
`name` is the generated ID of each currently connected tunnel. A tunnel appears
only once even when it has multiple connected clients. The endpoint does not
expose connection timing or request statistics.
### Rotate a secret
Open the tunnel from **MCP Servers > Tunnels** and select **Rotate Secret**. Rotation immediately invalidates the old secret and disconnects clients using it. Save the newly displayed secret, then restart the tunnel clients with it.
A tunnel client that still uses the old secret continues retrying but cannot reconnect.
### Update or delete a tunnel
Changing the display name or description does not change the tunnel ID or secret. Narrowing **Allowed URLs** can immediately block requests from catalog entries that no longer match.
Obot does not allow a tunnel to be deleted while any MCP catalog entry still uses it, including
tunnel references nested in composite catalog entries. The API returns `400 Bad Request` and lists
the dependent catalog entries. Update those entries to remove or replace the tunnel first. Deleting
the tunnel then disconnects its clients.
## Security behavior
- Use HTTPS for Obot in production so the WebSocket uses WSS. The tunnel secret is a bearer credential, and forwarded MCP headers may contain credentials.
- Obot stores a SHA-256 digest and a shortened preview of the secret, not the complete secret.
- A tunnel secret is authorized only to open `GET /tunnel/connect`; it does not grant access to the Obot API or UI.
- Tunneled requests are checked against the current allowed URL rules before forwarding.
- Same-origin redirects remain inside the tunnel. Cross-origin redirect locations are not followed through the tunnel.
- Run the CLI only on a trusted machine because it makes the final request to the private destination.
For tunneled targets, the tunnel allowlist is the primary network boundary. The usual gateway restrictions on localhost, private, and link-local destinations do not apply because the tunnel machine performs DNS resolution and connects to the target.
## Troubleshooting
| Symptom | What to check |
| ---------------------------------------------- | -------------------------------------------------------------------------------------------------------------------------- |
| The CLI repeatedly receives `401 Unauthorized` | The secret is incorrect or was rotated. Restart with the complete current secret. |
| The CLI repeatedly disconnects | Verify the Obot base URL, TLS trust, outbound firewall rules, and WebSocket support or idle timeouts in any reverse proxy. |
| Obot reports that the tunnel is not connected | Confirm the CLI process is running and that the tunnel ID appears in `GET /api/tunnels`. |
| Obot reports that the target is not allowed | Compare the final target URL with the tunnel's current allowed URL rules. |
| A forwarded request fails with a gateway error | From the tunnel machine, verify DNS, TLS, firewall access, and direct connectivity to the real MCP URL. |
| A catalog entry cannot be saved | Use an exact URL or hostname that matches the allowlist. Remove any URL template before selecting a tunnel. |
## API reference
| Method | Path | Purpose |
| -------- | ------------------------------------- | -------------------------------------------------------------- |
| `GET` | `/api/mcp-tunnels` | List configured MCP tunnels |
| `POST` | `/api/mcp-tunnels` | Create a tunnel and return its complete secret |
| `GET` | `/api/mcp-tunnels/{id}` | Get a tunnel with a secret preview |
| `PUT` | `/api/mcp-tunnels/{id}` | Update its manifest |
| `DELETE` | `/api/mcp-tunnels/{id}` | Delete it and disconnect its client |
| `POST` | `/api/mcp-tunnels/{id}/rotate-secret` | Rotate and return the new complete secret |
| `GET` | `/api/tunnels` | List live tunnel connections |
| `GET` | `/tunnel/connect` | CLI-only authenticated WebSocket upgrade |
| `GET` | `/tunnel/peer` | Internal authenticated WebSocket upgrade between Obot replicas |
The `POST` and `PUT` bodies contain the manifest fields directly:
```json
{
"displayName": "Office network",
"description": "Access to MCP services inside the office network",
"allowedURLs": [
"https://mcp.internal.example/mcp",
"https://services.internal.example/*",
"*.corp.example"
]
}
```
---
Document: Troubleshooting
Version: v0.28.0
Markdown: https://docs.obot.ai/v0.28.0/mcp-gateway/troubleshooting.md
HTML: https://docs.obot.ai/mcp-gateway/troubleshooting
# Troubleshooting
Start with the failing boundary rather than changing several settings at once.
| Symptom | Check |
| ------------------------------------------ | --------------------------------------------------------------------------------------------------------------------------------------------------------------------------------------------------------------------------------- |
| Cannot sign in | [Authentication setup](https://docs.obot.ai/v0.28.0/security/authentication.md#obot-doc-enabling-authentication-troubleshooting), configured provider, and callback URL |
| OAuth reports a missing resource parameter | The client's OAuth resource must identify the same MCP endpoint; see the [FAQ](https://docs.obot.ai/v0.28.0/faq.md) |
| vMCP is missing | The user's profiles, or ownership for a personal vMCP |
| A tool is missing or unexpectedly allowed | Component exposure, all matching profile grants, and instance tool selection |
| Remote connection fails | Server URL, upstream credentials, and reachability from Obot or its tunnel machine |
| Hosted server fails to start | Runtime/package settings, required configuration, workload events, and [image pull secrets](https://docs.obot.ai/v0.28.0/configuration/image-pull-secrets.md#obot-doc-troubleshooting) |
| Private endpoint is unreachable | [Tunnel troubleshooting](https://docs.obot.ai/v0.28.0/functionality/mcp-tunnels.md#obot-doc-troubleshooting) and its allowlist |
| Source changes do not appear in a vMCP | For an Obot-managed vMCP, apply its [snapshot update](https://docs.obot.ai/v0.28.0/mcp-gateway/publish.md#obot-doc-virtual-mcps-snapshots-and-updates). For a Git-managed vMCP, check source sync errors and component references |
Use **Test vMCP** to isolate the gateway connection from your external client. Inspect audit metadata for the failing request. Request and response bodies require Auditor access.
When reporting an issue, include the Obot version, runtime, client version, timestamp, and sanitized error. Do not include API keys, upstream tokens, or unredacted audit payloads.
---
Document: LLM Gateway overview
Version: v0.28.0
Markdown: https://docs.obot.ai/v0.28.0/llm-gateway/how-it-works.md
HTML: https://docs.obot.ai/llm-gateway/how-it-works
# LLM Gateway overview
## Overview
Obot reaches models through its built-in LLM gateway. The gateway serves every configured model behind one base URL, and clients call it with an **Obot API key** instead of provider credentials. Point an OpenAI- or Anthropic-compatible client, such as [Claude Code](https://docs.obot.ai/v0.28.0/llm-gateway/connect-clients.md#obot-doc-using-with-claude-code) or [Codex](https://docs.obot.ai/v0.28.0/llm-gateway/connect-clients.md#obot-doc-using-with-codex), at the gateway and call models by name.
The gateway forwards requests to the upstream provider and enforces per-user access:
- You never handle the provider's real API key. An administrator adds providers and their keys under **LLM Gateway** → **Providers**, and Obot substitutes the key on each request. See [Configure providers and models](https://docs.obot.ai/v0.28.0/configuration/model-providers.md).
- You can only call models that an administrator has granted you through a [Model Access Policy](https://docs.obot.ai/v0.28.0/functionality/model-access-policies.md).
- The model list returned to your client (`/v1/models`) is scoped to the models you are allowed to use.
Obot's own features, such as the MCP Inspector's chat and LLM judge guardrails, use the same gateway.
## Unified gateway
The gateway serves models from OpenAI, Anthropic, Amazon Bedrock, Google Vertex AI and Gemini, Azure, Mistral, Groq, xAI, DeepSeek, OpenRouter, Cohere, vLLM, Ollama and more behind a single base URL:
```
https:///api/llm-proxy/v1
```
- **Any model, any API format.** Every model is available in the OpenAI Chat Completions (`/v1/chat/completions`), OpenAI Responses (`/v1/responses`) and Anthropic Messages (`/v1/messages`) formats, so Claude Code can use GPT models and the OpenAI SDK can use Claude. See [API compatibility](https://docs.obot.ai/v0.28.0/llm-gateway/compatibility.md#obot-doc-supported-endpoints-and-formats) for every endpoint.
- **Model names** are `provider/model`, for example `openai/gpt-4.1`, `anthropic/claude-sonnet-4-5` or `bedrock/anthropic.claude-sonnet-4-5-20250929-v1:0`. Bare provider model IDs such as `claude-sonnet-4-5` also work, which is what Claude Code sends by default. So do undated Anthropic names such as `claude-sonnet-4-5` or `anthropic/claude-sonnet-4-5`, which Anthropic lists only by their dated IDs (`claude-sonnet-4-5-20250929`): they are served by the latest dated version. When several providers serve a bare ID, such as `gpt-4o-mini` from both OpenAI and Azure, the gateway picks one you have access to, preferring the provider that makes the model (OpenAI, Anthropic, Gemini, Mistral, Cohere, xAI, DeepSeek) over one that hosts it. Use `provider/model` to choose the provider yourself.
- **Fallbacks.** Add `"fallbacks": ["anthropic/claude-sonnet-4-5"]` to a request to fail over to other models when the primary one errors. Each fallback must also be a model you have access to. See [Routing rules and fallbacks](https://docs.obot.ai/v0.28.0/llm-gateway/how-it-works.md#obot-doc-routing-rules-and-fallbacks).
- **Authentication and access.** Use an Obot API key (`obot login --scope llm --print-token`). You can call only the models granted to you by your [profiles](https://docs.obot.ai/v0.28.0/functionality/model-access-policies.md). [Guardrails](https://docs.obot.ai/v0.28.0/functionality/guardrails.md), the LLM audit log and usage reporting all apply.
- **Budgets.** Usage of a model is limited by the budgets of your profiles that grant it. A request that would exceed a budget gets `429` with the budget's name and when more becomes available.
## The LLM Gateway page
The **Connect** tab of the **LLM Gateway** page shows the gateway's base URLs, how many models you can use (select it to list them by provider), and a card for each client (Claude Code, Codex CLI, OpenCode, Goose, Cline, Open WebUI, OpenAI SDK, Anthropic SDK, Vercel AI SDK, Google ADK and `curl`). Select a card to open ready-to-copy configuration for that client, and pick the model it uses. Find the page under **AI Resources** → **LLM Gateway** in the sidebar (route `/models`). If you don't have access to any models, contact an administrator to request access through a [profile](https://docs.obot.ai/v0.28.0/functionality/model-access-policies.md).
Models from gateway providers are granted to users by profiles. A profile's model picker lists them under the *LLM Gateway* provider.
### Administering the gateway
Administrators manage the gateway from these pages:
| Where | What it does |
| ------------------------------------------------------------------- | ------------------------------------------------------------------------------------------------------------------------------------------------------------------------------------------------------------------------------------------------------------------------------------------------------------------------------------------------------------------------------------------------------------------------------------------------------------------------------------------------------------------------------------------------------------------------------------------------------------------------------------------------------------------------------------------------------------------------------------------------------------------------------------------------------------------------------------------------------------------------------------------------------------------------------------------------------------------------------------ |
| **Usage** → **Model** | Requests, success rate, latency, tokens and spend over time, spend by provider and the top models, and usage by user, API key and model. |
| **LLM Gateway** → **Providers** | Add upstream providers and their keys, and set the [default models](https://docs.obot.ai/v0.28.0/llm-gateway/how-it-works.md#obot-doc-default-models). See [Configure providers and models](https://docs.obot.ai/v0.28.0/configuration/model-providers.md). |
| **LLM Gateway** → **Profiles** | Who gets what: each [profile](https://docs.obot.ai/v0.28.0/functionality/model-access-policies.md) names users and groups, the models they may use, their budgets and their applied guardrails, all edited and saved together in the profile's form. Profiles add up: a user in several profiles may use the models of each, and the applied guardrails of each apply to them. A budget covers only its own profile's models. |
| **LLM Gateway** → **Profiles** → a profile → **Budgets** | Caps on spend (USD), total/input/output tokens or requests over a rolling window of up to a year (e.g. the last 6 hours) or a calendar window (this hour, day, week or month, UTC). A budget either gives each of the profile's users their own allowance or is one pool they share, covers all of its profile's models or only some of them, and can exempt administrators. A budget applies to a request only when its profile grants the requested model, and every budget that applies must have room, so when several profiles' budgets cover the same model, the tightest one limits it. A profile without models has budgets that never apply. Obot enforces budgets from the usage it records in its own database, so usage is counted exactly across Obot replicas. A budget isn't a hard ceiling, though: a request is admitted while the budget has room and its usage is recorded when it finishes, so requests running at the same time can together go past the limit. |
| **LLM Gateway** → **Profiles** → a profile → **Applied Guardrails** | Guardrails applied to the profile (guardrail policies in the API) that block, redact or log sensitive or unwanted content in the profile's model requests and responses (including streams), using guardrails. See [Guardrails](https://docs.obot.ai/v0.28.0/functionality/guardrails.md). |
| **LLM Gateway** → **Guardrails** | **Guardrails** configure the checks to run, for profiles' applied guardrails and for [guardrail filters](https://docs.obot.ai/v0.28.0/functionality/filters.md#obot-doc-guardrail-filters) on MCP traffic, with built-in secrets, PII and LLM-judge checks and 3rd party integrations with Presidio, Azure AI Language and Content Safety, AWS Bedrock Guardrails, Google Model Armor, Lakera Guard (Check Point), Patronus and CrowdStrike AIDR. Its **Used by** column shows what uses each guardrail, including MCP guardrail filters. See [Guardrails](https://docs.obot.ai/v0.28.0/functionality/guardrails.md). |
| **LLM Gateway** → **Routing** | Rules that match requests with a [CEL](https://github.com/google/cel-spec) expression (over `model`, `provider`, `headers`, ...) and send them to other providers or models, split traffic by weight, or define fallback chains. See [Routing rules and fallbacks](https://docs.obot.ai/v0.28.0/llm-gateway/how-it-works.md#obot-doc-routing-rules-and-fallbacks). |
| **Audit Logs** → **LLM** | Every request with its user, the model it asked for and the provider, model and key that served it, whether a fallback did, its guardrail findings, tokens, duration and content. See [Audit usage and costs](https://docs.obot.ai/v0.28.0/llm-gateway/audit.md). |
| **LLM Gateway** → **Settings** | Queueing behavior and request size limits. |
## Default models
Obot features such as LLM judge guardrails use default model aliases instead of specific models:
| Alias | Used for |
| --------------------------------------------- | ------------------------------------ |
| **Language Model (Chat)** (`llm`) | The primary conversational model |
| **Language Model (Chat - Fast)** (`llm-mini`) | Quick responses and screening passes |
| **Vision** (`vision`) | Image understanding |
| **Image Generation** (`image-generation`) | Image generation tools |
| **Text Embedding** (`text-embedding`) | Embeddings |
Set `llm` and `llm-mini` with **Set Default Models** on the **Providers** tab. Obot fills `vision`, `image-generation` and `text-embedding` itself, and they can't be changed in the UI.
Obot fills an unset alias with a preferred model as soon as a provider serves one:
- `llm` and `vision`: `openai/gpt-5.4`, then `anthropic/claude-sonnet-4-6`
- `llm-mini`: `openai/gpt-5-mini`, then `anthropic/claude-haiku-4-5`
- `image-generation`: `openai/dall-e-3`
- `text-embedding`: `openai/text-embedding-3-large`
Setting a default model does not grant anyone access to it. A [Model Access Policy](https://docs.obot.ai/v0.28.0/functionality/model-access-policies.md#obot-doc-default-model-aliases) that grants the alias gives access to whichever model the alias points to.
### Using model aliases
Clients may also send a default model alias, such as `llm` or `llm-mini`, as the model name in gateway requests. These aliases use the same global targets, and the caller still needs access to the model the alias resolves to.
## Routing rules and fallbacks
A request can be served by a different model from the one the client asked for:
- A **routing rule** (**LLM Gateway** → **Routing**) whose condition matches sends the request to its targets, splitting traffic between them by weight. Rules are checked in priority order, lowest number first, and the first match applies. Rules with equal priority have no guaranteed evaluation order. Assign distinct priority values when precedence matters; the table's display order and a rule's creation time do not break ties. A rule can also list fallbacks.
- A **fallback** is tried when the model before it fails. Fallbacks come from the request's `fallbacks` field or from the routing rule that matched. They aren't tried when the provider rejects the request itself as invalid (such as HTTP 400 for a malformed image or an unknown parameter), since the fallbacks would reject it too: the caller gets the provider's error, and no other provider receives the request. A request that never reached a provider, such as one for a model none of the provider's keys serve, still goes on to its fallbacks.
- A **time to first token timeout** on a routing rule target (in seconds) cuts off a streaming request that gets no first token in time and moves it to the next fallback without retrying. When that target is chosen, the timeout applies to it and to each fallback except the last, which always runs to an answer, so it has no effect without a fallback. Requests that don't stream aren't affected.
Whichever model ends up serving a request:
- **The caller must be allowed to use it.** [Model access policies](https://docs.obot.ai/v0.28.0/functionality/model-access-policies.md) are checked for the requested model, for each fallback in the request before it is sent, and for every model the gateway then tries, including routing rule targets and fallbacks. A fallback in the request that the caller may not use is skipped, and the request's other fallbacks are kept; a fallback that isn't available at all is refused with HTTP 400. An attempt on a model the caller may not use is refused with HTTP 403 and isn't sent to the provider. If the request has a fallback the caller may use, it is tried next. Otherwise the caller gets the 403, for example `user does not have permission to use model "anthropic/claude-opus-4-8"`.
A routing rule therefore can't give anyone a model their access policy doesn't include. To route requests for one model to another, grant the target model to the same users and groups. This also covers rules that match a request header: a client can set any header, but the header can only route it to models it may already use.
- **Its budgets must have room.** Every budget of the caller's profiles that grant the model being tried, and that covers that model, is checked for each attempt (except attempts a user's [Claude subscription](https://docs.obot.ai/v0.28.0/llm-gateway/connect-clients.md#obot-doc-claude-code-with-a-claude-subscription) pays for), so a budget limited to a model applies whenever that model serves a request, however the request reached it. An attempt whose budget is exhausted is refused, and the gateway tries the next fallback, if any. If none can serve the request, the caller gets the budget's 429.
- **Usage is recorded against the model that served it.** Usage reports and budgets record that model, price the request at its rates, and charge the budgets that apply to it. A request that was refused is recorded against the model that was requested, and its audit record names no model as having served it.
The LLM audit log (**Audit Logs** → **LLM**) records both the model each request asked for and the provider, model and provider key that served it, and whether a fallback did.
## Before you begin
To use the gateway you need:
1. **A configured provider.** An administrator must add at least one provider with valid credentials under **LLM Gateway** → **Providers**. See [Configure providers and models](https://docs.obot.ai/v0.28.0/configuration/model-providers.md).
2. **Model access.** An administrator must grant you access to one or more models through a [Model Access Policy](https://docs.obot.ai/v0.28.0/functionality/model-access-policies.md). The [LLM Gateway page](https://docs.obot.ai/v0.28.0/llm-gateway/how-it-works.md#obot-doc-the-models-page) shows exactly what you can call.
3. **The Obot CLI.** Install and set up the `obot` CLI to obtain an API key. See [Obot CLI Setup](https://docs.obot.ai/v0.28.0/reference/cli-api.md).
Then [connect your clients](https://docs.obot.ai/v0.28.0/llm-gateway/connect-clients.md). For failed requests or model access errors, see [Troubleshooting](https://docs.obot.ai/v0.28.0/llm-gateway/troubleshooting.md).
---
Document: Configure providers and models
Version: v0.28.0
Markdown: https://docs.obot.ai/v0.28.0/configuration/model-providers.md
HTML: https://docs.obot.ai/configuration/model-providers
# Configure providers and models
Obot reaches models through its built-in [LLM gateway](https://docs.obot.ai/v0.28.0/llm-gateway/how-it-works.md). Administrators add the upstream providers it serves, and their keys, under **LLM Gateway** → **Providers**. Every provider is available in the default Obot edition without Community registration or an Enterprise license. You still need credentials and access to the upstream model service.
## Adding providers and keys
The gateway serves models from OpenAI, Anthropic, Amazon Bedrock, Google Vertex AI and Gemini, Azure, Mistral, Groq, xAI, DeepSeek, OpenRouter, Cohere, vLLM, Ollama and more. On the **Providers** tab of the **LLM Gateway** page:
- **Add a provider and its keys.** Several keys on one provider are load-balanced by weight, and a key can be limited to specific models.
- **Keep retries on for failover.** A request moves to another of the provider's keys only when it is retried. New providers retry twice, with backoff from 500 ms to 5 s.
- **Tune the connection.** Set base URLs (for self-hosted or proxied endpoints), timeouts, retries with backoff, concurrency and extra headers.
- **Add custom providers.** A custom provider points at any OpenAI-, Anthropic-, Gemini- or Cohere-compatible endpoint.
- **Set the default models.** **Set Default Models** chooses the models behind the aliases Obot's own features use. See [Default models](https://docs.obot.ai/v0.28.0/llm-gateway/how-it-works.md#obot-doc-default-models).
Models from gateway providers are listed on the **LLM Gateway** page under the *LLM Gateway* provider. Adding a provider does not make its models available to every user: grant them with [Profiles](https://docs.obot.ai/v0.28.0/functionality/model-access-policies.md).
## Provider notes
### OpenAI and Anthropic keys at startup
When the server's `OPENAI_API_KEY` or `ANTHROPIC_API_KEY` environment variable is set, Obot configures the gateway's `openai` or `anthropic` provider with that key at startup, as a key named `env-OPENAI_API_KEY` or `env-ANTHROPIC_API_KEY`, and updates the key when the value changes. You can disable, edit or delete it like any other key. See [Server Configuration](https://docs.obot.ai/v0.28.0/configuration/server-configuration.md).
Obot only writes the key when the variable's value is new to it, so a key you delete stays deleted after a restart. That includes deleting the provider, and changing its base URL, which removes its keys. To restore the key, add it again on the provider's page with the same value (any name works), or change the variable's value and restart Obot, which adds the key again as `env-OPENAI_API_KEY` or `env-ANTHROPIC_API_KEY`, and adds the provider too if it's gone.
### Private and local addresses
A provider's base URL, and the server URL or endpoint of its keys (Ollama, vLLM, SGLang, Azure, Databricks), may point at a private network address (`10.0.0.0/8`, `172.16.0.0/12`, `192.168.0.0/16`, `fc00::/7`) or at Obot's own host (`localhost`, `127.0.0.0/8`, `::1`) only when the provider's **Allow private network addresses** setting is on. Host names are resolved, and every address they resolve to is checked. Link-local addresses (`169.254.0.0/16`, `fe80::/10`) and cloud metadata addresses, such as `169.254.169.254` and AWS's `fd00:ec2::254`, are never allowed.
### Changing where keys are sent
Keys are only sent to the address they were entered for:
- **Changing a provider's base URL removes its keys.** The provider page asks you to confirm, and you add the keys again after saving. Through the API, a base URL change is refused while the provider has keys, unless the request adds `?removeKeys=true` to `PUT /api/llm-gateway/admin/providers/{name}`.
- **Changing a key's server URL or endpoint requires entering its secrets again** (its API key or client secret), so a stored secret can't be redirected to another server.
### Amazon Bedrock
Add the **AWS Bedrock** provider with a Bedrock API key or an access key ID and secret access key, and the region.
Anthropic models on Bedrock require you to submit Anthropic's use case details form in your AWS account first. Until you do, requests can fail with `Model use case details have not been submitted for this account`. See the [AWS model access documentation](https://docs.aws.amazon.com/bedrock/latest/userguide/model-access.html). Model availability depends on region; see the [AWS Bedrock Anthropic model cards](https://docs.aws.amazon.com/bedrock/latest/userguide/model-cards-anthropic.html).
### Azure
Add the **Azure OpenAI / AI Foundry** provider with the resource endpoint and either an API key or the tenant ID, client ID and client secret of a Microsoft Entra service principal. Assign the service principal **Cognitive Services User** or **Foundry User** (formerly Azure AI User) on the Foundry resource. **Cognitive Services OpenAI User** can allow OpenAI requests while Anthropic requests fail with `Principal does not have access to API/Operation`. See [Configure keyless authentication with Microsoft Entra ID](https://learn.microsoft.com/en-us/azure/foundry/foundry-models/how-to/configure-entra-id).
A key with neither uses Obot's own managed or workload identity. Its endpoint must then be an Azure OpenAI or AI Services host (`https://.openai.azure.com`, `.cognitiveservices.azure.com` or `.services.ai.azure.com`), and it can't request other scopes.
Certificate checks can't be turned off, and a custom CA can't be added, on Azure, Vertex AI and Bedrock providers, in their network or proxy settings, since they may use Obot's own cloud identity.
### Google Vertex AI
Add the **Google Vertex AI** provider with the project ID, the region and a service account key (JSON). Only service account keys are accepted: other Google credential types, such as external account, impersonated service account or authorized user credentials, are refused. A key without credentials uses Obot's own Google Cloud identity (application default credentials).
### Ollama, vLLM and other self-hosted models
Add the built-in **Ollama** or **vLLM** provider with the server URL; they don't need a key. For other OpenAI-compatible services, such as LiteLLM, add a custom OpenAI-compatible provider with its base URL. A base URL ending in `/v1`, as such servers usually document it, is saved without it, since the gateway adds `/v1` to every path itself. A server on your own network or on Obot's host needs **Allow private network addresses** on the provider; see [Private and local addresses](https://docs.obot.ai/v0.28.0/configuration/model-providers.md#obot-doc-private-and-local-addresses).
Many OpenAI-compatible servers serve only Chat Completions, not the OpenAI Responses API. Leave **Serves the OpenAI Responses API** off for them when adding the custom provider: the gateway then serves Responses API and Anthropic Messages requests (from Codex or Claude Code, for example) to it through Chat Completions. Turn it on only for a server that serves `/v1/responses`. Through the API, the same choice is the provider's `custom_provider_config.allowed_requests`: list the request types the server serves (`list_models`, `chat_completion`, `chat_completion_stream`, `embedding` and so on), leaving out `responses` and `responses_stream`.
When Obot runs in Docker and Ollama runs on the host, start Ollama with `OLLAMA_HOST=0.0.0.0` and use `http://host.docker.internal:11434` as the server URL. On Linux, also start the Obot container with `--add-host=host.docker.internal:host-gateway`.
## Server configuration
The gateway is always on. These settings control it:
| Flag / environment variable | Description |
| ------------------------------------------------------------------------- | ------------------------------------------------------------------------------------------------------------------------------------------------------------------------------------------------------------------------------------------------------------------------------------------------------------------------------------------------------------------------------------------------------------------------------------- |
| `--llm-gateway-data-dir` / `OBOT_SERVER_LLM_GATEWAY_DATA_DIR` | Where the gateway keeps model price and capability files (default `$XDG_DATA_HOME/obot/llm-gateway`). |
| `--llm-gateway-log-level` / `OBOT_SERVER_LLM_GATEWAY_LOG_LEVEL` | Log level for the embedded gateway (default `warn`). |
| `--llm-gateway-model-data-url` / `OBOT_SERVER_LLM_GATEWAY_MODEL_DATA_URL` | Where the gateway refreshes model prices and capabilities from, every 6 hours (default `https://upgrade-server.obot.ai/v1/model-data`). Obot's published images and release binaries include a copy of this data, so the gateway works without reaching this URL; set `off` to use only that copy, for example in air-gapped installs. See [model pricing](https://docs.obot.ai/v0.28.0/llm-gateway/audit.md#obot-doc-model-pricing). |
| `--daily-user-input-token-limit` / `--daily-user-output-token-limit` | Seed the *Daily token limit* budget, with administrators exempt, on every profile that exists when the gateway first starts (the *Default Policy* on a new installation). After that, edit or remove each profile's copy on its page; changing these settings has no effect. |
| `HTTPS_PROXY` / `HTTP_PROXY` / `NO_PROXY` | Obot routes gateway providers through the environment's egress proxy, except endpoints `NO_PROXY` excludes or that are on localhost. Connections through it verify the provider's certificate against the system's trusted CAs. A proxy set on a provider explicitly takes precedence. |
Through the API, the gateway's global proxy (`/api/llm-gateway/admin/proxy-config`) can't turn off certificate checks (`skip_tls_verify`), since that would apply to every provider. To use a proxy that inspects TLS, add its CA to the proxy settings (`proxy_config.ca_cert_pem`) of each provider that uses its own API keys.
## Related topics
- [LLM Gateway overview](https://docs.obot.ai/v0.28.0/llm-gateway/how-it-works.md) — the LLM Gateway page, default models, routing rules and fallbacks
- [Profiles](https://docs.obot.ai/v0.28.0/functionality/model-access-policies.md) — grant users access to specific models
- [Upgrading from model providers](https://docs.obot.ai/v0.28.0/llm-gateway/upgrade.md) — migration availability and guidance for existing installations
---
Document: Connect clients and applications
Version: v0.28.0
Markdown: https://docs.obot.ai/v0.28.0/llm-gateway/connect-clients.md
HTML: https://docs.obot.ai/llm-gateway/connect-clients
# Connect clients and applications
Every client reaches every model through the same gateway base URL, `https:///api/llm-proxy/v1`, and authenticates with an Obot API key. On the **Connect** tab of the [LLM Gateway page](https://docs.obot.ai/v0.28.0/llm-gateway/how-it-works.md#obot-doc-the-models-page), select a client's card to get ready-to-copy configuration for it, filled in with your Obot URL and the model you pick.
## Getting your API key
Your API key for the gateway must include LLM proxy access. Print one with the CLI:
```bash
obot login --url https://obot.example.com --scope llm --print-token
```
> **NOTE**
>
> Add `--no-expiration` if you want a key that doesn't expire.
## Quick start with curl
Use the model names shown on the **LLM Gateway** page. These examples assume you have access to `openai/gpt-5.5` and `anthropic/claude-opus-4-8`.
```bash
export OBOT_API_KEY="$(obot login --url https://obot.example.com --scope llm --print-token)"
# OpenAI Chat Completions, with a fallback
curl https://obot.example.com/api/llm-proxy/v1/chat/completions \
-H "Authorization: Bearer $OBOT_API_KEY" \
-H "content-type: application/json" \
-d '{"model":"openai/gpt-5.5","messages":[{"role":"user","content":"hi"}],"fallbacks":["anthropic/claude-opus-4-8"]}'
# OpenAI Responses
curl https://obot.example.com/api/llm-proxy/v1/responses \
-H "Authorization: Bearer $OBOT_API_KEY" \
-H "content-type: application/json" \
-d '{"model":"openai/gpt-5.5","input":[{"role":"user","content":"hi"}]}'
# Anthropic Messages
curl https://obot.example.com/api/llm-proxy/v1/messages \
-H "Authorization: Bearer $OBOT_API_KEY" \
-H "anthropic-version: 2023-06-01" \
-H "content-type: application/json" \
-d '{"model":"anthropic/claude-opus-4-8","max_tokens":1024,"messages":[{"role":"user","content":"hi"}]}'
# List the models you can use
curl https://obot.example.com/api/llm-proxy/v1/models \
-H "Authorization: Bearer $OBOT_API_KEY"
```
Any format works with any model. For example, send a Bedrock or Azure model to `/v1/messages` or `/v1/chat/completions` by its gateway name, such as `bedrock/anthropic.claude-sonnet-4-5-20250929-v1:0`.
## Using with Claude Code
Claude Code can route through the gateway and discover which models you have access to.
```bash
# 1. Point Claude Code at the gateway and authenticate with your Obot API key.
export ANTHROPIC_BASE_URL="https://obot.example.com/api/llm-proxy"
export ANTHROPIC_AUTH_TOKEN="$(obot login --url https://obot.example.com --scope llm --print-token)"
# 2. (Optional) Pick a model. Any gateway model works, including non-Anthropic ones.
export ANTHROPIC_MODEL="anthropic/claude-sonnet-4-5"
# 3. (Optional) Discover the Claude models you have access to at startup.
# Claude Code queries the gateway's /v1/models endpoint in Anthropic's format,
# which lists the Claude models you can use, from any provider, by their model IDs,
# and adds the results to the /model picker.
# Requires Claude Code v2.1.129 or later.
export CLAUDE_CODE_ENABLE_GATEWAY_MODEL_DISCOVERY=1
# 4. Launch Claude Code.
claude
```
Inside Claude Code:
- Run **`/model`** and select an Obot gateway model. Discovered models are labeled **"From gateway"**.
- Run **`/status`** to confirm which authentication method is active.
Claude Code reaches every gateway model, including Bedrock and Azure models, through the same base URL, but its `/model` picker lists only Claude models. Pass other models by name, for example `claude --model openai/gpt-5.5`. You don't need Claude Code's Bedrock or Foundry modes.
### Claude Code with a Claude subscription
When an administrator turns on **Allow Claude subscriptions** on the Anthropic provider's page (**LLM Gateway** → **Providers** → **Anthropic**), users signed in to Claude Code with a Claude Pro, Max, Team or Enterprise subscription can use it through the gateway. Removing the Anthropic provider turns this off. Their requests to Claude models are billed to their subscription instead of a provider key configured in Obot. Obot still authenticates the user, enforces model access and guardrails, and records the requests in the audit log and usage reports, with their token counts but no spend, since Obot didn't pay for them.
The user keeps their Claude Code login and sends their Obot API key in the `X-Obot-Api-Key` header:
```bash
export ANTHROPIC_BASE_URL="https://obot.example.com/api/llm-proxy"
export ANTHROPIC_CUSTOM_HEADERS="X-Obot-Api-Key: $(obot login --url https://obot.example.com --scope llm --print-token)"
# Don't set ANTHROPIC_API_KEY or ANTHROPIC_AUTH_TOKEN; they replace the subscription login.
# Pick the model by name: see below.
export ANTHROPIC_MODEL="anthropic/claude-sonnet-4-5"
claude
```
The Connect tab's setup for this mode turns on gateway model discovery, but it hasn't been confirmed that Claude Code uses discovery with a subscription login. To be sure of the model, set `ANTHROPIC_MODEL` or pass `claude --model`.
The gateway needs the **Anthropic** provider, but it doesn't need a key. Claude Code's model names only resolve once the gateway lists the models: with an enabled key, it lists them through that key; with no keys, or only disabled ones, it lists Anthropic's current models from its model catalog, both on the **LLM Gateway** page, where profiles grant them, and in `/v1/models`, where clients discover them. Requests sent with an Obot API key instead of a subscription still need an enabled key.
Only requests from Claude Code to Anthropic models use the subscription, and the subscription token is only ever sent to Anthropic:
- It's only forwarded while the Anthropic provider sends requests straight to `https://api.anthropic.com`, with certificate checks on. If an administrator changes the provider's base URL or TLS settings, including a CA in its proxy settings, the token isn't forwarded and requests use Obot's key instead. While Claude subscriptions are allowed, a CA can't be added to the Anthropic provider's proxy settings. The environment's egress proxy (`HTTPS_PROXY`) doesn't stop the token being forwarded, since connections through it still verify Anthropic's certificate.
- A routing rule or fallback can't send a subscription request to another provider, including a custom provider built on Anthropic's API. That attempt is refused with HTTP 403.
- Requests the user sends to other models use Obot's configured keys.
Budgets don't apply to requests the subscription pays for: they aren't refused when a budget is exhausted, and they don't count toward any budget. Budgets still apply to everything else the user sends.
See the Claude Code documentation for details:
- [LLM gateway configuration](https://code.claude.com/docs/en/llm-gateway)
- [Model configuration](https://code.claude.com/docs/en/model-config) (the `/model` picker and gateway discovery)
- [Authentication](https://code.claude.com/docs/en/authentication) (`/login` and `/logout`)
- [Environment variables](https://code.claude.com/docs/en/env-vars)
## Using with Codex
Codex uses the OpenAI Responses API, which the gateway serves for every model. Define a custom model provider in your Codex config.
1. Add the following to `~/.codex/config.toml`:
```toml
model = "openai/gpt-5.5"
model_provider = "obot"
[model_providers.obot]
name = "Obot LLM Gateway"
base_url = "https://obot.example.com/api/llm-proxy/v1"
env_key = "OBOT_API_KEY"
wire_api = "responses"
```
For a local deployment, use `base_url = "http://localhost:8080/api/llm-proxy/v1"`.
2. Set your API key and start Codex:
```bash
export OBOT_API_KEY="$(obot login --url https://obot.example.com --scope llm --print-token)"
codex # Codex CLI
# or
codex app # Codex App
```
Set `model` to a model name shown on the **LLM Gateway** page.
> **NOTE**
>
> The provider ID (`obot` above) can be any name except the reserved IDs `openai`, `ollama`, and `lmstudio`. Codex's built-in web search is an OpenAI server-side tool. When you use a model that OpenAI doesn't serve, such as a Bedrock or Azure model, add `web_search = "disabled"` to the config.
See the Codex documentation for details:
- [Configuration reference](https://developers.openai.com/codex/config-reference) (the `[model_providers]` keys)
- [Advanced configuration](https://developers.openai.com/codex/config-advanced) (custom providers and `wire_api`)
## Using the OpenAI and Anthropic SDKs
The OpenAI and Anthropic SDKs read their base URL and key from the environment. Point them at the gateway and use your Obot API key. Either SDK can call any gateway model.
```bash
# OpenAI SDK
export OPENAI_BASE_URL="https://obot.example.com/api/llm-proxy/v1"
export OPENAI_API_KEY="$(obot login --url https://obot.example.com --scope llm --print-token)"
# Anthropic SDK
export ANTHROPIC_BASE_URL="https://obot.example.com/api/llm-proxy"
export ANTHROPIC_AUTH_TOKEN="$(obot login --url https://obot.example.com --scope llm --print-token)"
```
For example, with the Python SDKs:
```python
from openai import OpenAI
client = OpenAI()
r = client.chat.completions.create(model="openai/gpt-5.5", messages=[{"role": "user", "content": "hello"}])
print(r.choices[0].message.content)
```
```python
import anthropic
client = anthropic.Anthropic()
m = client.messages.create(model="anthropic/claude-opus-4-8", max_tokens=512, messages=[{"role": "user", "content": "hello"}])
# Reasoning models answer with thinking blocks before the text
print(next(b.text for b in m.content if b.type == "text"))
```
## Using with agent frameworks
Agent frameworks reach the gateway through its OpenAI-compatible endpoint, so they can call any gateway model. Replace `openai/gpt-5.5` with a model name shown on the **LLM Gateway** page.
### Google Agent Development Kit (ADK)
ADK reaches OpenAI-compatible endpoints through its LiteLLM model wrapper. Install ADK and LiteLLM, and create an agent package:
```bash
pip install google-adk litellm
mkdir -p obot_agent && echo "from . import agent" > obot_agent/__init__.py
```
Define the agent in `obot_agent/agent.py`:
```python
import os
from google.adk.agents import Agent
from google.adk.models.lite_llm import LiteLlm
root_agent = Agent(
name="assistant",
# LiteLLM's openai/ prefix, then the gateway model name
model=LiteLlm(
model="openai/openai/gpt-5.5",
api_base="https://obot.example.com/api/llm-proxy/v1",
api_key=os.environ["OBOT_API_KEY"],
),
instruction="You are a helpful assistant.",
)
```
LiteLLM removes only the first `openai/` and sends the rest, such as `anthropic/claude-opus-4-8`, to the gateway as the model name. Set your API key and run the agent:
```bash
export OBOT_API_KEY="$(obot login --url https://obot.example.com --scope llm --print-token)"
adk run obot_agent
```
See [ADK's LiteLLM models](https://adk.dev/agents/models/litellm/) and [LiteLLM's OpenAI-compatible endpoints](https://docs.litellm.ai/docs/providers/openai_compatible).
### Vercel AI SDK
Use the AI SDK's OpenAI-compatible provider, which calls the gateway's Chat Completions endpoint:
```bash
npm install ai @ai-sdk/openai-compatible
```
Save the following as `index.mts`:
```ts
import { createOpenAICompatible } from '@ai-sdk/openai-compatible';
import { generateText } from 'ai';
const obot = createOpenAICompatible({
name: 'obot',
baseURL: 'https://obot.example.com/api/llm-proxy/v1',
apiKey: process.env.OBOT_API_KEY,
});
const { text } = await generateText({
model: obot('openai/gpt-5.5'),
prompt: 'hello',
});
console.log(text);
```
Set your API key and run it:
```bash
export OBOT_API_KEY="$(obot login --url https://obot.example.com --scope llm --print-token)"
npx tsx index.mts
```
See [the AI SDK's OpenAI-compatible providers](https://ai-sdk.dev/providers/openai-compatible-providers).
## Using with open-source agents
These agents use the gateway's OpenAI-compatible endpoint, so they can call any gateway model. Replace `openai/gpt-5.5` with a model name shown on the **LLM Gateway** page.
### OpenCode
Add a custom provider to `~/.config/opencode/opencode.json` (or `opencode.json` in your project):
```json
{
"$schema": "https://opencode.ai/config.json",
"model": "obot/openai/gpt-5.5",
"provider": {
"obot": {
"npm": "@ai-sdk/openai-compatible",
"name": "Obot LLM Gateway",
"options": {
"baseURL": "https://obot.example.com/api/llm-proxy/v1",
"apiKey": "{env:OBOT_API_KEY}"
},
"models": {
"openai/gpt-5.5": {
"name": "openai/gpt-5.5"
}
}
}
}
}
```
Then set your API key and start OpenCode:
```bash
export OBOT_API_KEY="$(obot login --url https://obot.example.com --scope llm --print-token)"
opencode
```
Add an entry under `models` for each gateway model you want in OpenCode's model list. See [OpenCode providers](https://opencode.ai/docs/providers/) and [OpenCode config](https://opencode.ai/docs/config/).
### Goose
Goose's OpenAI provider takes the host and the request path separately:
```bash
export GOOSE_PROVIDER="openai"
export GOOSE_MODEL="openai/gpt-5.5"
export OPENAI_HOST="https://obot.example.com"
export OPENAI_BASE_PATH="api/llm-proxy/v1/chat/completions"
export OPENAI_API_KEY="$(obot login --url https://obot.example.com --scope llm --print-token)"
goose session
```
See [Goose providers](https://goose-docs.ai/docs/getting-started/providers).
### Cline
1. In Cline's settings (the gear icon), set **API Provider** to **OpenAI Compatible**.
2. Set **Base URL** to `https://obot.example.com/api/llm-proxy/v1`.
3. Set **API Key** to the key printed by `obot login --url https://obot.example.com --scope llm --print-token`.
4. Set **Model ID** to a gateway model name, such as `openai/gpt-5.5`.
See [Cline's OpenAI Compatible provider](https://docs.cline.bot/provider-config/openai-compatible).
### Open WebUI
1. As an Open WebUI admin, open **Settings** > **Admin** > **Connections** and, under **Manage OpenAI API Connections**, select **Add Connection**.
2. Set **URL** to `https://obot.example.com/api/llm-proxy/v1`.
3. Set **API Key** to the key printed by `obot login --url https://obot.example.com --scope llm --print-token`.
4. Save, then choose a gateway model from the model menu in a new chat.
Or, for a new Open WebUI install, set the connection when starting it with Docker:
```bash
docker run -d -p 3000:8080 \
-e OPENAI_API_BASE_URL="https://obot.example.com/api/llm-proxy/v1" \
-e OPENAI_API_KEY="$(obot login --url https://obot.example.com --scope llm --print-token)" \
-v open-webui:/app/backend/data --name open-webui --restart always \
ghcr.io/open-webui/open-webui:main
```
For an Obot on the same machine, such as `http://localhost:8080`, use `http://host.docker.internal:8080/api/llm-proxy/v1` instead, and on Linux add `--add-host=host.docker.internal:host-gateway`: inside the container, `localhost` is Open WebUI itself. The Connect tab does this for you, in both the steps and the Docker command, when Obot's URL is `localhost`. If Open WebUI runs on the same machine without Docker, keep the `localhost` URL.
Every Open WebUI user's requests go through the gateway with this one key, so Obot attributes them to the key's owner. See [Open WebUI's OpenAI-compatible setup](https://docs.openwebui.com/getting-started/quick-start/connect-a-provider/starting-with-openai-compatible/).
> **NOTE**
>
> Cline and Open WebUI store the key you give them. Add `--no-expiration` to `obot login` if you want a key that doesn't expire.
For supported endpoints and known limits, see [API compatibility](https://docs.obot.ai/v0.28.0/llm-gateway/compatibility.md). If a request fails, see [Troubleshooting](https://docs.obot.ai/v0.28.0/llm-gateway/troubleshooting.md).
---
Document: Profiles: model access, budgets and guardrails
Version: v0.28.0
Markdown: https://docs.obot.ai/v0.28.0/functionality/model-access-policies.md
HTML: https://docs.obot.ai/functionality/model-access-policies
# Profiles: model access, budgets and guardrails
## Overview
Profiles decide who gets what from the LLM Gateway. A profile names users and groups, and gives them:
- **Models** they can use through the LLM Gateway.
- **Budgets** that cap their spend, tokens or requests.
- **Applied guardrails** that check their model requests and responses. See [Guardrails](https://docs.obot.ai/v0.28.0/functionality/guardrails.md).
Administrators create profiles for organizational needs—whether that means giving everyone standard models and a monthly budget, restricting powerful models to specific teams, or checking one team's traffic for regulated data. Profiles were called model access policies, and the API still uses that name (`/api/model-access-policies`).
For external clients, the gateway's model list and requests are limited by these grants. A provider being configured does not make its models available to every user. See [Connect clients and applications](https://docs.obot.ai/v0.28.0/llm-gateway/connect-clients.md) for how clients connect and list their models.
## How Profiles Work
Each profile defines:
- **Who** it applies to (subjects)
- **Which** models they can use. A profile can grant no models, to only apply guardrails. Its budgets then never apply, since a budget covers only its own profile's models.
- Its **budgets** and **applied guardrails**
Profiles add up. A user in several profiles can use the models of each, and the applied guardrails of each check their traffic. A budget covers only its own profile's models: a request is limited by the budgets of the user's profiles that grant the model that serves it (all of a profile's models, or the specific models a budget names). Every one of those budgets must have room, so when several profiles' budgets cover the same model, the tightest one limits it. One profile can't lift another's limits. Routing rules and fallbacks can serve a request with a model other than the one requested, so budgets are checked for each model the gateway tries, and the request is charged to the model that serves it. Requests paid for by the user's own Claude subscription don't count against budgets.
For example, if *Everyone* grants model A with a $10 monthly budget and *Power users* grants models A and B with a $100 monthly budget, a power user's requests for A must fit both budgets, and their requests for B only the *Power users* budget.
The LLM Gateway page and gateway model discovery show only models granted to the user through one or more profiles. If no profile grants access to a model, the user cannot call it through the LLM Gateway.
### Subjects
A profile can grant access to:
- **Individual users** — Select specific people by name
- **Groups** — Select authentication provider groups (such as "engineering" or "marketing")
- **Everyone** — Use the "All Obot Users" option to grant access to all authenticated users
Using "All Obot Users" is convenient for making certain models universally available while using separate profiles to grant additional models to specific teams.
### Models
When adding models to a profile, you can select:
- **Specific models** — Individual models from your configured providers
- **Default model aliases** — References to whichever model is currently set as the default for a given purpose (see [Default Model Aliases](https://docs.obot.ai/v0.28.0/functionality/model-access-policies.md#obot-doc-default-model-aliases))
- **Wildcard suffix patterns** — Grants access to every model whose ID starts with a given prefix (see [Wildcard Suffix Patterns](https://docs.obot.ai/v0.28.0/functionality/model-access-policies.md#obot-doc-wildcard-suffix-patterns))
- **All models** — Grants access to every available model
> **INFO**
>
> Administrators Need a Profile
>
> Administrators do not have automatic access to all models. Like any other user, an administrator must be included in a profile to use a model through the LLM Gateway.
#### Wildcard Suffix Patterns
To grant access to a family of models—including versions that don't exist yet—end your entry with a single `*`. For example, `anthropic/claude-haiku-4-5*` grants access to every model whose name starts with `anthropic/claude-haiku-4-5`, such as date-suffixed releases like `anthropic/claude-haiku-4-5-20251001`.
To add a pattern, start typing a prefix into the search box of the **Add Models** dialog. A pattern entry (your prefix followed by `*`) is offered at the top of the results, along with a live count of the models it currently matches. You can also type the pattern out explicitly, ending with `*`.
Patterns follow these rules:
- The `*` is only allowed at the end of the entry, and the prefix cannot be empty or begin/end with whitespace (a bare `*` is the existing "All models" option)
- Matching is case-sensitive and applies to the model name, which starts with the provider (`provider/model`)
- To match a model family on several providers, add one pattern per provider
- Patterns automatically cover future models: when a provider adds a new model whose ID starts with the prefix, users gain access without any profile changes
- Patterns can be combined with specific models and default model aliases in the same profile
## Model Availability
Only models configured with the **Language Model (Chat)** usage type appear when creating profiles. Models configured for other purposes—such as text embedding, image generation, or vision—do not appear as options.
To change which models are available or to add providers, use **LLM Gateway > Providers**. See [Configure providers and models](https://docs.obot.ai/v0.28.0/configuration/model-providers.md).
## Default Model Aliases
Default aliases are **global to the Obot installation**. A profile can grant access through an alias, but cannot choose or override the model that alias points to.
| Policy selection | Alias | Purpose |
| ---------------------------- | ---------- | --------------------------------------- |
| Language Model (Chat) | `llm` | Primary default language model |
| Language Model (Chat - Fast) | `llm-mini` | Default for faster language-model tasks |
Administrators change the targets with **Set Default Models** on the **Providers** tab of the **LLM Gateway** page; see [Default models](https://docs.obot.ai/v0.28.0/llm-gateway/how-it-works.md#obot-doc-default-models). Selecting an alias in a profile grants its subjects access to whichever model that global alias currently resolves to.
For example, if a profile grants `llm` and an administrator changes `llm` from model A to model B, the profile's users gain access to B. That alias no longer grants A; users retain access to A only if another matching grant allows it. To keep a team's access tied to a particular model, select that specific model in the profile.
Clients may also use `llm` and `llm-mini` in LLM Gateway requests. These request aliases use the same global targets and still require access to the resolved model. See [Using model aliases](https://docs.obot.ai/v0.28.0/llm-gateway/how-it-works.md#obot-doc-using-model-aliases).
## Fresh Installations
When Obot starts for the first time, a **Default Policy** profile is automatically created. This profile:
- Grants access to **All Obot Users**
- Includes all default model aliases
- Has a *Daily token limit* budget: per user, 10,000,000 input and 100,000 output tokens per day. Administrators are exempt, and a user's personal daily token limits replace the budget's for that user.
This ensures that once you add a provider under **LLM Gateway > Providers**, users covered by the profile can access the default models. You can modify or delete this profile to restrict access as needed.
The *Daily token limit* budget's limits come from `OBOT_SERVER_DAILY_USER_INPUT_TOKEN_LIMIT` and `OBOT_SERVER_DAILY_USER_OUTPUT_TOKEN_LIMIT`. See [Server configuration](https://docs.obot.ai/v0.28.0/configuration/server-configuration.md).
## Upgrades and Migration
When upgrading from a version that used model providers, policies that named a model provider's model are re-pointed to the LLM gateway model for the same upstream model. See [Upgrading from model providers](https://docs.obot.ai/v0.28.0/llm-gateway/upgrade.md). Wildcard patterns written for earlier versions matched provider-native IDs, such as `claude-haiku-4-5*`. They're replaced with the provider-qualified form, such as `anthropic/claude-haiku-4-5*`, for each provider whose models they matched. A pattern that matched no model is left as it was; add the provider to it yourself.
## Managing Profiles
To manage profiles, go to **LLM Gateway > Profiles**.
The **Profiles** tab shows each profile as a card with its users and groups and how many models, budgets and applied guardrails it has. Click a card to open the profile.
A profile is edited in one form, with a section for each part: **Name**, **Users & Groups**, **Models**, **Budgets** and **Applied Guardrails**. Budgets and applied guardrails are added and changed in a dialog. Nothing is saved until you click **Save**, which saves the profile and then each of its budgets and applied guardrails. If one of them can't be saved, the form says which and why, keeps it, and stays on the profile; fix it and save again.
### Creating a Profile
1. Click **Add Profile**
2. Enter a descriptive name
3. Add subjects (users, groups, or All Obot Users)
4. Select which models to include, if any
5. Optionally, click **Add Budget** to add budgets and **Add Guardrail** to apply guardrails
6. Click **Save**
A budget can cover all of the profile's models or only the ones you select from the models the form grants at that moment. If you later remove a model from the profile, budgets limited to it drop it; a budget left with none of its models must be edited before the profile can be saved.
### Editing a Profile
Click any profile in the list to change its name, subjects or models, and to add, change or remove its budgets and applied guardrails. Click a budget or applied guardrail to edit it, or its remove button to remove it. Changes take effect when you save.
### Deleting a Profile
Deleting a profile deletes its budgets and applied guardrails, and removes the models it grants from its users. If a user loses access to all models as a result, they will no longer be able to make model requests through the LLM Gateway until another profile grants them access.
## Related Topics
- [Configure providers and models](https://docs.obot.ai/v0.28.0/configuration/model-providers.md) — Add providers and set default models
- [MCP Access Policies](https://docs.obot.ai/v0.28.0/mcp-gateway/access.md) — Similar access control for MCP servers
- [User Roles](https://docs.obot.ai/v0.28.0/security/policy-coverage.md) — Understanding administrator and user permissions
---
Document: Guardrails
Version: v0.28.0
Markdown: https://docs.obot.ai/v0.28.0/functionality/guardrails.md
HTML: https://docs.obot.ai/functionality/guardrails
# Guardrails
## Overview
Guardrails check content flowing through Obot and act on what they find. They apply to:
- **LLM gateway traffic**: requests to models (input) and model responses (output), including streamed responses and tool calls the model makes. Guardrails applied in [profiles](https://docs.obot.ai/v0.28.0/functionality/model-access-policies.md) check this traffic.
- **MCP traffic**: tool calls and their results, resource contents and prompts, for servers reached through Obot's MCP gateway. [Guardrail filters](https://docs.obot.ai/v0.28.0/functionality/filters.md#obot-doc-guardrail-filters), configured under **MCP Servers > Filters**, check this traffic.
A guardrail can **block** the request or response, **redact** the offending text and let the rest through, or only **log** what it found.
Guardrails are made of:
- **Guardrails** each configure one check, such as secrets detection, a PII service or an LLM judge policy, with its settings and credentials. Guardrail policies and MCP guardrail filters share them.
- **Applied guardrails** (guardrail policies in the API) decide which LLM gateway traffic is checked, by which guardrails, for whom, and what happens when a guardrail finds something. Each belongs to a profile.
- **Guardrail filters** do the same for MCP traffic. They are MCP filters, so they use the same server targeting and selectors as other filters and run in the same filter chain. See [Guardrail filters](https://docs.obot.ai/v0.28.0/functionality/filters.md#obot-doc-guardrail-filters).
Where to find them:
| What | Where |
| ------------------------------------ | ----------------------------------------------------------------------------------------------------------------------------------------------------------------------------------------------------------------------------------------------------------------------------------------------- |
| Guardrails | The **Guardrails** tab of **AI Resources > LLM Gateway**. Guardrails are shared, so a change applies to model and MCP traffic alike. Its **Used by** column shows the applied guardrails that use each guardrail, each with the profile it's applied in, and the guardrail filters that use it. |
| Applied guardrails for model traffic | **AI Resources > LLM Gateway > Profiles**, in each profile's **Applied Guardrails** section |
| Guardrail filters for MCP traffic | **AI Resources > MCP Servers > Filters** |
| What guardrails did | **Operations > Audit Logs**: the LLM audit log for model traffic, and the MCP audit log for guardrail filters |
## Guardrail types
When you add a guardrail, its types are grouped as **Built-in** checks that Obot runs itself and **3rd Party Integrations** with external services. You can add more than one guardrail of a type, for example with different settings; a 3rd party integration that's already configured is marked **Configured**.
| Type | What it detects | Can redact |
| -------------------------------- | ----------------------------------------------------------------------------------------------------------------------------------------------------------------------------------------------------------------------------------------------------------------------------------------------------------------------------------------------------------------------------------------------------------------------------------------------------------------------------------------------------------------------------------------------------------------------- | ---------------------------- |
| **Secrets Detection** (built-in) | API keys and tokens for AWS, GitHub, GitLab, Slack, Stripe, Google, OpenAI, Anthropic, Azure, Twilio, SendGrid, npm, Hugging Face and Obot; private keys, JWTs, database URLs; optionally generic secrets: high-entropy values assigned to names like `api_key`, `access_key`, `client_secret`, `token` or `password`, including prefixed names such as `AWS_SECRET_ACCESS_KEY`. camelCase names such as `clientSecret` and subscripts such as `env["API_KEY"]` count only when assigned a quoted value, so code that assigns another variable or a call isn't flagged. | Yes |
| **Custom Regex** (built-in) | Your RE2 patterns, plus ready-made patterns for email addresses, phone numbers (North American, and international numbers written with their `+` country code, but not a `+` before a date), US SSNs, credit cards (checksum-verified), IPv4 and IPv6 addresses (dotted runs of more than four numbers, such as versions, and IPv6-looking names without a digit, such as `dead::beef`, aren't matched), and IBANs, with or without spaces (checksum-verified). | Yes |
| **LLM Judge Policy** (built-in) | Anything you can describe in plain language, e.g. "Do not help book travel above economy class". On model traffic it judges the latest user message (input) and the model's tool calls (output), not the model's text replies. Screened by the `Chat - Fast` default model, with a second review by the `Chat` default model before blocking. This is what [message policies](https://docs.obot.ai/v0.28.0/functionality/ai-judge-policies.md) became. | No |
| **Microsoft Presidio** | Personal data, using your self-hosted Presidio Analyzer. By default: email addresses, phone numbers, credit cards, US SSNs, ITINs, passports, driver's licenses and bank numbers, IBANs and IP addresses. | Yes |
| **Azure AI Language PII** | Personal and health data. | Yes |
| **Azure AI Content Safety** | Hate, sexual, violence and self-harm content above a severity threshold; optionally prompt injection with Prompt Shields. | No |
| **AWS Bedrock Guardrails** | Whatever the Bedrock guardrail is configured for: denied topics, content and word filters, sensitive information and contextual grounding. | Anonymized content |
| **Google Cloud Model Armor** | Responsible AI filters, prompt injection and jailbreaks, malicious URLs, CSAM and Sensitive Data Protection, per the Model Armor template. | Sensitive data |
| **Lakera Guard (Check Point)** | Prompt attacks, PII, content violations, unknown links and custom detectors. With a **Project ID**, that project's policy decides what is flagged. Without one, Lakera's default policy screens the content and only results at or above **Minimum confidence** (by default `l2_very_likely`) count, since the default policy also flags some ordinary prompts. | PII, profanity, custom regex |
| **Patronus AI** | Results of Patronus evaluators, such as toxicity and PII detectors or LLM judges with your criteria. | No |
| **CrowdStrike Falcon AIDR** | Malicious prompts, PII, secrets, malicious entities, topics and more, per the collector's policy. | Content AI Guard redacts |
Credentials such as API keys are stored encrypted and are never shown again after they are saved. Leave a credential blank when editing a guardrail to keep the current value. Changing where a guardrail's credentials are sent (its endpoint, base URL, region, analyzer URL or location) requires entering them again, so stored credentials can't be redirected to another server. A guardrail service may be on a private network, such as a self-hosted Presidio at `http://presidio-analyzer:3000`, but not on Obot's own host (`localhost`, `127.0.0.0/8`, `::1`), a link-local address (`169.254.0.0/16`, `fe80::/10`) or a cloud metadata address such as `169.254.169.254` or AWS's `fd00:ec2::254`. Host names are checked when a guardrail is saved and again on every connection. This differs from remote MCP servers, whose URLs may not resolve to private addresses unless an administrator sets `OBOT_SERVER_DISALLOW_PRIVATE_IPMCP=false` (see [Remote server](https://docs.obot.ai/v0.28.0/mcp-gateway/register-remote.md)): remote MCP servers can be added by users with the Power User role, while guardrails are configured only by administrators and their services often run next to Obot. A Google Cloud Model Armor guardrail without a service account key uses Obot's own application default credentials, so it only sends requests to Model Armor's own endpoints (`modelarmor.googleapis.com`, regional `modelarmor..rep.googleapis.com`, or a Private Service Connect `*.p.googleapis.com` endpoint); any other endpoint requires a service account key.
For a Presidio guardrail, **Load all types from the service** lists every entity type your Analyzer supports, including its custom recognizers. Types such as `PERSON`, `LOCATION`, `DATE_TIME` and `URL` aren't checked by default, because they match ordinary text, like the names of public figures, cities, "Friday" and links.
Use **Test** on a saved guardrail to run it against sample text and see what it finds and how the text would be redacted.
A guardrail can't be deleted while an applied guardrail or a guardrail filter uses it.
## Applied guardrails
Guardrails are applied to LLM gateway traffic in [profiles](https://docs.obot.ai/v0.28.0/functionality/model-access-policies.md): open a profile and click **Add Guardrail** in its **Applied Guardrails** section, or click one to change it. Applied guardrails are saved with the profile. The API calls them guardrail policies. They apply to LLM gateway traffic only. To check MCP traffic, create a [guardrail filter](https://docs.obot.ai/v0.28.0/functionality/filters.md#obot-doc-guardrail-filters). Each applied guardrail has:
- **Apply to**: input, output or both.
- **Guardrails**: one or more guardrails to run.
- **Action**:
- **Block** rejects the request, or ends the response, with a message naming the policy and what was found. You can replace that message with your own.
- **Redact** replaces what was found with a label such as `[REDACTED:EMAIL]` and lets the rest through. Some guardrails can only tell that content is a problem, not where it is. A redacting policy blocks when one of those finds something.
- **Log** records the finding in the request's LLM audit log entry and lets the request through unchanged.
- **Profile**: the profile it's applied in. It applies to that profile's users and groups. The applied guardrails of every profile a user is in apply to them.
- **Condition** (optional): a [CEL](https://github.com/google/cel-spec) expression that must be true for the policy to apply.
- It can use `model` (for example `"openai/gpt-4.1"`), `provider`, `params` (currently only `params.max_tokens`, when the request sets it; test with `"max_tokens" in params`), `headers`, `user.id` and `user.groups`.
- `user.groups` holds the IDs of the user's auth provider groups, the same IDs that group subjects use. It doesn't hold group names or Obot roles.
- For example: `model.startsWith("openai/") && !("" in user.groups)`.
- Reading a header that isn't there is an error, so test for it first: `"x-team" in headers && headers["x-team"] == "sales"`. A condition that fails to evaluate is logged by the Obot server (at most once a minute per policy); the policy is then skipped, or blocks the request if it fails closed.
- **Sampling rate**: the percentage of matching traffic to check, for expensive guardrails.
- **Input scope**: whether input checks look at the whole conversation or only what was added since the model last replied. Redacting policies always check the whole conversation, so nothing unredacted is sent.
- **Fail closed**: whether to block when a guardrail or the policy's condition can't be evaluated, for example because an external service or the LLM judge's model is down. By default the policy is skipped, and a guardrail's error is recorded on the request's LLM audit log entry.
Guardrail policies run in the order they were created. A block stops evaluation. Each redaction is applied before the next policy runs.
## How checks are applied
### LLM gateway
Input policies run before anything else sees the request, so the provider never sees content before it is redacted. Output policies run after the response arrives and before it is returned. Token counting requests (`/v1/messages/count_tokens`, `/v1/responses/input_tokens`) carry the whole prompt to the provider and are checked as input. Obot's own [LLM audit log](https://docs.obot.ai/v0.28.0/llm-gateway/audit.md) records requests as clients sent them, before redaction.
Checks cover message text, tool calls and tool results, and also reasoning (thinking) and refusal text. Redacting signed reasoning, such as Anthropic extended thinking, invalidates its signature, so the provider may reject a later request that sends that reasoning back.
Some clients, notably Claude Code, normally have their requests forwarded to Anthropic as sent. When any guardrail applies to a request, Obot instead sends the request it checked, and returns the response it checked, so nothing bypasses the guardrail policies.
For **streamed responses**, Obot holds the stream while a policy that can block or redact applies. It checks the complete response, then delivers it at once: redacted if needed, or replaced by an error if blocked. A secret split across stream chunks is still found. Log-only policies don't hold the stream unless they fail closed. If a stream can't be held, a finding that would block or redact ends the stream and is recorded as an error, since the content has already been delivered.
A blocked request gets HTTP 400 with the block message. In the OpenAI Chat Completions and Responses formats the error's type is `guardrail_intervention`. In the Anthropic Messages format it is `invalid_request_error`, since Anthropic clients such as Claude Code only expect Anthropic's own error types.
### MCP gateway
MCP traffic is checked by [guardrail filters](https://docs.obot.ai/v0.28.0/functionality/filters.md#obot-doc-guardrail-filters), which run in-process in the MCP gateway's filter chain, in order with any other filters. See that page for what is checked and how outcomes are audited.
## Where outcomes are recorded
What guardrail policies did to a request is recorded on its [LLM audit log](https://docs.obot.ai/v0.28.0/llm-gateway/audit.md#obot-doc-audit-logs-and-usage-whats-logged-1) entry: each policy that found something or failed, its guardrail, the stage, the outcome (blocked, redacted, logged or error), the categories found, and, for an error, why the guardrail couldn't be evaluated. It never includes the offending content.
What guardrail filters did to MCP traffic is recorded in the MCP audit log, as described under [Guardrail filters](https://docs.obot.ai/v0.28.0/functionality/filters.md#obot-doc-guardrail-filters).
## Message policies
Message policies are now LLM Judge guardrails. When Obot starts, each existing message policy is converted once into an LLM Judge guardrail and a blocking guardrail policy. The policy belongs to the profile for everyone if the policy applied to everyone, or to a new profile, named ` (message policy)`, with the policy's users and groups. A policy that applied to no one gets a profile with no users or groups, so its guardrail policy applies to no one. Add users or groups to that profile before you enable the policy, since a profile can't be saved without them.
- Policies on **user messages** become input policies.
- Policies on **tool calls** become output policies.
- Policies on **both** become policies for input and output.
The guardrail policies start disabled. To enable one, open its profile, click the applied guardrail, turn on **Enabled** at the top of the dialog, click **Apply**, then **Save** the profile. They fail closed, as message policies did: when the judge's model is unavailable, the request is blocked.
The original policies are kept but no longer enforced. The message policy API was removed.
## API
Administrators can manage guardrails and guardrail policies with these endpoints, under `/api/llm-gateway`:
| Endpoint | Purpose |
| ---------------------------------------------------------------------------- | ------------------------------------------------------------------------------------------------------------------------------------------------------------------------------------------------------------------------ |
| `GET, POST /guardrails`, `GET, PUT, DELETE /guardrails/{id}` | Guardrails (credentials are write-only) |
| `POST /guardrails/{id}/test` | Run a guardrail against sample text |
| `GET /guardrails/providers` | Guardrail types and their settings |
| `POST /guardrails/providers/{type}/fields/{field}/options` | List a guardrail field's choices from the service its settings point at, such as the entity types a Presidio Analyzer supports. Send the guardrail's `config`, and `guardrailID` to use a saved guardrail's credentials. |
| `POST /guardrails/validate-condition` | Check a CEL condition |
| `GET, POST /guardrail-policies`, `GET, PUT, DELETE /guardrail-policies/{id}` | Guardrail policies (`target` must be `llm`, `profileID` names the profile and `guardrailIDs` the guardrails). `enabled` defaults to false, so set `"enabled": true`. `?profileID=` lists one profile's. |
Guardrail filters are managed with the filter API, `/api/mcp-webhook-validations`. A guardrail filter has a `guardrail` object in place of a `url`, `mcpServerManifest` or `systemMCPServerCatalogEntryID`:
```json
{
"name": "No secrets in tool calls",
"resources": [{ "type": "mcpCatalog", "id": "default" }],
"selectors": [{ "method": "tools/call" }],
"guardrail": {
"guardrailIDs": [""],
"action": "redact",
"direction": "both",
"failClosed": false,
"samplingRate": 100,
"subjects": [{ "type": "group", "id": "" }],
"condition": "mcp_tool != \"search\"",
"blockMessage": ""
}
}
```
`action` is `block` or `redact`; guardrail filters can't log only. `direction` is `request`, `response` or `both` (the default). `samplingRate` defaults to 100. `subjects` are `user`, `group` or `everyone`; none means everyone. `allowedToMutate` is set from the action (true for `redact`) and doesn't otherwise apply to guardrail filters.
## Related topics
- [LLM Gateway](https://docs.obot.ai/v0.28.0/llm-gateway/how-it-works.md)
- [MCP Servers](https://docs.obot.ai/v0.28.0/functionality/mcp-servers.md)
- [Filters](https://docs.obot.ai/v0.28.0/functionality/filters.md)
- [LLM audit logs](https://docs.obot.ai/v0.28.0/llm-gateway/audit.md)
- [MCP audit logs](https://docs.obot.ai/v0.28.0/security/audit-data.md)
---
Document: Audit usage and costs
Version: v0.28.0
Markdown: https://docs.obot.ai/v0.28.0/llm-gateway/audit.md
HTML: https://docs.obot.ai/llm-gateway/audit
# Audit usage and costs
Use audit records to investigate individual requests and usage views to understand consumption over time.
1. Open **Audit Logs** and select **LLM**.
2. Filter by time, user, API key, provider, model, user agent, or session.
3. Inspect the request outcome, duration, token counts and spend, and how the gateway routed it: the provider, model and provider key that served it, and whether a fallback did. Sensitive request and response fields require the Auditor role.
4. Use **Usage** > **Model** for requests, success rate, latency, tokens and spend over time, spend by provider and the top models, and to compare users, API keys and models over the same period.
5. Configure a one-time or scheduled [audit export](https://docs.obot.ai/v0.28.0/configuration/audit-log-export.md) when records need to outlive the configured retention period.
Estimated spend is not a provider invoice; see [model pricing](https://docs.obot.ai/v0.28.0/llm-gateway/audit.md#obot-doc-model-pricing). To cap spend rather than report it, use [budgets](https://docs.obot.ai/v0.28.0/llm-gateway/how-it-works.md#obot-doc-administering-the-gateway).
Usage reports come from Obot's token usage records, which are kept whether or not the LLM audit log is enabled. Every model request Obot sends to the gateway has one, failed ones included. Requests Obot refuses itself, such as for a model the caller may not use, and model listing and token counting requests, have none.
## Model pricing
The gateway prices each request for the model that served it, from the request's token usage and the model's published rates, including cache reads and writes and long-context rates. Spend in audit records, usage reports and USD budgets all use this price.
- **Where the rates come from:** Obot's published images and release binaries include model prices and capabilities derived from [LiteLLM's model list](https://github.com/BerriAI/litellm/blob/main/model_prices_and_context_window.json) (MIT license), and refreshes them every 6 hours from `https://upgrade-server.obot.ai/v1/model-data`. If the refresh can't reach that URL, the gateway keeps the prices it has. To change where they come from, or to use only the included copy, set [`OBOT_SERVER_LLM_GATEWAY_MODEL_DATA_URL`](https://docs.obot.ai/v0.28.0/configuration/model-providers.md#obot-doc-server-configuration).
- **Models without prices:** a model the list doesn't include, such as a custom deployment name or a self-hosted model, reports tokens without spend, and doesn't count toward USD budgets.
- **Cost overrides:** set `overrideCost` on a model with `PUT /api/models/{id}` to price it at your own rates instead. There's no UI control for it. An override replaces the gateway's price for that model.
MCP and LLM audit retention are configured independently. Review [Audit data, privacy, and retention](https://docs.obot.ai/v0.28.0/security/audit-data.md) before exporting sensitive fields.
## LLM Gateway Audit Logs
LLM gateway audit logs capture requests that flow through Obot's LLM gateway, in any of the API formats it serves.
### What's Logged
- **Model information**: Provider and requested model
- **Routing**: The provider and model that served the request, which [routing rules and fallbacks](https://docs.obot.ai/v0.28.0/llm-gateway/how-it-works.md#obot-doc-routing-rules-and-fallbacks) can make differ from the requested model, the provider key it was served with, or that the user's Claude subscription paid for it, and whether a fallback served it
- **Request information**: Request path, method, response status, and outcome
- **Token usage and spend**: Input and output token counts, the input tokens read from and written to the provider's prompt cache, the output tokens spent reasoning, and what the request cost (for a model with a price)
- **Client information**: Client name, version, session ID, and IP address
- **User information**: Who made the request
- **Timestamps and duration**: When the request occurred and how long it took
- **Guardrail findings**: For each [applied guardrail](https://docs.obot.ai/v0.28.0/functionality/guardrails.md#obot-doc-applied-guardrails) that found something in the request or its response, or failed to check it: the policy, the guardrail, whether it checked the request or the response, the categories it found, whether it blocked, redacted, logged or failed, and, if it failed, why. Findings never include the content that was found.
### Viewing LLM Audit Logs
Navigate to **Operations > Audit Logs**, then select **LLM**.
The LLM audit log view shows request metadata, token usage, model information, and outcomes. Users with the Auditor role can view sensitive request and response fields when available.
A fork icon next to a request's model marks a request that another model served; the model that served it is shown under the requested one, and its details show the full route under **Routing**. A request a user's [Claude subscription](https://docs.obot.ai/v0.28.0/llm-gateway/connect-clients.md#obot-doc-claude-code-with-a-claude-subscription) paid for has no provider key; **Routing** shows **Paid by**: *The user's Claude subscription* instead. Its tokens are recorded, but no spend.
A shield next to a request's timestamp marks a request a guardrail acted on, and its details list each finding under **Guardrails**. Blocked requests are logged too, with the block in their response. Guardrail findings are not sensitive fields, so every user who can view the audit log sees them.
### Filtering LLM Audit Logs
Filter LLM logs by:
- Date range
- User
- API key
- Model provider
- Target model
- Served provider
- Path
- Response status
- Outcome
- User agent
- Client session
- Model discovery requests, which shows or hides model list requests. They're hidden by default.
- Search query
### Exporting LLM Audit Logs
LLM audit logs can be exported as one-time or scheduled JSONL exports using the same storage configuration as MCP audit log exports. See [Audit Log Export](https://docs.obot.ai/v0.28.0/configuration/audit-log-export.md) for configuration options.
---
Document: API compatibility
Version: v0.28.0
Markdown: https://docs.obot.ai/v0.28.0/llm-gateway/compatibility.md
HTML: https://docs.obot.ai/llm-gateway/compatibility
# API compatibility
## Supported endpoints and formats
The gateway serves every model at one base URL, `https:///api/llm-proxy`, in the OpenAI Chat Completions, OpenAI Responses and Anthropic Messages formats. Any format works with any model, so Claude Code can use GPT models and the OpenAI SDK can use Claude.
| Endpoint | Format |
| --------------------------------------------- | ----------------------- |
| `/v1/chat/completions` | OpenAI Chat Completions |
| `/v1/responses`, `/v1/responses/input_tokens` | OpenAI Responses |
| `/v1/messages`, `/v1/messages/count_tokens` | Anthropic Messages |
| `/v1/models` | The models you can use |
Model names are `provider/model`, for example `openai/gpt-4.1`, `anthropic/claude-sonnet-4-5` or `bedrock/anthropic.claude-sonnet-4-5-20250929-v1:0`. Bare provider model IDs such as `claude-sonnet-4-5` also work, as do undated Anthropic names and the `llm` and `llm-mini` [aliases](https://docs.obot.ai/v0.28.0/llm-gateway/how-it-works.md#obot-doc-using-model-aliases). See [Model names](https://docs.obot.ai/v0.28.0/llm-gateway/how-it-works.md#obot-doc-unified-gateway) for how a name that more than one provider serves is resolved.
Errors come back in the request's API format: Anthropic's error JSON for `/v1/messages` and for Anthropic clients (which send `anthropic-version`), and OpenAI's otherwise, so SDKs report them as they would the provider's own. This includes Obot's own refusals, such as HTTP 401 for a missing or invalid key, 403 for a model you may not use, and 404 for a model that isn't available.
The earlier `/api/llm-proxy/openai` and `/api/llm-proxy/anthropic` routes still work. Other per-provider routes are removed and return HTTP 410. See [Client routes](https://docs.obot.ai/v0.28.0/llm-gateway/upgrade.md#obot-doc-client-routes).
## Limitations
- **Access is policy-bound.** You can only call models an administrator has granted you through a [Model Access Policy](https://docs.obot.ai/v0.28.0/functionality/model-access-policies.md), and `/v1/models` returns only those models. A request for a model you don't have access to is rejected.
- **Send the exact model name.** Use the model name shown on the [LLM Gateway page](https://docs.obot.ai/v0.28.0/llm-gateway/how-it-works.md#obot-doc-the-models-page) exactly as displayed.
- **Claude Code model discovery.** Gateway model discovery is off by default and requires Claude Code v2.1.129 or later.
- **Minimum output token limit for OpenAI-format providers.** A `max_tokens`, `max_completion_tokens` or `max_output_tokens` under 16 is raised to 16 for OpenAI and OpenAI-compatible providers, the smallest limit OpenAI's Responses API accepts. Anthropic models get the limit as sent.
- **Usage is recorded.** Requests count toward Obot [usage and budgets](https://docs.obot.ai/v0.28.0/llm-gateway/audit.md).
- **Audit logs can be exported.** Administrators can create one-time or scheduled exports for LLM gateway audit logs. See [Audit Log Export](https://docs.obot.ai/v0.28.0/configuration/audit-log-export.md).
## Related topics
- [Configure providers and models](https://docs.obot.ai/v0.28.0/configuration/model-providers.md) — add providers and their keys
- [Model Access Policies](https://docs.obot.ai/v0.28.0/functionality/model-access-policies.md) — grant users access to specific models
- [Guardrails](https://docs.obot.ai/v0.28.0/functionality/guardrails.md) — block, redact or log content in model traffic
- [Obot CLI Setup](https://docs.obot.ai/v0.28.0/reference/cli-api.md) — install and configure the `obot` CLI
- [Audit usage and costs](https://docs.obot.ai/v0.28.0/llm-gateway/audit.md) — monitor token usage
- [Audit Log Export](https://docs.obot.ai/v0.28.0/configuration/audit-log-export.md) — export LLM gateway audit logs
---
Document: Upgrading from model providers
Version: v0.28.0
Markdown: https://docs.obot.ai/v0.28.0/llm-gateway/upgrade.md
HTML: https://docs.obot.ai/llm-gateway/upgrade
# Upgrading from model providers
> **WARNING**
>
> Migration is not supported yet
>
> Existing LLM gateway users should hold off on updating to v0.28.0. Migration from v0.27 model providers is not supported at this time, and existing provider credentials, models and access settings are not automatically migrated to the new gateway.
>
> Migration support is planned for a future patch release. Wait for that release and its migration instructions before upgrading an existing installation. If you test v0.28.0, use a separate copy of your database and keep a backup for rollback.
Earlier versions of Obot reached models through per-provider model providers (OpenAI, Anthropic, Generic Responses Compatible, Amazon Bedrock, Azure and others), each with its own proxy route. In v0.28.0, the [LLM gateway](https://docs.obot.ai/v0.28.0/llm-gateway/how-it-works.md) is the only way Obot reaches models, and it can't be turned off.
> **NOTE**
>
> Development installations
>
> Development installations that used the earlier embedded gateway must re-enter that gateway's provider configuration, keys, routing rules and settings. This does not provide migration from v0.27 model providers.
## What happens on upgrade
Existing provider credentials, default model aliases and model access policies are not automatically migrated to the gateway.
Fresh installations can configure providers and access through the gateway.
## Client routes
| Route | Status |
| ------------------------------------------------------------------------------------------------------------------------------------------------------------ | ------------------------------------------------------------------------------------------------------------------------------------------------------------------- |
| `/api/llm-proxy/v1` | Serves every model in the OpenAI Chat Completions, OpenAI Responses and Anthropic Messages formats. Use this for new setups. |
| `/api/llm-proxy/openai`, `/api/llm-proxy/anthropic` | Remain available through the gateway, but require configured gateway providers, models and access. Route compatibility does not migrate an existing setup. |
| `/api/llm-proxy/generic-responses`, `/api/llm-proxy/aws-bedrock`, `/api/llm-proxy/aws-bedrock-api-key`, `/api/llm-proxy/azure`, `/api/llm-proxy/azure-entra` | Removed. They return HTTP 410. Point these clients at `/api/llm-proxy/v1` and use gateway model names, such as `bedrock/anthropic.claude-sonnet-4-5-20250929-v1:0`. |
Claude Code's Bedrock Mantle and Foundry modes pointed at the removed routes. Switch to the standard setup in [Using with Claude Code](https://docs.obot.ai/v0.28.0/llm-gateway/connect-clients.md#obot-doc-using-with-claude-code).
## Other changes
- **Model access policies are profiles.** Each policy becomes a profile on the **Profiles** tab, with the same users, groups and models. Budgets and guardrail policies belong to profiles.
- **Daily token limits are replaced by budgets.** `--daily-user-input-token-limit` and `--daily-user-output-token-limit` only seed the *Daily token limit* budget when the gateway first starts. They default to 10,000,000 input and 100,000 output tokens per user per day, and a flag set below 0 leaves that limit out. A budget covers only its own profile's models, so every profile that exists at the upgrade gets its own copy of the budget, with administrators exempt and users' personal daily token limits still in its place. Every model a user could reach stays limited, but a user in several profiles gets an allowance from each of them. Edit or delete each copy on its profile's page; deleted copies don't come back, and profiles you create later don't get one. With no profiles at all, Obot creates the *Default Policy*, as on a first start, and gives it the budget. The `/api/users/{id}/remaining-token-usage` endpoint is removed.
- **The model provider configuration API is removed.** The configure, deconfigure, reveal and validate endpoints under `/api/model-providers` no longer exist. Listing and getting model providers still work, and return the gateway and any retained legacy providers.
- **The models.dev price sync is removed.** `--model-info-source-url` / `OBOT_SERVER_MODEL_INFO_SOURCE_URL` no longer exists. Model prices now come from [`OBOT_SERVER_LLM_GATEWAY_MODEL_DATA_URL`](https://docs.obot.ai/v0.28.0/llm-gateway/audit.md#obot-doc-model-pricing).
- **Message policies are LLM judge guardrails.** They're converted into LLM Judge guardrails used by disabled guardrail policies for you to review and enable. A message policy that didn't apply to all users gets its own profile, named after the policy with *(message policy)* added, with the policy's users and groups and no models. `OBOT_SERVER_ENABLE_MESSAGE_POLICIES` is removed. Past message policy violations stay in the database but aren't shown in the UI or returned by the API, and the LLM audit log no longer marks or filters requests a message policy changed. See [AI Judge Policies](https://docs.obot.ai/v0.28.0/functionality/ai-judge-policies.md).
---
Document: Troubleshooting
Version: v0.28.0
Markdown: https://docs.obot.ai/v0.28.0/llm-gateway/troubleshooting.md
HTML: https://docs.obot.ai/llm-gateway/troubleshooting
# Troubleshooting
Start with the request's Obot provider endpoint, requested model, user, and time. An administrator or auditor can use **Operations > Audit Logs > LLM** to correlate the request with its recorded outcome. Remove API keys and sensitive prompts before sharing diagnostics.
## Authentication fails
Confirm that the client sends an Obot API key with **LLM proxy access**, using the authentication format documented for that client. An upstream provider key does not authenticate the client to Obot. An expired or deleted authorization scope no longer grants access.
Check the key against `/api/me` as described in [Testing an API key](https://docs.obot.ai/v0.28.0/functionality/agent-auth-scopes.md#obot-doc-testing-an-api-key). A successful result verifies the key's identity; it does not prove the key has LLM proxy access or that its owner has model grants.
## No models appear or a model is denied
1. Open **LLM Gateway** as the affected user and check which models are available.
2. Ask an administrator to check the matching policies under **LLM Gateway > Profiles**. Administrators also need model grants.
3. Check that the provider is configured under **LLM Gateway > Providers** and that the intended model is listed under **Models** on the provider's page. If it's missing, select **Refresh models**.
4. Use the model name shown on **LLM Gateway**, in `provider/model` form, such as `anthropic/claude-sonnet-4-5`.
A configured provider does not grant every user access. See [Control model access](https://docs.obot.ai/v0.28.0/functionality/model-access-policies.md).
## An alias fails or uses an unexpected model
`llm` and `llm-mini` refer to global defaults. An administrator can inspect their targets with **Set Default Models** under **LLM Gateway > Providers**.
The alias must point to an active model, and the caller must have access to that model. See [Default models](https://docs.obot.ai/v0.28.0/llm-gateway/how-it-works.md#obot-doc-default-models).
## The endpoint or request format is rejected
Check the client's base URL against the example on **LLM Gateway**. The gateway serves the OpenAI Chat Completions, OpenAI Responses and Anthropic Messages formats at one base URL for every model. Requests to a former per-provider route other than OpenAI and Anthropic get `410 Gone` with the new URL.
For client-specific settings and known limits, see [Using with Claude Code](https://docs.obot.ai/v0.28.0/llm-gateway/connect-clients.md#obot-doc-using-with-claude-code), [Using with Codex](https://docs.obot.ai/v0.28.0/llm-gateway/connect-clients.md#obot-doc-using-with-codex) and [API compatibility](https://docs.obot.ai/v0.28.0/llm-gateway/compatibility.md#obot-doc-limitations).
## A request is blocked or limited
A `429` response names the [budget](https://docs.obot.ai/v0.28.0/llm-gateway/how-it-works.md#obot-doc-administering-the-gateway) that would be exceeded and when more becomes available. A `413` response means the request body is larger than the gateway's request size limit, set under **LLM Gateway** → **Settings** (100 MB by default); a change to the limit applies at once on every replica. A blocked request names the [applied guardrail](https://docs.obot.ai/v0.28.0/functionality/guardrails.md#obot-doc-applied-guardrails) that blocked it, unless the applied guardrail has its own block message; an administrator can find it, and its outcome, on the request's entry in the LLM audit log under **Operations > Audit Logs**.
## The upstream provider rejects the request
An administrator should inspect the provider and its keys under **LLM Gateway > Providers**, the upstream credentials, requested model or deployment, and any upstream quota or rate-limit error. Check network access from Obot to the provider. Repeatedly changing the user's Obot key will not repair an invalid upstream credential.
## Verify the repair
Repeat a small request using the same client and the affected user's access. Check the returned model and the new audit outcome. A successful request under an administrator's account does not establish another user's access. For an unreachable Obot service, continue to [deployment troubleshooting](https://docs.obot.ai/v0.28.0/operations/troubleshooting.md).
---
Document: Registries and skills overview
Version: v0.28.0
Markdown: https://docs.obot.ai/v0.28.0/registries/overview.md
HTML: https://docs.obot.ai/registries/overview
# Registries and skills overview
Registries help users discover reusable server definitions and skills. Administrators curate what is available and grant access; users select the resources appropriate to their work.
| Resource | What it provides | Next step |
| --------------------- | ------------------------------------------------------------------------------------------ | ----------------------------------------------------------------------------------------------------------------------------------------------------------- |
| MCP server definition | A hosted server's launch settings or a remote server's address, plus configuration fields | Browse [MCP Servers](https://docs.obot.ai/v0.28.0/concepts/mcp-registry.md), then [create a vMCP](https://docs.obot.ai/v0.28.0/mcp-gateway/server-types.md) |
| Skill | Instructions and supporting files an AI client or agent can install and use | [Publish and distribute skills](https://docs.obot.ai/v0.28.0/registries/publish-skills.md) |
| Git catalog | A repository containing MCP server definitions and vMCP definitions synchronized into Obot | Configure [Git Catalogs](https://docs.obot.ai/v0.28.0/configuration/mcp-server-gitops.md) |
## Registry and catalog terminology
The **MCP registry** is the discovery feature. A **catalog entry** is one server definition in that registry. Adding an entry makes a definition available; it does not give every user access or create a client connection.
A **vMCP** supplies a connection endpoint using one or more of those definitions. An administrator can share a vMCP with users who do not have independent access to its source catalog entries. See [Share vMCPs](https://docs.obot.ai/v0.28.0/mcp-gateway/publish.md).
## Choose what to publish
Publish server definitions when users should build their own vMCPs. Publish a shared vMCP when users should connect to a centrally configured set of tools. Publish a skill when users need reusable instructions and files; installing a skill does not itself grant access to an MCP server or model.
Git catalogs can manage both MCP entries and vMCP definitions, including component configuration, tool selections, and profiles. Edit a Git-managed vMCP in its source repository. Skills have their own Git sources and access policies. See [Roles and access policies](https://docs.obot.ai/v0.28.0/security/policy-coverage.md) to choose the appropriate access control.
---
Document: MCP Servers
Version: v0.28.0
Markdown: https://docs.obot.ai/v0.28.0/concepts/mcp-registry.md
HTML: https://docs.obot.ai/concepts/mcp-registry
# MCP Servers
The MCP Registry is a central place to list and discover MCP servers. It provides a curated collection of servers available to users based on their access permissions.
See the [registry and skills overview](https://docs.obot.ai/v0.28.0/registries/overview.md) for the difference between a catalog entry, a shared vMCP, and a skill.
## Registry Concepts
### Server Sources
MCP server definitions can come from:
- **Official Obot repository**: The default set from [obot-platform/mcp-catalog](https://github.com/obot-platform/mcp-catalog)
- **Custom Git repositories**: Your own repositories containing server definitions (see [MCP Server GitOps](https://docs.obot.ai/v0.28.0/configuration/mcp-server-gitops.md))
- **Direct entry**: Servers added manually through the UI
### Server Definitions
Each server in the registry includes:
- **Name and Description**: Human-readable identification
- **Runtime Configuration**: How to run the server (npx, uvx, containerized, or remote)
- **Environment Variables**: Required and optional configuration
- **Tool Preview**: Description of available tools
- **Icon and Metadata**: For display in the UI
### Access Control
Administrators and Power Users+ control which servers are visible to which users by assigning servers to registries and granting users access to those registries.
## MCP Registry API
Obot implements the [MCP Registry specification](https://github.com/modelcontextprotocol/registry/blob/main/docs/reference/api/generic-registry-api.md), enabling MCP clients to programmatically discover available servers.
## Learn More
- [MCP Access Policies](https://docs.obot.ai/v0.28.0/mcp-gateway/access.md) - Controlling which servers are available to which users and groups
- [MCP Registry API](https://docs.obot.ai/v0.28.0/functionality/mcp-registry-api.md) - Programmatic server discovery and contributing servers
---
Document: Skills
Version: v0.28.0
Markdown: https://docs.obot.ai/v0.28.0/registries/publish-skills.md
HTML: https://docs.obot.ai/registries/publish-skills
# Skills
A skill is a directory containing `SKILL.md` and optional supporting files in a Git repository. Obot indexes that directory; editing an indexed skill happens in its source repository.
1. Prepare the skill's frontmatter and instructions, plus any supporting scripts or reference files.
2. Push the directory to a Git repository.
3. Add the repository as a [skill source](https://docs.obot.ai/v0.28.0/registries/publish-skills.md#obot-doc-skills-skill-sources), choosing its branch, tag, or commit where needed.
4. Check synchronization status and validation warnings. Sources sync hourly and can be refreshed manually.
5. Create a [skill access policy](https://docs.obot.ai/v0.28.0/registries/publish-skills.md#obot-doc-skill-access-policies-managing-policies) granting the intended users or groups access to the skill or source.
6. Have a permitted user complete [Obot CLI setup](https://docs.obot.ai/v0.28.0/reference/cli-api.md), then discover and install the skill into their local AI client using the Obot CLI or bootstrap skill.
Test discovery as a regular user: administrators can see all skills regardless of access policies. Removing a source or grant prevents future discovery through Obot but does not erase copies already downloaded to clients.
Use [Git-backed configuration](https://docs.obot.ai/v0.28.0/configuration/mcp-server-gitops.md#obot-doc-supported-url-formats) for repository URL formats and private repository credentials.
## Skill discovery
Skills are reusable, structured instructions that agents can discover and install to expand their capabilities. Each skill is a self-contained package stored in a git repository, containing a `SKILL.md` file with a description, metadata, and the instructions themselves. Obot indexes skills from configured sources and makes them available to agents based on access policies.
Administrators manage skill sources and control who can access which skills. Agents search, install, and use skills during conversations.
## What Is a Skill?
A skill is a directory in a git repository that contains a `SKILL.md` file. This file uses YAML frontmatter to define the skill's identity—its name, description, license, and compatibility requirements—followed by markdown content with the actual instructions.
Skills can also include supporting files alongside the `SKILL.md`, such as helper scripts or reference data. When an agent installs a skill, the entire directory is downloaded.
Each skill has:
- **Name** — A unique identifier within the repository (e.g., `code-review`)
- **Display Name** — A human-readable name generated from the skill name (e.g., "Code Review")
- **Description** — A summary of what the skill does
- **License** — The skill's license, if specified
- **Compatibility** — Any requirements or constraints (e.g., "Python 3.8+")
Obot follows the Agent Skills standard. See [agentskills.io](https://agentskills.io) for more information about skills.
## Skill Sources
Skill sources are git repositories that contain one or more skills. When you add a source, Obot scans the repository for directories containing `SKILL.md` files and indexes each valid skill it finds. Sources are synced automatically every hour and can also be refreshed manually.
To manage skill sources, go to **Skills** and select the **Sources** tab.
### Adding a Source
1. Click **Add Source URL**
2. Enter a **Name** for the source
3. Provide the **Source URL** (HTTPS)
4. Optionally specify a **Reference** (branch, tag, or commit hash) — if omitted, Obot uses the branch in the URL or `main`
5. Save the source
GitHub, GitLab, and Bitbucket Cloud URLs work with or without a `.git` suffix. For example, `https://bitbucket.org/workspace/repo` is a valid source. Self-hosted git repositories require a `.git` suffix. See [supported Git URL formats and private repository authentication](https://docs.obot.ai/v0.28.0/configuration/mcp-server-gitops.md#obot-doc-supported-url-formats) for details.
After saving, Obot fetches the repository and discovers skills. The sync status appears next to the source entry, showing whether the sync is in progress, how many skills were found, or any errors that occurred.
> Try out `https://github.com/obot-platform/skills` to access some examples.
### Refreshing a Source
Sources sync automatically every hour, but you can trigger an immediate sync by selecting a source and clicking the **Sync** button. This is useful after pushing changes to a skill repository.
### Removing a Source
Deleting a source also removes all skills that were discovered from it. Users who previously installed those skills keep their local copies, but the skills will no longer appear in search results.
## Browsing Skills
To view all discovered skills, go to **Skills** and select the **Skills** tab.
The skills list shows every valid skill found across all configured sources. Each entry displays the skill's name, description, creation date, and which source it came from. You can:
- **Search** skills by name or description
- **Filter** by source repository
- **Click a skill** to view its full metadata, including repository URL, commit reference, license, and compatibility
Skills in this view are read-only. Their content is managed in the source git repository—to update a skill, push changes to the repository and sync the source.
> **NOTE**
>
> Skills that fail validation (for example, due to a malformed `SKILL.md`) still appear in the list but are marked with a warning icon and a description of the validation error.
## Use skills in an AI client
Complete [Obot CLI setup](https://docs.obot.ai/v0.28.0/reference/cli-api.md) to install the Obot bootstrap skill for your client. It teaches the client how to discover and install approved skills through Obot. Available skills depend on the signed-in user's [skill access policies](https://docs.obot.ai/v0.28.0/registries/publish-skills.md#obot-doc-skill-access-policies-managing-policies).
### Example Interaction
1. Ask your local AI client to find a code review skill using Obot.
2. Review the matching skills and choose one to install.
3. Ask the client to review code using the installed skill.
Installed files live in the selected client's skill directory. How and when the client loads them depends on that client's skill support. See [CLI setup](https://docs.obot.ai/v0.28.0/reference/cli-api.md) for installation targets and commands.
## Access Control
By default, skills are not visible to regular users. Administrators must create [skill access policies](https://docs.obot.ai/v0.28.0/registries/publish-skills.md#obot-doc-skill-access-policies-managing-policies) to grant users and groups access to specific skills or entire skill sources.
Administrators always have full access to all skills regardless of policies.
## Access policy coverage
Skill Access Policies control which users and groups can discover and install which skills. Administrators create policies to grant skill access based on organizational needs—whether that means giving everyone access to all skills, restricting certain skill sources to specific teams, or granting access to individual skills.
Without a policy granting access, regular users cannot see or install any skills. Administrators always have full access regardless of policies.
## How Policies Work
Each policy defines two things:
- **Who** can access the skills (users and groups)
- **Which** skills they can access
When an agent searches for skills on behalf of a user, only skills granted through one or more policies are returned. If no policy grants a user access to any skills, the agent's skill search returns no results.
### Users and Groups
A policy can grant access to:
- **Individual users** — Select specific people by name
- **Groups** — Select authentication provider groups (such as "engineering" or "data-science")
- **Everyone** — Use the "All Obot Users" option to grant access to all authenticated users
Using "All Obot Users" is convenient for making a baseline set of skills universally available, while separate policies can grant additional skills to specific teams.
### Skills
When adding skills to a policy, you can select:
- **Individual skills** — Specific skills by name
- **Entire skill sources** — All skills from a particular source repository, including any skills added to that repository in the future
- **All skills** — Grants access to every skill across all sources, including skills added in the future
Skills are displayed grouped by their source repository, making it easy to find and select related skills.
## Managing Policies
To manage policies, go to **Skills > Access Policies**.
### Creating a Policy
1. Click **Add Access Policy**
2. Enter a descriptive **Name** for the policy
3. Add **Users & Groups** — search for and select the users or groups who should have access
4. Add **Skills** — search for and select individual skills, entire skill sources, or all skills
5. Click **Save**
### Editing a Policy
Click any policy in the list to view and modify its name, users and groups, or skills. Changes take effect immediately.
### Deleting a Policy
Deleting a policy removes skill access for the affected users. If a user loses access to all skills as a result, agents acting on their behalf will no longer be able to search for or install skills until another policy grants them access.
Skills that were already installed before losing access remain on the client until removed locally.
## Example: Data Science Team
To give your data science team access to data-related skills:
1. Create a policy named "Data Science Skills"
2. Add the "data-science" group as a subject
3. Add the skill source repository that contains your data analysis and visualization skills
4. Save the policy
Members of the data science group can now search for and install any skill from that repository. As new skills are added to the repository, they automatically become available to the team.
## Multiple Policies
Access is additive across policies. If a user matches multiple policies, they get access to the combined set of skills from all matching policies. There is no way to deny access through a policy—policies only grant access.
## Related Topics
- [Git-backed configuration](https://docs.obot.ai/v0.28.0/configuration/mcp-server-gitops.md) — Repository URL formats and credentials
- [CLI and APIs](https://docs.obot.ai/v0.28.0/reference/cli-api.md) — Connect local clients and install the bootstrap skill
---
Document: Git Catalogs
Version: v0.28.0
Markdown: https://docs.obot.ai/v0.28.0/configuration/mcp-server-gitops.md
HTML: https://docs.obot.ai/configuration/mcp-server-gitops
# Git Catalogs
## Overview
Obot supports managing MCP servers through Git repositories, enabling GitOps workflows. Instead of manually adding MCP servers one at a time, administrators can source server configurations from Git repositories. This supports collaborative workflows with proper code review, versioning, and automated validation processes.
Catalog sources can also define [vMCPs](https://docs.obot.ai/v0.28.0/mcp-gateway/server-types.md) whose components refer to entries in those sources.
### Key Benefits
- **Version Control**: Change tracking, rollback capabilities, and branch-based development
- **Collaborative Workflows**: PR-based reviews, team collaboration, and approval processes
- **Validation & Quality Assurance**: Automated testing, CI/CD integration, and consistent formatting
- **Automation**: Integration with existing DevOps workflows and automated deployment
## Getting Started
1. **Create or Fork a Repository**: Start with the official [Obot MCP server repository](https://github.com/obot-platform/mcp-catalog) or create your own
2. **Add Server Configurations**: Create YAML files for each MCP server following the format below
3. **Configure Obot**: Point your Obot instance to the Git repository containing your server configurations
4. **Establish Review Workflows**: Set up branch protection rules and PR-based review processes for configuration changes
5. **Automate Validation**: Implement CI/CD pipelines to validate YAML syntax and test server configurations
## Adding a Git Source URL
Administrators can add Git repositories as catalog sources from the **Admin → MCP Servers → Git Source URLs** tab. Click **Add server(s) from Git** and enter the repository URL.
> **NOTE**
>
> Connection URLs for MCP servers are derived from catalog entry names. Git-synced catalog entries have deterministic names based on the repository and file path, so the connection URL remains the same even if you remove and re-add the Git repository.
### Supported URL formats
| Platform | Example |
| --------------------------- | ------------------------------------------------------------------------------------ |
| GitHub | `https://github.com/org/repo` or `https://github.com/org/repo.git` |
| GitHub with branch | `https://github.com/org/repo/my-branch` |
| GitLab | `https://gitlab.com/org/repo` or `https://gitlab.com/org/repo.git` |
| GitLab with branch | `https://gitlab.com/org/repo/my-branch` |
| GitLab with subgroups | `https://gitlab.com/group/subgroup/repo.git` |
| Bitbucket Cloud | `https://bitbucket.org/workspace/repo` or `https://bitbucket.org/workspace/repo.git` |
| Bitbucket Cloud with branch | `https://bitbucket.org/workspace/repo/my-branch` |
| Self-hosted | `https://git.example.com/org/repo.git` |
For GitHub, GitLab, and Bitbucket Cloud a `.git` suffix is optional. For self-hosted instances it is required. To specify a branch, append it after the repository name (e.g. `/my-branch` or `.git/my-branch`). GitLab subgroup repositories require the `.git` suffix to distinguish the subgroup path from a branch name. If no branch is specified, Obot uses `main`.
### Private repositories
To pull from a private repository, enter a **Personal access token** in the optional field below the URL. The token is stored securely and never returned by the API after saving.
**Required token scopes:**
- **GitHub**: `repo` (read access is sufficient)
- **GitLab**: `read_repository` (clone access) + `read_api` (pre-clone size check)
- **Bitbucket Cloud personal API token**: `read:repository:bitbucket`, belonging to a user with access to the repository. See [Atlassian's API token documentation](https://support.atlassian.com/bitbucket-cloud/docs/using-api-tokens/).
- **Bitbucket Cloud repository access token**: **Repositories → Read** on the catalog repository. Create one under the repository's **Settings → Security → Access tokens**. See [Atlassian's repository access token documentation](https://support.atlassian.com/bitbucket-cloud/docs/create-a-repository-access-token/).
For private Bitbucket Cloud repositories, enter either token type in the **Personal access token** field. Use a repository URL such as `https://bitbucket.org/workspace/repo`; no username or token is needed in the URL. Public Bitbucket Cloud repositories do not require a token.
If no per-URL token is configured, Obot falls back to the `GITHUB_AUTH_TOKEN` environment variable.
## Selecting Catalog Files
Obot recursively scans for `*.json`, `*.yaml`, and `*.yml` files. Hidden child directories such as `.git` and `.github` are always skipped, so GitHub Actions workflows can live alongside catalog entries. Keep catalog entries outside hidden directories.
To customize discovery, add these files at the catalog repository root. Both accept one pattern per line, ignoring blank lines and `#` comments.
### `.obotcatalogs`: include files
A nonempty pattern list replaces the defaults. Patterns without `/` match filenames at any depth; patterns with `/` match paths relative to the catalog root:
```text
# Matching filenames anywhere in the repository
*.mcp.yaml
# YAML files directly inside servers/
servers/*.yaml
```
### `.ignoreobotcatalogs`: exclude files or directories
Patterns match root-relative paths and override includes. Matching a directory excludes its entire subtree:
```text
scripts
renovate.json
.pre-commit-config.yaml
```
Wildcards do not cross `/`, and `**` is not recursive. To exclude a whole directory tree, list the directory itself. Include patterns must match files; a bare directory does not include its contents.
## Validating Catalog Entries
With the `obot` CLI installed, run this from your catalog repository root before pushing changes:
```sh
obot mcp validate-catalog .
```
Directory validation honors the same pattern files and hidden-directory skipping as catalog sync, then selects files for `--format`: `*.yaml` and `*.yml` for `yaml` (the default), or `*.json` for `json`. It checks the selected catalog entries and exits with an error if validation fails, making it suitable for CI.
You can also validate individual files:
```sh
obot mcp validate-catalog servers/github.yaml
```
Explicit file arguments are validated directly, without applying directory filters. Use `--format json` to require JSON input:
```sh
obot mcp validate-catalog --format json servers/github.json
obot mcp validate-catalog --format json .
```
For system MCP catalog entries, use `obot mcp validate-system-catalog` with the same `--format yaml|json` flag. Both commands default to `yaml`; other format values are rejected.
Both commands validate entries against the Obot version of the CLI. An entry whose [Obot version range](https://docs.obot.ai/v0.28.0/configuration/mcp-server-gitops.md#obot-doc-obot-version-range) excludes that version is skipped the same way catalog sync skips it: the command checks only the entry's version range and that its `entryKey` (or, for system catalog entries, its name) is valid and unique, and prints a note to stderr instead of validating the rest of the entry. A development build of the CLI validates every entry. To validate entries that require a newer Obot version, use a CLI from that version or later.
The previous names, `validate-catalog-yaml` and `validate-system-catalog-yaml`, remain available as compatibility aliases with the same flags and YAML default.
## Converting Legacy Catalog Configuration
Use `obot mcp convert-catalog` to migrate legacy `env`, header, and `serverUserType` fields to the current `config` schema in place:
```sh
obot mcp convert-catalog servers/github.yaml
obot mcp convert-catalog --format json servers/github.json
```
`--format` defaults to `yaml` and accepts `yaml` or `json`. For a directory, only files with the selected format's extensions are converted, honoring `.obotcatalogs` and `.ignoreobotcatalogs`. YAML conversion preserves comments; JSON conversion writes JSON. Unknown fields are retained, and a file that fails conversion is left unchanged. Review the changes before publishing. Composite definitions must be migrated to vMCPs separately. The previous name, `convert-catalog-yaml`, remains a compatibility alias.
## Configuration Format
MCP server configurations can use YAML or JSON files, each defining a single MCP server. The examples below use YAML. These files contain comprehensive metadata including:
- **Name and Description**: Human-readable identification
- **Tool Previews**: Documentation of available tools and their parameters
- **Metadata**: Categories, icons, repository URLs, and classification information
- **Environment Variables**: Required and optional configuration parameters
- **Resource Requirements**: Optional CPU and memory requests and limits for hosted server deployments
- **Runtime Configuration**: Deployment and connection details
For examples and reference implementations, see the official Obot MCP server repository at [github.com/obot-platform/mcp-catalog](https://github.com/obot-platform/mcp-catalog).
## YAML Configuration Structure
Each MCP server is defined in its own YAML file with the following structure:
### Basic Information
```yaml
entryKey: server-name # optional stable key within this source
name: Server Name
description: |
Detailed description of the server's capabilities and features.
Supports multi-line markdown formatting.
```
The optional `entryKey` field defines a stable key for this catalog entry. It must be unique within its source, DNS-friendly, and cannot contain `::`.
### vMCP definitions
Set top-level `type: vmcp` to synchronize a vMCP. An omitted or empty `type` means `entry`. A vMCP uses the [vMCP manifest fields](https://docs.obot.ai/v0.28.0/mcp-gateway/server-types.md), plus an optional `entryKey` that keeps its identity stable when its display name changes:
```yaml
type: vmcp
entryKey: research
displayName: Research
toolSearch: true # Optional; defaults to false for direct tool listing and calls.
components:
- name: Search
id: search-component
mcpServerCatalogEntryKey: search
```
With `toolSearch: true`, clients discover tools through `search_tools` and invoke them through `call_tool`. See [Tool search](https://docs.obot.ai/v0.28.0/mcp-gateway/server-types.md#obot-doc-tool-search) for client behavior and access controls.
Each component's `mcpServerCatalogEntryKey` names an entry's `entryKey` in the same source. To refer to an entry in another source of the same catalog, use `sourceID::entryKey`, where `sourceID` is the source URL without `http://` or `https://` and trailing slashes. Catalog entries used as vMCP components therefore need an `entryKey`. A vMCP can be in its own file or in a YAML/JSON list alongside entries.
For example, to reference `entryKey: search` from the catalog source `https://github.com/example/shared-catalog/`:
```yaml
components:
- name: Search
id: search-component
mcpServerCatalogEntryKey: github.com/example/shared-catalog::search
```
Every component must have a nonblank `id`. If a profile uses `allowedComponents`, use that ID as the map key. Keep component IDs stable across updates so saved configuration stays associated with the same component. When adopting an [orphaned vMCP](https://docs.obot.ai/v0.28.0/configuration/mcp-server-gitops.md#obot-doc-migrating-git-synced-composites-to-vmcps), use its existing component IDs.
```yaml
type: vmcp
entryKey: research
displayName: Research
components:
- id: search-component
name: Search
mcpServerCatalogEntryKey: search
profiles:
- name: everyone
subjects:
- type: selector
id: "*"
vmcpPermissions:
allowedComponents:
search-component:
allowedTools: null # Allow all enabled tools for this component.
```
A component's `configuration` sets a policy for each of its entry's configuration fields: `fixed`, `userAllowed`, or `prohibited`. A `fixed` field can use `secretBinding` instead of a clear-text `value` so Obot reads the value from a Kubernetes Secret when the component server starts:
```yaml
components:
- id: gitlab-component
name: GitLab
mcpServerCatalogEntryKey: obot-gitlab
configuration:
- key: GITLAB_PERSONAL_ACCESS_TOKEN
policy: fixed
secretBinding:
name: gitlab-secret # Kubernetes Secret name
key: gitlab_key # Key within that Secret
```
vMCP secret bindings follow the same rules as [catalog entry secret bindings](https://docs.obot.ai/v0.28.0/configuration/mcp-server-gitops.md#obot-doc-kubernetes-secret-bindings) and are only available in Git catalog sources. A binding cannot be combined with `value`, and the entry's field must not define a static `value`. Catalog synced vMCPs cannot be configured through the Obot UI or API, so sync reports an error and does not create the vMCP when a required `fixed` field has neither a `value` nor a `secretBinding`.
When replacing a migrated composite with a catalog vMCP, keep the same `entryKey` and catalog source. Migration and sync use these to generate the same vMCP ID, preserving existing connections and credentials. Sync marks the vMCP as `adopted` when it takes over management. If the original entry had no `entryKey`, retain its name as the vMCP's `displayName` for matching.
For example, if the original composite had `entryKey: email` and `name: Email`, publish this replacement in the same catalog source after migration:
```yaml
type: vmcp
entryKey: email
displayName: Email
components:
- name: Gmail
id: gmail-component
mcpServerCatalogEntryKey: obot-gmail
- name: Outlook
id: outlook-component
mcpServerCatalogEntryKey: obot-outlook
```
The source must also contain entries with `entryKey: obot-gmail` and `entryKey: obot-outlook`. If the original composite had no `entryKey`, omit `entryKey: email` above and keep `displayName: Email` unchanged.
Rather than writing replacements by hand, use `obot mcp generate-vmcp-catalog` to generate them. See [Migrating Git-synced composites to vMCPs](https://docs.obot.ai/v0.28.0/configuration/mcp-server-gitops.md#obot-doc-migrating-git-synced-composites-to-vmcps).
### Tool Previews
```yaml
toolPreview:
- name: tool_name
description: Description of what this tool does
params:
param1: Parameter description
param2: Optional parameter description (optional)
```
### Metadata and Classification
```yaml
metadata:
categories: Category Name, Another Category
unsupportedTools: tool1,tool2 # Optional
icon: https://example.com/icon.png
repoURL: https://github.com/owner/repo
```
`unsupportedTools` is a comma-separated list of tools that are known not to work well in Obot. Obot marks these tools as unsupported and leaves them unselected by default, but this field is not an access-control restriction: a client connected directly to the MCP server can still discover them through `tools/list` and call them.
To restrict which tools clients can discover and call, create a [virtual MCP (vMCP)](https://docs.obot.ai/v0.28.0/concepts/mcp-hosting.md#obot-doc-virtual-mcps-vmcps) and configure its exposed tools and access profiles.
### Obot Version Range
```yaml
minObotVersion: v0.27.0 # optional
maxObotVersion: v0.30.0 # optional
```
Use `minObotVersion` and `maxObotVersion` to offer an entry only on the Obot versions that support it, for example when the entry relies on functionality added in a specific release. Both fields are optional and inclusive, and an omitted field leaves that side of the range unrestricted. Values must be full release versions with a leading `v`, such as `v0.27.0`.
When the running Obot version is outside the range, Obot skips the entry during catalog sync, as if the entry were not in the source:
- The entry does not appear in Obot and cannot be used to create servers.
- A [vMCP definition](https://docs.obot.ai/v0.28.0/configuration/mcp-server-gitops.md#obot-doc-vmcp-definitions) that references the entry is not created. A vMCP that already exists is kept as it is, without catalog updates, until the entry is back in range. vMCP definitions do not support `minObotVersion` and `maxObotVersion` themselves.
- Skipped entries do not cause sync errors, even if they use fields or runtimes that the running Obot version does not support.
- If an entry that was previously synced falls outside the range, Obot handles it the same way as an entry removed from the source.
Obot re-syncs its catalogs when it starts on a new version, so entries become available or unavailable as soon as you upgrade. Development builds ignore the version range. Obot versions released before support for these fields ignore them and show the entry.
These fields also apply to entries in the system MCP catalog, such as [built-in filters](https://docs.obot.ai/v0.28.0/functionality/filters.md#obot-doc-built-in-filters). They are only supported on entries synced from a catalog source.
### Environment Variables
```yaml
env:
- key: ENVIRONMENT_VARIABLE
name: Human Readable Name
required: true
sensitive: true
description: Description of this variable
```
#### Static values
A field with a `value` is static configuration: users are not asked for it. Obot stores static values
in its encrypted credential store and omits them from the catalog entry returned by the API, so they
are not visible to users who can connect to the entry. The value is still clear text in the Git
repository; use a [secret binding](https://docs.obot.ai/v0.28.0/configuration/mcp-server-gitops.md#obot-doc-kubernetes-secret-bindings) for secrets that should not be
committed. Removing a `value` from the source removes it from the entry on the next sync.
#### Selectable configuration values
Git-synced catalog entries can constrain an environment variable or remote header to a catalog-owned
set of values by adding `options`. Obot renders these fields as dropdowns and rejects configuration
values that are not listed. Option values are case-sensitive; each option requires a unique, non-empty
`value` and a non-empty display `name`. The optional `description` is shown after selection.
```yaml
env:
- name: DigitalOcean Service
key: DIGITALOCEAN_SERVICE
description: Choose the DigitalOcean service to connect
required: true
sensitive: false
options:
- name: App Platform
value: apps
description: Deploy, manage, and monitor App Platform applications.
- name: Kubernetes
value: doks
description: Manage DigitalOcean Kubernetes clusters and node pools.
```
The same `options` shape is supported under `remoteConfig.headers`. An option-backed field cannot
also define a static `value` or `secretBinding`, and options cannot be authored through the catalog
entry UI or non-Git catalog APIs. Optional fields may be left unselected; required fields must select
one of the declared values.
For `remoteConfig.urlTemplate`, declare every `${VAR}` as a required field under `env`, where it may
also define options. Template substitutions are validated selections and cannot be supplied by
overriding the derived URL directly.
```yaml
runtime: remote
remoteConfig:
urlTemplate: https://${REGION}.api.example.com/mcp
env:
- key: REGION
name: Region
required: true
sensitive: false
options:
- name: United States
value: us
- name: Europe
value: eu
```
### Caller attribution headers
Set `injectObotHeaders` on a `remote` or `containerized` catalog entry to select caller information sent to its backend. Omit the field or use an empty list to disable injection. Other runtimes do not support this setting. See [caller attribution headers](https://docs.obot.ai/v0.28.0/mcp-gateway/server-configuration.md#obot-doc-caller-attribution-headers) for the available fields and their limits.
```yaml
name: Internal API
runtime: remote
remoteConfig:
fixedURL: https://api.example.com/mcp
injectObotHeaders:
- X-Obot-User-Id
- X-Obot-Api-Key-Id
- X-Obot-IDP-Groups
```
### Server User Type
```yaml
serverUserType: singleUser # Valid values: "singleUser" or "multiUser"
```
The `serverUserType` field specifies how users interact with the catalog entry:
- `singleUser`: Each user who installs this catalog entry gets their own independent MCP server instance.
- `multiUser`: The catalog entry is a template for shared multi-user deployments. An administrator or Power User+ deploys the template into a catalog or workspace, and users connect to that shared deployment through per-user MCP server instances.
Catalog entries should set this field explicitly. For compatibility with existing catalogs, some import paths normalize an omitted value to `singleUser` before validation. Any persisted value other than `singleUser` or `multiUser` is rejected at validation time.
Catalog templates support the `npx`, `uvx`, `containerized`, and `remote` runtimes.
### Composite runtime removal
Catalog entries with `runtime: composite` are no longer supported, including entries imported through GitOps. Obot converts existing composites to vMCPs when it upgrades. Replace the composite definitions in your catalog sources with vMCP definitions, as described in [Migrating Git-synced composites to vMCPs](https://docs.obot.ai/v0.28.0/configuration/mcp-server-gitops.md#obot-doc-migrating-git-synced-composites-to-vmcps).
#### Multi-user template with shared configuration
Use `serverUserType: multiUser` when the catalog entry should create a shared deployment instead of one server per user. Deployment-level configuration, such as shared credentials, is configured on the deployed server.
```yaml
name: Shared Weather
description: Shared weather API server for the organization.
serverUserType: multiUser
runtime: uvx
uvxConfig:
package: weather-mcp-server
env:
- key: WEATHER_API_KEY
name: Weather API Key
required: true
sensitive: true
description: Shared API key configured on the deployed multi-user server.
```
#### Per-user headers for multi-user deployments
If each user must provide values after connecting to the shared deployment, define `multiUserConfig.userDefinedHeaders`. These values are stored on the user's MCP server instance and sent through the gateway for that user's requests.
```yaml
name: Shared Internal API
description: Shared multi-user server with per-user request headers.
serverUserType: multiUser
runtime: remote
remoteConfig:
fixedURL: https://api.example.com/mcp
multiUserConfig:
userDefinedHeaders:
- key: X-User-Token
name: User Token
required: true
sensitive: true
description: Personal token used by the upstream service for this user.
```
### Resource Requirements
Catalog entries can optionally define CPU and memory requests and limits for hosted MCP server deployments. These values are useful when a specific server needs more or fewer resources than the platform defaults.
```yaml
resources:
requests:
cpu: 250m
memory: 512Mi
limits:
cpu: "1"
memory: 1Gi
```
Supported fields are:
- `resources.requests.cpu`
- `resources.requests.memory`
- `resources.limits.cpu`
- `resources.limits.memory`
Values use standard Kubernetes resource quantity syntax, such as `250m`, `1`, `512Mi`, or `1Gi`.
When omitted, Obot uses the configured MCP server resource defaults. When specified, catalog entry resource values override the corresponding default request or limit for servers created from that catalog entry.
If the Kubernetes runtime has MCP resource maximums configured, catalog entry resource values must be less than or equal to those maximums when the entry is created, updated, or refreshed from Git. If a previously-created MCP server already exceeds the current maximums, users can still connect to it, but configuration changes to that server must lower the resources below the maximums.
### Kubernetes Secret Bindings
Secret bindings let you wire an env var, header, or file to a key in an externally-managed Kubernetes Secret instead of asking the user to supply the value at install time.
Secret bindings are only available when Obot is using the Kubernetes MCP runtime backend.
The referenced Kubernetes Secret must be in the Obot server namespace and must have the [configured allowed secret-binding label](https://docs.obot.ai/v0.28.0/configuration/server-configuration.md).
Obot checks this label when resolving bound values. If the Secret is missing the label, the binding is treated the same as a missing Secret or key. Required bound fields are reported as missing configuration.
#### Basic env var binding
The resolved value is injected into the MCP server pod as an environment variable — this works for `npx`, `uvx`, and `containerized` runtimes (not `remote`, which uses header bindings instead).
```yaml
env:
- key: API_KEY
name: API Key
required: true
sensitive: true
description: Bound to a pre-existing Kubernetes Secret — no user input needed.
secretBinding:
name: my-secret # Kubernetes Secret name
key: api_key # Key within that Secret
```
**Constraints:**
- Not supported for `remote` runtime env vars (use a header binding instead).
- `required: false` is allowed — when the Secret or key is absent the server deploys without that env var.
- For `remoteConfig.urlTemplate`, `${VAR}` placeholders must not reference env vars that use `secretBinding`.
#### File binding
When `file: true` the secret value is written to a file under `/files/` and the env var is set to the file path. This is useful for secrets that applications expect to read from the filesystem.
```yaml
env:
- key: TLS_CERT
name: TLS Certificate
file: true
required: true
sensitive: true
description: PEM certificate; mounted as a file at the path stored in TLS_CERT.
secretBinding:
name: my-tls-secret
key: tls.crt
```
The application reads the certificate path from `os.Getenv("TLS_CERT")` and opens the file at that path.
#### Dynamic file binding
Adding `dynamicFile: true` (requires `file: true`) allows the mounted file to update **without restarting the pod** when the source Kubernetes Secret changes. The application is responsible for watching/re-reading the file for changes. This only has an effect when `file: true`.
```yaml
env:
- key: API_CREDENTIALS
name: API Credentials File
file: true
dynamicFile: true
required: true
sensitive: true
description: Credentials file updated in-place when the Secret rotates — no pod restart needed.
secretBinding:
name: rotating-api-creds
key: credentials.json
```
**Constraints:**
- `dynamicFile` is ignored unless `file: true`.
- `file` and `dynamicFile` are not supported on header bindings.
#### Header binding (remote servers)
For `remote` runtime servers, bind an outbound HTTP header to a Kubernetes Secret key:
```yaml
runtime: remote
remoteConfig:
fixedURL: https://api.example.com/mcp
headers:
- key: Authorization
name: API Token
required: true
sensitive: true
secretBinding:
name: api-token-secret
key: token
```
### OpenAPI schemas
Use the `openapi` runtime to expose an HTTP API as an MCP server. These examples use [Frankfurter](https://frankfurter.dev/), a public exchange-rate API that requires no authentication.
To import a schema through the admin UI, follow [OpenAPI: Import an HTTP API](https://docs.obot.ai/v0.28.0/concepts/mcp-hosting.md#obot-doc-openapi-import-an-http-api).
#### Basic example
This exposes the API's operations as MCP tools:
```yaml
name: Frankfurter
description: Currency information and exchange rates
runtime: openapi
openAPIConfig:
source:
url: https://api.frankfurter.dev/v2/openapi.json
baseURL: https://api.frankfurter.dev/v2 # Optional override
```
#### Header input
Configure API token headers as required, sensitive inputs:
```yaml
name: Frankfurter with header input
description: Currency information and exchange rates
runtime: openapi
openAPIConfig:
source:
url: https://api.frankfurter.dev/v2/openapi.json
baseURL: https://api.frankfurter.dev/v2 # Optional override
config:
- key: Authorization
name: Example API token
description: Demonstration only; enter a dummy value for Frankfurter.
usage: header
required: true
sensitive: true
prefix: "Bearer "
```
Instead of `source.url`, use `source.content: |` with an inline JSON or YAML schema. Set exactly one source. Do not set `schema`; Obot generates it from the source, and entries that set it fail to sync. Omit `config` for APIs without authentication. Configure any credential headers declared by the schema; GitOps does not automatically add them. Supply credentials through Obot, not in the catalog file. OAuth flows are not supported; OAuth declarations do not prevent importing a schema.
If importing or validating a schema fails, the catalog reports a sync error and keeps its last good entry. Schema download URLs and parsed API target URLs use the same localhost, private-IP, and link-local restrictions configured for remote MCP servers. In production, schema URLs and API targets must use HTTPS. Schema URLs cannot include authentication or redirects, and catalog access tokens are never forwarded to them. Schemas are limited to 1 MiB and must be self-contained, without external references.
Obot supplies a default hosted OpenAPI wrapper image, so no custom MCP server image is needed. Running servers use the imported snapshot; synchronizing the catalog source imports the schema again and retains the last good entry if import or validation fails.
### Runtime Configuration
For remote servers:
```yaml
runtime: remote
remoteConfig:
hostname: api.example.com
fixedURL: https://api.example.com/mcp # Alternative to hostname
headers:
- name: Authorization Header
description: API token description
key: Authorization
required: true
sensitive: true
```
For local packages:
```yaml
runtime: uvx
uvxConfig:
package: 'package-name@latest'
```
## Complete Example
Here's a full example of an MCP server configuration file (`github.yaml`):
```yaml
name: GitHub
description: |
A Model Context Protocol (MCP) server that provides easy connection to GitHub using the hosted version – no local setup or runtime required. Access comprehensive GitHub functionality through a remote server with additional tools not available in the local version.
## Features
- **Repository Management**: Browse and query code, search files, analyze commits, and understand project structure
- **Issue & PR Automation**: Create, update, and manage issues and pull requests with AI assistance
- **CI/CD & Workflow Intelligence**: Monitor GitHub Actions workflow runs, analyze build failures, and manage releases
- **Code Analysis**: Examine security findings, review Dependabot alerts, and get comprehensive codebase insights
## What you'll need to connect
**Required:**
- **Personal Access Token**: GitHub Personal Access Token with appropriate repository permissions
entryKey: github
toolPreview:
- name: create_issue
description: Create a new issue in a GitHub repository
params:
owner: Repository owner
repo: Repository name
title: Issue title
body: Issue body content (optional)
labels: Labels to apply to this issue (optional)
- name: create_pull_request
description: Create a new pull request in a GitHub repository
params:
base: Branch to merge into
head: Branch containing changes
owner: Repository owner
repo: Repository name
title: PR title
body: PR description (optional)
metadata:
categories: Developer Tools
unsupportedTools: create_or_update_file,push_files
icon: https://avatars.githubusercontent.com/u/9919?v=4
repoURL: https://github.com/github/github-mcp-server
runtime: remote
remoteConfig:
hostname: api.githubcopilot.com
headers:
- name: Personal Access Token
description: GitHub PAT
key: Authorization
required: true
sensitive: true
```
This example demonstrates all the key components: descriptive content with markdown formatting, tool previews with parameter documentation, metadata classification, and remote runtime configuration with authentication headers.
## Migrating Git-synced composites to vMCPs
When Obot upgrades to a release without composite MCP servers, it converts every composite catalog entry to a [vMCP](https://docs.obot.ai/v0.28.0/mcp-gateway/server-types.md) at startup. The vMCP keeps the composite's components, tool settings, access, configuration, and users' existing connections and credentials.
Composites that you created in the Obot UI need no further action. A composite that was synced from a Git source becomes an **orphaned** vMCP: Obot keeps serving it, but no catalog source defines it. To manage it through GitOps again, publish a matching vMCP definition in the same source. On its next sync, Obot adopts the vMCP instead of creating a new one, so connections and credentials carry over.
`obot mcp generate-vmcp-catalog` generates those definitions. The previous name, `generate-vmcp-catalog-yaml`, remains a compatibility alias with the same flags and YAML default.
### What the command does
```bash
obot mcp generate-vmcp-catalog [path] [--format yaml|json] [--mode stdout|file|dir] [--overwrite]
```
The command asks Obot for every orphaned vMCP in the default catalog that was migrated from a composite synced from ``. It then writes one `type: vmcp` catalog item for each. Each item contains:
- An explicit `entryKey`. This is the composite's original `entryKey`, or the key Obot derived from its name if it had none. Because the key is explicit, you can later rename the vMCP's `displayName` without losing its identity.
- Each component's existing `id`, name, tool prefix, allowed tools, and tool overrides.
- Configuration policies without their values. Sync keeps the fixed values Obot already stores for each component ID, so secrets never end up in your repository.
- The vMCP's profiles, including an empty list if it has none. Omitting `profiles` would give the vMCP an admin-only default profile.
- For each component, a `mcpServerCatalogEntryKey` that points to the entry the component uses. Entries in the same source are referenced by `entryKey` alone. Entries in another source of the catalog are referenced as `sourceID::entryKey`.
The command only reads from Obot. It doesn't change Obot or your repository.
### Before you begin
- **Use an administrator account.** Sign in with the CLI first (for example, `obot login --url https://obot.example.com`), or set `OBOT_BASE_URL` and `OBOT_TOKEN`.
- **Finish the upgrade and let the catalog sync.** Component references are built from the catalog entries' current sources. If a source URL changed, entries keep reporting the old URL until the catalog syncs. For example, an upgrade can move the default catalog to a new branch. Obot starts a sync automatically when an upgrade changes the default source URL. If you changed a source yourself, click **Sync** on **Admin → MCP Servers** and wait for it to finish. The command refuses to generate a definition for a component whose entry still reports a removed source.
- **Know the exact source URL the composite came from.** It must be the URL configured in Obot, including any branch path such as `/v2-schema`. The scheme (`http://` or `https://`) and trailing slashes are ignored when matching.
### Migrate a catalog source
1. **Generate the vMCP definitions** from a checkout of the catalog repository:
```bash
obot mcp generate-vmcp-catalog https://github.com/example/catalog --mode dir ./vmcps
```
2. **Replace the composites.** In the same repository and branch, delete each `runtime: composite` definition and commit the matching generated file in its place. The vMCP must be published in the source that the composite came from: Obot derives the vMCP's identity from the catalog, source URL, and `entryKey`, so publishing it anywhere else creates a separate vMCP.
3. **Review the definitions before committing.** Don't change `entryKey` or component `id` values. Changing either breaks the match with the orphaned vMCP or its stored configuration. You can edit display names, descriptions, tool settings, and profiles.
4. **Validate the source:**
```bash
obot mcp validate-catalog .
```
5. **Push the change** and click **Sync** on **Admin → MCP Servers**. If sync can't adopt a vMCP, the error appears next to the source on the **Git Source URLs** tab.
6. **Confirm the adoption** by running the command again. When every vMCP from the source has been adopted, the command prints:
```text
No orphaned vMCPs from https://github.com/example/catalog are awaiting catalog sync.
```
Once a vMCP is adopted, the catalog source manages it like any other synced item. Make future changes in the source. Removing the vMCP's definition from the source deletes the vMCP.
### Output modes
Use `--format yaml|json` to choose the output format (default: `yaml`) and `--mode` to choose where it goes:
| Mode | Output |
| ------------------ | ------------------------------------------------------------------------------------------------------------------------------------------------------------------------------------------------------------------------------ |
| `stdout` (default) | Every vMCP in one YAML list or JSON array, printed to standard output. |
| `file` | Every vMCP in one YAML list or JSON array, written to the file at `[path]`. |
| `dir` | Each vMCP in its own file in the `[path]` directory, named after its display name. If two vMCPs share a display name, the second file name also includes the `entryKey`. Files use `.yaml` or `.json` according to `--format`. |
```bash
obot mcp generate-vmcp-catalog https://github.com/example/catalog --mode file vmcps.yaml
obot mcp generate-vmcp-catalog https://github.com/example/catalog --format json --mode file vmcps.json
```
The command never replaces an existing file unless you pass `--overwrite`. In `stdout` mode, only the generated YAML or JSON goes to standard output and all messages go to standard error, so you can redirect the output to a file.
The command generates definitions for every vMCP it can, even when some vMCPs can't be generated. It prints a `Skipping vMCP` message to standard error for each one it skips, then exits with an error. Scripts can therefore treat a nonzero exit status as "some vMCPs still need attention".
### Troubleshooting
**`No orphaned vMCPs from are awaiting catalog sync.`**
Either every orphaned vMCP from that source has already been adopted, or the URL doesn't match the source the composites were synced from. Check the URL on the **Git Source URLs** tab, including any branch path.
**`Skipping vMCP "": ...`**
A catalog vMCP can only reference catalog entries that are synced from a Git source and have an `entryKey`. Fix the cause shown in the message, then run the command again:
| Message ends with | Fix |
| ------------------------------------------------------------------------------------------------ | -------------------------------------------------------------------------------------------------------------------------- |
| `which has no entryKey; add an entryKey to that entry so the vMCP can reference it` | Add an `entryKey` to that entry in its source, sync the catalog, and run the command again. |
| `which is no longer a source of catalog "default"; sync the catalog and generate the YAML again` | The entry still reports a source URL that the catalog no longer uses. Sync the catalog and run the command again. |
| `which is not synced from a catalog source` | The component uses an entry created in the Obot UI. Move that entry into a Git source, or keep managing this vMCP in Obot. |
| `uses multi-user MCP server ...` or `which no longer exists` | There is no catalog entry the definition can reference. Keep managing this vMCP in Obot. |
**Sync reports `component catalog entry "::" was not found`**
The reference doesn't match any entry in the catalog's current sources. This usually happens when a source URL changed after you generated the YAML, because `sourceID` includes the full source URL and branch path. Sync the catalog, then run the command again, or update the `sourceID` prefix in the published YAML.
---
Document: Device Management (Sentry) overview
Version: v0.28.0
Markdown: https://docs.obot.ai/v0.28.0/device-management/how-sentry-works.md
HTML: https://docs.obot.ai/device-management/how-sentry-works
# Device Management (Sentry) overview
Device management gives administrators visibility into the AI clients, MCP servers, skills, and plugins configured on user workstations. It can also audit and control tool calls made by supported local AI clients.
Device management is a **beta feature**.
## What it does
Device management helps administrators:
1. Install and configure [Obot Sentry](https://github.com/obot-platform/obot-sentry) on user workstations to enable device scanning, local agent audit logs, and optional tool call enforcement.
2. Monitor device scan coverage across the organization.
3. Review each device's latest inventory of AI clients, MCP servers, skills, and plugins.
4. Drill into where a specific MCP server or skill appears across devices.
5. Inspect scan history and compare previous submissions from a device.
6. Review captured config and manifest files for a specific scan item.
7. Define which tool calls supported local AI clients may run and review the resulting enforcement decisions.
## Devices
Under Device Management in the Obot Administration section, Devices contains the following views:
| View | What it shows |
| ------------------ | ------------------------------------------------------------------------------------------------------------------------ |
| Configuration | Obot Sentry agent settings, install downloads, and enrollment keys. |
| Overview | Organization-level scan coverage, top observed clients, MCP servers, and skills, and scan submission activity over time. |
| Devices | Workstations that have submitted scans, with high-level inventory counts and links to device history. |
| Device Skills | Skills observed across scanned devices, with drilldowns into where each skill appears. |
| Device MCP Servers | MCP servers observed across scanned devices, with drilldowns into affected devices and client configurations. |
| Device Clients | AI clients observed across scanned devices, with drilldowns into associated users, MCP servers, and skills. |
The **Enforcement Decisions** view under Device Management shows the tool calls that Obot Sentry allowed or blocked.
---
Document: Enroll devices
Version: v0.28.0
Markdown: https://docs.obot.ai/v0.28.0/device-management/enroll.md
HTML: https://docs.obot.ai/device-management/enroll
# Enroll devices
## Configuration
The Configuration view sets up [Obot Sentry](https://github.com/obot-platform/obot-sentry), a lightweight agent that enrolls workstations with Obot and enables device scanning, local agent audit logs, and optional tool call enforcement on enrolled devices.
On first visit, select **Get Started** to create the device configuration, then follow the numbered install guide:
1. **Generate an enrollment key.** New devices enroll with your Obot server using this key. The credential is revealed once, when the key is created.
2. **Select your installation method.** How Obot Sentry is delivered to your devices.
3. **Select an operating system.** The operating system your devices run.
4. **Download the install artifacts.** A ZIP package for the selected installation method and operating system.
5. **Follow the install instructions.** The steps match your selections and show where to put the enrollment key.
Once Obot Sentry is installed and enrolled, devices begin reporting to Obot and appear in the other Device Management views.
### Installation methods
Installation methods and operating systems vary by Obot Sentry release. The current release supports:
| Installation method | Operating system | What the download contains |
| ------------------- | ---------------- | --------------------------------------------------------------------------------------------------------------------------------------------------------------------------------------------------------------- |
| Do it Yourself | Windows | An MSI that sets up automatic scanning and audit hook maintenance, and handles upgrades and uninstalls. A standalone `obot-sentry.exe` is also included for running one-off scans or installing hooks manually. |
| Do it Yourself | macOS | A standalone `obot-sentry` binary for running scans and installing audit hooks manually. |
| Microsoft Intune | Windows | An `.intunewin` package to deploy as a Windows app (Win32) from the Intune admin center. Assigned device groups install Obot Sentry on their next check-in, then scan and maintain audit hooks automatically. |
Each download's install instructions cover installing, configuring the enrollment key, and uninstalling for that method and operating system.
### Enrollment keys
- Keys can be named and given an expiration date. The default expiration is one year.
- Revoking a key stops new devices from enrolling with it. Already-enrolled devices are unaffected.
- New devices cannot enroll until at least one key exists.
- New devices cannot enroll once your license's device limit is reached. Remove devices you no longer use from the [Devices](https://docs.obot.ai/v0.28.0/device-management/inventory.md#obot-doc-devices-1) view to free their seats.
### Settings and updates
Open the agent settings (the gear icon) to review or change how Obot Sentry behaves on your devices.
The available settings also vary by Obot Sentry release. The current release has one:
| Setting | Description | Default |
| ----------------------- | ------------------------------------------------------------------------------- | ------- |
| Scan interval (minutes) | How often each signed-in user's device submits a scan. Accepts 15–1440 minutes. | 60 |
Use **Check for updates** to pick up new Obot Sentry releases. If an Update available badge appears, save the agent settings to rebuild your downloads with the new release.
---
Document: Inspect device inventory
Version: v0.28.0
Markdown: https://docs.obot.ai/v0.28.0/device-management/inventory.md
HTML: https://docs.obot.ai/device-management/inventory
# Inspect device inventory
## Overview
The Overview is a dashboard that summarizes the submitted scans for the selected time range. Use the date range filter to change the window.
It helps administrators answer questions like:
- How many devices have submitted scans?
- Which users are submitting scans?
- Which local AI clients are most common?
- Which MCP servers and skills appear most often?
- Is scan submission activity increasing or dropping off?
Its inventory totals use the latest scan for each device in the selected window. The scan submission timeline counts every scan submitted in the window.
## Devices
The Devices view lists every device enrolled through an enrollment key. These are the devices that count toward your license's device limit.
For each device, the list shows its hostname, device ID, operating system and architecture, and when it enrolled. If the device has submitted a scan, the list also shows details from its latest scan: the user, when it was scanned, and counts of MCP servers, skills, plugins, and clients.
From this view, administrators can:
- Search by hostname, device ID, operating system, or user.
- Remove one or more devices. Removing a device frees its seat, revokes its access right away, and deletes its scan history. Its audit logs are kept. If the device still has a valid enrollment key, it enrolls again automatically the next time it submits a scan or audit log.
- Open a device detail page.
Scans submitted with `obot scan` from devices that aren't enrolled don't appear in this list, but they're still included in the Overview and in the Clients, MCP Servers, and Skills views.
The device detail page shows metadata from the latest scan and separates the latest inventory into MCP servers, skills, plugins, and clients.
It also shows latest inventory tabs for:
- MCP Servers
- Skills
- Plugins
- Clients
Each tab supports drilldown into the specific observed item. The page also includes scan history, so administrators can open an older scan and inspect what was reported at that time.
## MCP Server inventory
The Device MCP Servers view helps administrators understand which MCP servers are configured on user workstations and where they appear.
From this view, administrators can:
- Search by server name.
- Sort and filter the fleet-wide server inventory.
- Open an MCP server detail page.
The detail page shows the server configuration summary and the devices where that server was observed.
Occurrences link back to the device scan item that reported the server. This makes it possible to move from a fleet-wide MCP server view to the device and scan where it was observed.
## Skill inventory
The Device Skills view groups observed skills by skill name.
From this view, administrators can:
- Search by skill name.
- Sort the observed skills inventory.
- Open a skill detail page.
The skill detail page shows a skill summary and the devices where that skill was observed.
Occurrences link back to the device scan item that reported the skill.
## Client inventory
The Device Clients view groups observed AI clients by client name.
From this view, administrators can:
- Search by client name.
- Sort by client name, MCP server count, skill count, or user count.
- Open a client detail page.
The client detail page shows the users whose latest device scans include that client, along with the MCP servers and skills associated with that client.
## Scan item details
Opening an item from a device or scan page shows the scan-scoped details for that observation.
MCP server details include the client and scope where the server was found, its endpoint or command, related configuration file, and a reconstructed configuration snippet. Secret values are not shown; keys that were present are rendered with placeholder values.
Skill details include the client and scope where the skill was found, description, source information when available, parent plugin when applicable, and supporting files. If a collected file includes content, the UI displays that content.
Plugin details include the client and scope where the plugin was found, plugin metadata, enabled state, detected capabilities, and supporting files.
## Supported local clients
Device scans detect and inventory these local AI clients:
| Client | What scan can collect |
| -------------- | --------------------------------------------- |
| Claude Code | Client presence, MCP servers, skills, plugins |
| Claude Desktop | Client presence, MCP servers, skills, plugins |
| Codex | Client presence, MCP servers, skills, plugins |
| Cursor | Client presence, MCP servers, skills, plugins |
| Goose | Client presence, MCP servers |
| Hermes | Client presence, MCP servers, skills |
| Kiro | Client presence, MCP servers, skills, plugins |
| OpenClaw | Client presence |
| OpenCode | Client presence, MCP servers, skills, plugins |
| VS Code | Client presence, MCP servers |
| Windsurf | Client presence, MCP servers, skills |
| Zed | Client presence, MCP servers |
Project-scoped configuration is found by walking the user's home directory. Global client configuration is read directly from each client's known config location. Skills are detected from known skill directories, nested plugin skills, and `SKILL.md` files found during the project crawl.
## What scans include
Submitted scans include:
- Device metadata, such as hostname, OS, architecture, OS username, scanner version, scan time, and stable device identity.
- Detected AI clients and their local install or configuration paths when available.
- MCP server observations, including where the server was found and the command or URL used to launch it.
- Skill observations, including skill metadata, related files, script presence, and source information when available.
- Plugin observations, including plugin metadata, enabled state, related files, and detected capabilities.
- Captured config or manifest files.
MCP server environment variable values and HTTP header values are not part of the structured MCP server observations. Only their key names are recorded.
> **CAUTION**
>
> Captured config and manifest file content may contain whatever is present in those files. Files larger than 1 MiB are recorded as oversized and their content is not included.
## Access and permissions
Any authenticated user can submit a device scan.
Reading submitted scan data is limited to users with administrative, owner, or auditor access. In the Obot UI, submitted scans appear in the admin Device Management section. Repeated submissions from the same workstation are grouped as scans from the same device.
Admins and owners can delete an individual device scan from the scan detail page and remove enrolled devices from the Devices view. Auditors can view enrolled devices but cannot remove them.
Creating the device configuration, changing agent or enforcement settings, and managing enrollment keys require administrative or owner access. Auditors can view the Configuration and Enforcement Decisions views but cannot make changes.
## Troubleshooting
### Server submission fails
Check that the Obot server is reachable from the workstation and that the API key has permission to submit device scans.
### A tool call is unexpectedly blocked
Open **Enforcement Decisions**, select the blocked call, and review its reason and resolved target. Confirm that an allow rule covers the reported server identity and tool. If the call does not appear, or if Obot Sentry could not identify the server or reach Obot, consult the `INSTRUCTIONS.md` included in the device configuration download for platform-specific diagnostics.
---
Document: Policy enforcement
Version: v0.28.0
Markdown: https://docs.obot.ai/v0.28.0/device-management/enforcement.md
HTML: https://docs.obot.ai/device-management/enforcement
# Policy enforcement
## Tool call enforcement
Tool call enforcement controls which tool calls Claude Code, Codex, Cursor, and Kiro may run on enrolled devices. Before a supported client runs a tool, Obot Sentry checks it against the allowlist for the device configuration. A call runs only when an allow rule matches it.
> **NOTE**
>
> Tool call enforcement is experimental.
### What enforcement does
Enforcement keeps local AI clients on the MCP servers and tools you approve. It blocks the common ways an unapproved server ends up in use, such as a server copied from a blog post, a repository that ships its own `.mcp.json`, or a mistyped package name. Every allow and block is recorded, so you can see which servers people try to use and approve the ones they need.
Obot Sentry runs on the user's device and works from each client's own configuration, so enforcement has limits that a determined user can work around. Read [Limitations](https://docs.obot.ai/v0.28.0/device-management/enforcement.md#obot-doc-limitations) before you roll it out. When you need controls that the user can't change, run agents and MCP servers on infrastructure Obot manages instead; see [Strengthen enforcement](https://docs.obot.ai/v0.28.0/device-management/enforcement.md#obot-doc-strengthen-enforcement).
### Fail-closed behavior and client support
Enforcement fails closed. A call is blocked when:
- No allow rule matches it.
- Obot Sentry cannot identify the MCP server targeted by the call.
- Obot cannot be reached or cannot return a decision.
- The device is not enrolled.
Local tool call auditing for Visual Studio Code continues to work, but Visual Studio Code does not currently support enforcement.
> **IMPORTANT**
>
> Cursor users with enforcement enabled need to go to `Cursor Settings → Rules, Skills, Subagents → Include third-party Plugins, Skills, and other configs` and turn it off.
> Doing this will prevent Cursor from loading Claude's hooks and allow enforcement to work as expected.
> **IMPORTANT**
>
> Kiro runs hooks only in folders the user has trusted. In an untrusted folder, Kiro still runs the agent and asks the user to approve each tool call, but Obot Sentry neither checks nor audits those calls. The same is true in a window with no folder open. Kiro also reads trust only when it starts, so a folder the user trusts afterward stays unchecked until Kiro is restarted.
>
> Cover this in your MDM:
>
> - Decide how to handle workspace trust. Setting Kiro's `security.workspace.trust.enabled` to `false` treats every folder as trusted, so the hooks always run, but it also turns off Kiro's protection against untrusted repositories, and users can change it back. Obot Sentry does not change this setting.
> - Tell users to restart Kiro after they trust a new folder.
>
> A user who turns off an Obot Sentry hook in Kiro's Agent Hooks panel only does so until the next hourly hook installation, which turns it back on.
>
> The Kiro CLI runs these hooks only on its v3 agent engine (`kiro-cli chat --v3`, or the CLI setting `chat.agentEngine` set to `v3`). Its default v2 engine does not run them, so CLI sessions on v2 are neither checked nor audited. Obot Sentry does not change this setting. If you set it through your MDM, users can still choose v2 for a single session with `--v2`.
### How Obot Sentry identifies the MCP server
When a client calls an MCP tool, its hook reports the tool name and the name the server is configured under. It does not report the URL, package, or command behind that name. Obot Sentry works that out by reading the client's MCP configuration files the same way the client does, and then checks the result against the allowlist.
For Claude Code, Obot Sentry reads, from highest precedence to lowest:
1. The managed MCP configuration (`managed-mcp.json`). If this file exists and does not list the server, the call is blocked, because Claude Code does not let users override it.
2. Project configuration for the folder Claude Code was started in and each folder above it: `.mcp.json` files and per-project servers in `~/.claude.json`.
3. The user's servers in `~/.claude.json`.
4. claude.ai connectors recorded in `~/.claude.json`.
If the same server name is defined differently in two of these places and Obot Sentry can't tell which one the client used, it blocks the call and the decision asks you to rename one of them.
Because the server is identified from configuration files, an enforcement decision records the server Obot Sentry found in the configuration. It does not record the network connection or process the client actually started.
### Configure enforcement
In **Administration > Device Management > Devices**, open the **Configuration** view and find **Tool Call Enforcement**.
1. Review the rules under **Allow**. When enforcement is enabled for the first time with an empty allowlist, Obot starts with Obot-hosted MCP servers, built-in agent tools, and built-in agent MCP servers allowed.
2. Add any other MCP servers and tools your users need.
3. Turn on **Enforce tool calls on enrolled devices**, then save the configuration.
4. Download the updated install package and follow its included `INSTRUCTIONS.md` to apply the change to devices. The included instructions contain the setup steps for the selected operating system and deployment method.
Consider starting with a few devices, then fill in the allowlist from their [enforcement decisions](https://docs.obot.ai/v0.28.0/device-management/enforcement.md#obot-doc-review-enforcement-decisions) before rolling out more widely.
Changing the allowlist takes effect on devices that already have enforcement set up without reinstalling Obot Sentry. Turning enforcement off in Obot stops blocking immediately and stops recording new enforcement decisions. Follow the package's included instructions if you also want to remove enforcement from devices.
### Allow rules
The broad allow rules are:
| Rule | What it allows |
| ------------------------------ | --------------------------------------------------------------------------------------------------------------------------------------------------------------------------------------------------------------------- |
| All Obot-hosted MCP servers | Any MCP server hosted by this Obot instance. |
| All built-in agent tools | The client's own tools, such as reading and writing files, running shell commands, and starting tasks. |
| All built-in agent MCP servers | MCP servers that ship as part of a supported AI client: Claude Code's built-in servers, and the JavaScript REPLs that the Codex app's built-in browser and computer use run on, including in the ChatGPT desktop app. |
| Everything | Every call that Obot Sentry can identify. All other allow rules are ignored while this is selected. |
You can also allow an individual MCP server by:
| Identity | Matching behavior |
| --------- | -------------------------------------------------------------------------------------------------------------------------------------------- |
| URL | Matches the scheme, hostname, port, and URL path. A path also covers paths beneath it. |
| Hostname | Matches every MCP server on that hostname, regardless of path or port. |
| Package | Matches an npm package launched with `npx` or a Python package launched with `uvx`. You can allow any version or require a specific version. |
| Connector | Matches a connector by display name, such as a claude.ai Connector. |
For each server, leave **Tools** empty to allow all of its tools, or list the specific tool names to allow. Enforcement matches tool names, not the arguments passed to a tool.
A local MCP server launched directly from an executable or script path does not provide a supported identity for the allowlist. Obot Sentry blocks calls to a server it cannot identify rather than treating its local command as trusted.
### Review enforcement decisions
Open **Administration > Device Management > Enforcement Decisions** to review calls checked while enforcement was enabled. The view shows allowed and blocked totals for the selected date range and supports searching and filtering by result, device, agent, tool type, MCP server, and tool.
Open a decision to see:
- Why the call was allowed or blocked.
- The client, tool, and MCP server involved.
- The server identity Obot Sentry found, when available.
- The device that made the call.
For an identified, blocked MCP call, an administrator can add an allow rule directly from the decision. Depending on the identity available, the rule can allow the hostname, all tools on that server, or only the tool in that decision. The new rule applies to matching calls from every device using the configuration; it does not change the historical decision.
## Limitations
### What a determined user can get around
Enforcement depends on files and settings that the user can change on their own device. A user who means to use an unapproved MCP server can do so in ways that include:
- **Removing the hooks.** Claude Code and Kiro hooks are installed in the user's home directory, so the user can edit or delete them until Obot Sentry's next hourly hook installation puts them back. Codex and Cursor hooks are installed in machine-level files, so they are only as protected as those files' permissions. Use your MDM to check that the hook files are in place and to report devices where they're missing as out of compliance.
- **Shadowing an allowed server.** A client can load MCP configuration from places Obot Sentry doesn't read, such as Claude Code's `--mcp-config` flag. A user can define a server there under the same name as an allowed one. Obot Sentry then checks the allowed server while the client runs the other. For Claude Code, a [managed MCP configuration](https://code.claude.com/docs/en/managed-mcp) closes this gap by stopping Claude Code from loading any server that isn't in it, including servers passed with `--mcp-config`. Other clients may have similar controls. Check each client you allow, and treat one without them as a gap.
- **Replacing the package runner.** Obot Sentry treats a configuration entry that changes `PATH` or other package-resolution settings as unidentifiable and blocks it. It can't see which `npx` or `uvx` the user's own shell finds first, so a different executable earlier on the user's `PATH` can run anything under an allowed package name.
- **Changing configuration around the check.** Anything that runs as the user, including the user's own hooks, can change a client's configuration files between the time Obot Sentry reads them and the time the client uses them.
### What it can block by mistake
Enforcement fails closed, so anything Obot Sentry can't identify is blocked, including servers you want to allow:
- Servers defined only in configuration Obot Sentry doesn't read. For Claude Code, this includes servers that come from plugins or the `--mcp-config` flag.
- Local servers launched from an executable or script path rather than `npx` or `uvx`.
- A server name that is defined differently in more than one configuration file.
The Enforcement Decisions view shows the reason for each block. Use it to find and fix these cases.
## Strengthen enforcement
The limitations above come from enforcement running on a device the user controls and working from the client's own configuration. The strongest option is to move the work somewhere the user doesn't control:
- **Run Claude sessions in Claude Environments.** [Claude Environments](https://docs.obot.ai/v0.28.0/claude-environments/overview.md) runs Claude cloud sessions in isolated sandboxes on your own Kubernetes cluster. Obot decides who can start a session and which vMCPs it can use, and an egress gateway outside the sandbox controls which hosts the session can reach, injects credentials, and audits every request. See [Network access, secrets, and auditing](https://docs.obot.ai/v0.28.0/claude-environments/security.md). These controls sit outside the sandbox, so changing the agent's configuration inside a session doesn't get around them.
- **Host MCP servers in Obot.** Instead of letting each device run its own `npx` or `uvx` servers, [host them in Obot](https://docs.obot.ai/v0.28.0/concepts/mcp-hosting.md) as isolated containers or Kubernetes workloads, with [egress rules](https://docs.obot.ai/v0.28.0/configuration/mcp-server-egress-control.md) applied, and give users access through a vMCP.
On devices, use enforcement as one of several layers:
- **Use the client's own managed settings.** Some clients can be locked down directly, and those controls don't depend on reading configuration files. For example, Claude Code can be given a [managed MCP configuration](https://code.claude.com/docs/en/managed-mcp) that users can't override, and Obot Sentry respects it. Deliver these settings through your MDM.
- **Send remote MCP traffic through Obot.** A remote MCP server reached through an Obot gateway is governed by gateway access controls, filters, and audit logs on the server side, where the user can't change them. Network egress controls that block direct connections to remote MCP servers close the path around the gateway.
- **Manage the device with your MDM.** Keep the client settings that enforcement depends on in place, such as Kiro's hook and workspace trust settings, and keep the machine-level hook files for Codex and Cursor writable only by administrators.
- **Review enforcement decisions.** Repeated blocks show which servers people need. A device that keeps submitting scans but no longer reports enforcement decisions may have lost its hooks.
---
Document: Claude Environments (experimental)
Version: v0.28.0
Markdown: https://docs.obot.ai/v0.28.0/claude-environments/overview.md
HTML: https://docs.obot.ai/claude-environments/overview
# Claude Environments (experimental)
> **WARNING**
>
> Experimental
>
> Claude Environments is experimental and disabled by default. APIs, configuration, and snapshot compatibility can change. Evaluate it in a non-production cluster and keep work you need in source control. A supported Kubernetes version alone does not establish compatibility with this integration.
Claude Environments lets an organization run Claude cloud sessions on its own Kubernetes infrastructure. Users chat in Claude, while Obot controls who can start a session, which vMCPs it can use, its network access, and its resource limits. Obot uses [Agent Substrate](https://github.com/agent-substrate/substrate) to run isolated actors and suspend idle workspaces.
This replaces the former Hosted Agents feature. There is no separate agent configuration or chat interface in Obot: administrators configure environments and profiles, and users select an environment in Claude.
## What you need
- Obot deployed in Kubernetes with a compatible cluster, snapshot bucket, and Substrate database. Docker deployments cannot run this feature.
- An administrator who can install cluster-scoped resources and configure cloud storage access.
- A Claude Team or Enterprise organization with self-hosted environments enabled by its Owner. Anthropic's feature is also in public beta and has its own eligibility restrictions; check [Anthropic's availability documentation](https://code.claude.com/docs/en/self-hosted-environments#availability-and-limitations).
Start with [cluster compatibility](https://docs.obot.ai/v0.28.0/claude-environments/cluster-requirements.md), then [install the integration](https://docs.obot.ai/v0.28.0/claude-environments/installation.md) and [configure an environment](https://docs.obot.ai/v0.28.0/claude-environments/administration.md).
## How requests reach Obot
Each Obot replica runs an Anthropic orchestrator process for each configured environment. The orchestrator authenticates with the environment key and polls Anthropic over an outbound connection. Its spawn hook calls Obot locally when a work order arrives. Anthropic does not need an inbound connection to Obot, and Helm does not deploy a separate orchestrator pod.
Obot validates the session identity, resolves its Obot user, and checks environment profiles before provisioning. Substrate supplies worker pools and actors; the runner connects back to Claude. Model inference and session communication still reach Anthropic. Self-hosting does not make Claude an offline service.
A Claude session has one persistent Obot session record. Reconnects can create new executions and actors within that session while restoring its workspace snapshot. An actor is not a Kubernetes pod: multiple actors can share a worker pod.
## Access and visibility
- Administrators create environments, import account mappings, and manage all sessions.
- Users see environments granted through profiles, a read-only view of their tool and network access, and **My Claude Sessions**. Infrastructure settings and secrets are not shown in that read-only view.
- Administrators can inspect **All Claude Sessions**, including the associated Obot user, state, last-used time, repositories, and available Slack metadata.
- Egress logs appear in **Audit Logs → Claude Environments**. Payload access additionally requires the auditor role.
On Docker, the sidebar entry explains the Kubernetes requirement. On Kubernetes with the feature disabled, the entry is hidden. Egress audit navigation is hidden when the integration is unavailable.
See [operations and troubleshooting](https://docs.obot.ai/v0.28.0/claude-environments/operations.md) for lifecycle and recovery, and [network access and auditing](https://docs.obot.ai/v0.28.0/claude-environments/security.md) for the security boundaries.
---
Document: Cluster compatibility and prerequisites
Version: v0.28.0
Markdown: https://docs.obot.ai/v0.28.0/claude-environments/cluster-requirements.md
HTML: https://docs.obot.ai/claude-environments/cluster-requirements
# Cluster compatibility and prerequisites
> **WARNING**
>
> Experimental compatibility
>
> This is an experimental integration. Provider research below was checked on **October 13, 2026**. GKE has an upstream installation guide; EKS and AKS are evaluation candidates, not validated Obot deployment targets. No end-to-end cloud-provider test is implied by this table.
## Provider matrix
| Platform | Evaluation path | Status and constraints |
| ---------------------------- | ------------------------------------------------ | -------------------------------------------------------------------------------------------------------------------------------------------------------------------------------------------------------------------------------------------------------------------------------------------------------------------------------- |
| GKE Standard | 1.36 with the certificate APIs enabled, or 1.37+ | Explicit upstream deployment path. On 1.36, enabling the APIs on an existing cluster also requires replacing existing nodes. Google's documented node baseline is `c3-standard-4` or larger; E2 is excluded. Obot's chart still needs an end-to-end test on your cluster. |
| GKE Autopilot | None for the current chart | Unsupported by upstream; host access does not fit Autopilot restrictions. |
| EKS with Linux EC2 nodes | Evaluate 1.37 control plane **and nodes** | AWS lists 1.37 as available; upstream Kubernetes makes the certificate features stable in that version. This is an inference about prerequisites, not confirmation that Substrate works on EKS. Check API discovery, projections, node security, storage, and suspend/resume. Older EKS versions are not a documented path here. |
| EKS Fargate | None for the current chart | Fargate does not support the DaemonSet and host ports used by atelet. EKS Auto Mode is separately unvalidated; use conventional EC2 node groups for initial evaluation. |
| AKS with Linux VM node pools | Evaluate 1.37 where available in your region | Microsoft's schedule lists 1.37 for October 2026; availability rolls out by region. The certificate prerequisites follow upstream Kubernetes, but we have not established an AKS-specific Substrate support path. Earlier versions and AKS Automatic are unvalidated. Do not target virtual nodes for the node-level runtime. |
| k3d / K3s | K3s `v1.36.4+k3s1` with the flags below | Local development configuration exercised during this integration's development; not a production reference architecture. |
Sources: [Google's Substrate guide](https://docs.cloud.google.com/kubernetes-engine/ai-ml/install-overview-substrate), [EKS version notes](https://docs.aws.amazon.com/eks/latest/userguide/kubernetes-versions-standard.html), [Fargate limitations](https://docs.aws.amazon.com/eks/latest/userguide/fargate.html), [AKS version policy](https://learn.microsoft.com/en-us/azure/aks/supported-kubernetes-versions), and [Kubernetes 1.37 certificate graduation](https://kubernetes.io/blog/2026/08/28/kubernetes-v1-37-pod-certificates-and-cluster-trust-bundles/).
Google's upstream production support is a separate allowlisted program; it does not change Obot's experimental status. An existing Obot installation working on a provider is not proof that its nodes can run Substrate.
## Certificate APIs and projections
Substrate uses `ClusterTrustBundle` and `PodCertificateRequest` for mutual TLS. The control plane must serve these APIs and the kubelets must support the corresponding projected volumes. Helm cannot enable cluster feature gates.
For the tested K3s 1.36 configuration, the server uses these arguments:
```text
--kube-apiserver-arg=runtime-config=certificates.k8s.io/v1beta1=true
--kube-apiserver-arg=feature-gates=ClusterTrustBundle=true,PodCertificateRequest=true
--kubelet-arg=feature-gates=ClusterTrustBundle=true,ClusterTrustBundleProjection=true,PodCertificateRequest=true
```
Apply the kubelet settings to every node that will run certificate-dependent pods, including separate agent nodes. On managed providers, use their supported API enablement mechanism, not K3s flags. Kubernetes 1.37 graduates these features, but check the provider's actual control-plane and node versions and available API versions.
For GKE 1.36, an authorized cluster administrator can enable the APIs using the following command. Replace the placeholders. This changes cluster configuration; schedule the subsequent node replacement as maintenance.
```nu
gcloud container clusters update CLUSTER_NAME --location CONTROL_PLANE_LOCATION --enable-kubernetes-unstable-apis=certificates.k8s.io/v1beta1/podcertificaterequests,certificates.k8s.io/v1beta1/clustertrustbundles
```
Follow [GKE's beta API instructions](https://docs.cloud.google.com/kubernetes-engine/docs/how-to/use-beta-apis) and its Substrate guide for node replacement. Changing the control plane alone on 1.36 can leave pods failing with `MountVolume.SetUp failed: unimplemented`. Some older upstream setup notes recommend recreating the cluster; Google's current guide describes updating the cluster and replacing its nodes.
Before installing, run these read-only checks in the intended context:
```nu
kubectl version
kubectl get nodes -o wide
kubectl api-resources --api-group=certificates.k8s.io
kubectl get storageclass
```
API discovery must include `clustertrustbundles` and `podcertificaterequests`. Discovery alone does **not** verify kubelet projection support. After installation, confirm the certificate controller issues credentials, projected volumes mount successfully, and both Obot and Substrate pods become Ready. Do not label a provider compatible until the [acceptance checks](https://docs.obot.ai/v0.28.0/claude-environments/operations.md#obot-doc-acceptance-checks) pass.
## Worker nodes and admission policies
Use Linux nodes with sufficient allocatable CPU, memory, and disk for the control plane, worker pools, and downloaded runtime assets. The chart selects Linux atelet nodes. Its gVisor assets cover amd64 and arm64; select worker and runner images that support your architecture.
Atelet uses host ports **8085 and 9090** and host paths including `/var/lib/ate`, `/var/lib/kubelet/plugins`, `/var/lib/kubelet/device-plugins`, and `/dev`. Cluster admission policies must permit the chart's pod specifications, capabilities, and host access. A restricted serverless pool is not interchangeable with a Linux VM node pool.
The chart provides the gVisor SandboxConfig; it is not a request to enable GKE Sandbox's RuntimeClass. Upstream also has micro-VM options with different device requirements; this guide covers Obot's packaged gVisor runtime.
Configure `substrate.worker.nodeSelector` to restrict both atelet and all environment workers to the same nodes. Set `substrate.worker.tolerations` for any custom node taints; every WorkerPool and atelet receive the full list. Environments cannot override either setting.
## Storage, networking, and scope
- Provide an existing S3-compatible or GCS snapshot bucket. Obot does not provision it. Both `ate-system/atelet` and `ate-system/ate-api-server` need the appropriate object access; test writing, restoring, and deleting snapshots.
- Use bundled PostgreSQL with a default StorageClass (or explicitly select one), or supply an external database. Keep Substrate's database separate from Obot's database.
- Permit DNS and internal service traffic among Obot, Substrate, and workers. Permit outbound access to Anthropic, registries, snapshot storage, and the gVisor assets referenced by the SandboxConfig. Repository and tool destinations also need environment egress permission.
- The bundled database's ingress restriction requires a CNI that enforces NetworkPolicy.
- Install only one Substrate instance per cluster. Its namespaces (`ate-system` and `podcertificate-controller-system`), signer names, and CRDs are cluster-wide conventions. Use a cluster without a separate Substrate installation; do not run Google's installer alongside the Obot chart.
On AKS, Azure Blob Storage is not a configured snapshot backend in this chart. Use supported S3-compatible storage or GCS and validate its authentication. On EKS or GKE, workload identity can avoid static bucket keys, but the IAM associations must be configured for the Substrate service accounts; Obot's own identity is not automatically reused.
---
Document: Install Claude Environments
Version: v0.28.0
Markdown: https://docs.obot.ai/v0.28.0/claude-environments/installation.md
HTML: https://docs.obot.ai/claude-environments/installation
# Install Claude Environments
> **WARNING**
>
> Experimental
>
> Use an evaluation cluster first. Complete the [cluster prerequisites](https://docs.obot.ai/v0.28.0/claude-environments/cluster-requirements.md) before enabling the chart. The feature is disabled by default.
## Enable the feature
Use an Obot build and chart that contain this feature. Preserve your normal database, authentication, encryption, ingress, and other Obot deployment settings. The examples below are Nushell commands from a checkout containing `./chart`; they show the **additional** configuration and are not a replacement for your normal Obot installation command.
For an existing S3 bucket and an existing credentials Secret:
```nu
let substrate_args = [
'--set' 'substrate.enabled=true'
'--set-string' 'config.OBOT_SERVER_SUBSTRATE_SNAPSHOT_LOCATION=s3://YOUR_BUCKET/claude/'
'--set-string' 'substrate.storage.env.AWS_REGION=us-east-1'
'--set-string' 'substrate.storage.existingSecret=substrate-snapshot-credentials'
]
# Append ...$substrate_args to your normal helm upgrade command.
helm upgrade --install obot ./chart --namespace obot --create-namespace ...$substrate_args --wait --wait-for-jobs --timeout 10m
```
The Secret must exist in `ate-system` and contain `AWS_ACCESS_KEY_ID` and `AWS_SECRET_ACCESS_KEY`. For a fresh namespace owned by this release, prepare it before creating the Secret:
```nu
kubectl create namespace ate-system
kubectl label namespace ate-system app.kubernetes.io/managed-by=Helm
kubectl annotate namespace ate-system meta.helm.sh/release-name=obot meta.helm.sh/release-namespace=obot
```
Replace release name/namespace for your installation. If the namespace already exists, verify who owns it before adding ownership metadata; do not adopt another installation's resources. Alternatively, supply the two keys through `substrate.storage.credentials` and Helm creates the namespace and Secret in the same installation. Never commit actual credentials to documentation or source control; command-line values can also be retained in shell history and Helm release data.
With workload identity, omit both `existingSecret` and `credentials`, configure the cloud IAM bindings independently, and confirm that the Substrate pods can access the bucket. Do not specify both static-secret options.
### R2 and other S3-compatible services
Keep `substrate.storage.backend=s3`, the `s3://` snapshot URI, and add endpoint settings appropriate to the service. For R2:
```nu
let r2_args = [
'--set-string' 'substrate.storage.env.AWS_ENDPOINT_URL=https://ACCOUNT_ID.r2.cloudflarestorage.com'
'--set-string' 'substrate.storage.env.AWS_REGION=auto'
'--set-string' 'substrate.storage.env.AWS_S3_USE_PATH_STYLE=true'
]
```
Append `...$r2_args` as well as the feature arguments and your credentials configuration to the Helm command. The bucket must already exist.
### GCS
Set `substrate.storage.backend=gcs` and a `gs://YOUR_BUCKET/claude/` snapshot URI. Use application default credentials, such as GKE Workload Identity, for the `ate-system/atelet` and `ate-system/ate-api-server` service accounts. Configure snapshot object read/write/delete and bucket metadata access. Do not assume that IAM permissions on the Obot pod grant access to these other pods.
### PostgreSQL
Without an external DSN, Helm deploys PostgreSQL with an 8 GiB persistent volume. Use `substrate.postgres.storageClass` and `substrate.postgres.storageSize` to customize it.
For an external database, add:
```nu
let database_args = [
'--set-literal' 'substrate.postgres.dsn=postgres://USER:PASSWORD@HOST:5432/substrate?sslmode=require'
'--set-string' 'substrate.postgres.role=DATABASE_ROLE'
]
```
The role is the database role used for schema management and runtime access. It must be able to apply Substrate migrations. The DSN is stored in a Kubernetes Secret; keep it out of `config`. Changing between bundled and external PostgreSQL does not migrate data. Use a dedicated Substrate database, not Obot's existing database.
## Images and internal connections
The chart selects the published `v0.2.1` Substrate component images under `ghcr.io/obot-platform/substrate`. The default runner is the published `ghcr.io/obot-platform/obot-claude-runner:v0.2.1` image, pinned by its multi-platform digest in Obot. You do not need to build these images for an ordinary evaluation.
For custom images, use the [substrate-images repository](https://github.com/obot-platform/substrate-images). Keep the worker, control plane, generated API clients, and chart compatible. A worker image accepts a tag; a runner image must use `repository@sha256:FULL_DIGEST`. Existing environments keep their saved images when deployment defaults change.
Helm supplies the Substrate API address and internal Obot Service URL. Certificate paths, the API token path, and credential-provider port are fixed internally. No public Substrate ingress or separate Claude orchestrator Deployment is needed.
| Helm value | Purpose / default |
| ---------------------------------------------------------- | -------------------------------------------------------------------------------------------------------------------------------------------------------------------------------- |
| `substrate.enabled` | Enable the integration and bundled runtime; `false` by default. |
| `config.OBOT_SERVER_SUBSTRATE_SNAPSHOT_LOCATION` | Required cluster-wide `s3://` or `gs://` snapshot URI. |
| `config.OBOT_SERVER_SUBSTRATE_NAMESPACE` | Environment worker namespace; `obot-agents`. |
| `config.OBOT_SERVER_SUBSTRATE_WORKER_IMAGE` | Optional new-environment default; empty derives from the chart's repository and version. |
| `config.OBOT_SERVER_SUBSTRATE_RUNNER_IMAGE` | Optional digest-pinned new-environment default; empty uses Obot's built-in runner. |
| `substrate.image.repository` | Component repository prefix; `ghcr.io/obot-platform/substrate`. |
| `substrate.imagePullSecrets` | Registry Secrets already present in both Substrate namespaces. |
| `substrate.apiServer.replicas` | API replicas; `2`. Set `1` for a smaller evaluation deployment. |
| `substrate.worker.nodeSelector` | Shared node selector for every WorkerPool and atelet; defaults to `kubernetes.io/os: linux`. Environments cannot override it. |
| `substrate.worker.tolerations` | Kubernetes tolerations applied to every WorkerPool; defaults to `[]`. Atelet receives all entries plus its built-in sandbox-class toleration. Environments cannot override this. |
| `substrate.storage.backend` | `s3` by default; `gcs` is also supported. |
| `substrate.storage.existingSecret` / `credentials` / `env` | Snapshot authentication and provider environment settings. |
| `substrate.postgres.dsn` / `role` | External database configuration; empty DSN selects bundled PostgreSQL. |
| `substrate.otel.endpoint` | Optional OTLP collector; upstream otherwise tries localhost and can log exporter warnings. |
| `config.OBOT_SERVER_EGRESS_AUDIT_LOG_RETENTION_DAYS` | Audit retention; `90`, or `0` to disable audit cleanup. |
Worker replicas, actor limits, idle timeout, session retention, allowed hosts, and secrets are configured per environment in the UI, not through the retired `substrate.poc.*` or `substrate.claude.*` values. Do not carry those values into a new installation.
### Worker scheduling
Configure worker placement centrally in Helm:
```yaml
substrate:
worker:
nodeSelector:
kubernetes.io/os: linux
workload: agents
tolerations:
- key: workload
operator: Equal
value: agents
effect: NoSchedule
```
Helm passes these values to Obot as `OBOT_SERVER_SUBSTRATE_WORKER_NODE_SELECTOR`
and `OBOT_SERVER_SUBSTRATE_WORKER_TOLERATIONS` (JSON), and applies them to atelet.
Use the shared Helm values rather than overriding these environment variables in
`config`, so Obot and atelet stay consistent.
Node selectors and tolerations are configuration-only and apply uniformly to all
WorkerPools, including existing environments. Neither setting can be changed
through the environment UI or API. Adding or removing a configured toleration
updates every WorkerPool during reconciliation.
When upgrading, move `substrate.atelet.nodeSelector` to
`substrate.worker.nodeSelector`. Existing environments' saved node selectors are
ignored; all workers adopt the global selector and tolerations. Plan this rollout as a scheduling
change: checkpoint sessions before changing selectors or removing tolerations,
especially `NoExecute` tolerations.
## Verify and continue
```nu
kubectl get pods -n ate-system
kubectl get pods -n podcertificate-controller-system
kubectl get pods -n obot
kubectl get workerpools -n obot-agents
```
No environment worker pool is expected until an administrator creates an environment. Bootstrap Jobs create signing material and install custom resources. A Helm timeout is not proof of successful installation: inspect events and certificate projection failures before continuing.
Next, [create a Claude environment and map users](https://docs.obot.ai/v0.28.0/claude-environments/administration.md), then run the [acceptance checks](https://docs.obot.ai/v0.28.0/claude-environments/operations.md#obot-doc-acceptance-checks).
---
Document: Configure environments and users
Version: v0.28.0
Markdown: https://docs.obot.ai/v0.28.0/claude-environments/administration.md
HTML: https://docs.obot.ai/claude-environments/administration
# Configure environments and users
> **WARNING**
>
> Experimental
>
> Claude Environments is experimental. Review effective access and test a new environment before sharing it with users.
## Create an environment
1. A Claude organization Owner enables self-hosted environments and creates an environment in Claude's Cloud environments administration page. Copy its environment key and follow [Anthropic's setup instructions](https://code.claude.com/docs/en/self-hosted-environments).
2. In Obot, open **AI Resources → Claude Environments** and add an environment.
3. Enter a display name and the environment key. Obot derives the organization and environment IDs from the key; there are no separate ID fields to fill in.
4. Configure access profiles and select the shared vMCPs each profile grants. Selection is searchable, with selected vMCPs shown first.
5. Configure worker capacity and actor defaults, then save.
The key is write-only and stored in Obot's credential store. Configure [credential encryption](https://docs.obot.ai/v0.28.0/security/credentials.md) before storing sensitive production credentials. If encryption is disabled, Obot still accepts the key and stores it without application-level encryption.
An environment record corresponds to one Claude environment and one worker pool. An organization can have multiple environments. Account mappings are shared by all environments with the same organization ID.
## Profiles and vMCP access
Profiles grant access to users and groups. Omitted profiles on API creation use the same Obot Admin default as vMCPs; an explicitly empty profile list grants nobody access. An admin role does not replace the need for profile access when launching a session.
For a user matching several profiles:
| Setting | Effective policy |
| ------------------------------------------ | ----------------------------------------------------------------------------------------------------------------------------------------------------------- |
| vMCPs | Union of matching profiles. Each vMCP's own access policy also applies. |
| Empty vMCP list | A profile with no selected vMCPs grants no tools. |
| Actor CPU, memory, idle timeout, retention | Each empty field inherits its environment default; then take the maximum value across matching profiles. Disabled retention (`-1`) wins over finite values. |
| Additional egress hosts | Union of environment and matching-profile hosts. Profiles can expand network access. |
| Allow all web destinations | Enabled if the environment or any matching profile enables it. |
| Injected headers | A profile overrides the environment for a destination/header collision; the first matching profile in displayed order wins among profiles. |
For example, two matching profiles granting vMCP A and vMCP B provide both tools, if the user's vMCP policies permit them. Profiles requesting 1 CPU and 2 CPUs resolve to 2 CPUs. A single profile can lower an environment's actor default; the environment is the inheritance default, not an extra profile included in the maximum.
Disabled Obot users are denied access. Mapping a Claude account does not grant profile or vMCP access.
## Worker and actor configuration
| Setting | Default | Where configured |
| ---------------------------------- | ------------------------ | --------------------------------------------------------------- |
| Worker replicas | 1 | Environment only |
| Worker CPU / memory | 2 CPUs / 4 GiB | Environment only; Kubernetes requests equal these limits |
| Worker image | Deployment worker image | Worker pool configuration |
| Worker node selector / tolerations | Deployment configuration | Shared by every environment; not editable through the UI or API |
| Actor CPU / memory | 1 CPU / 2 GiB | Environment and profile |
| Idle timeout | 5 minutes | Environment and profile; 1–10080 minutes |
| Session retention | 30 days | Environment and profile; `-1` disables cleanup |
| Runner image | Deployment runner digest | Actor **Advanced configuration**, environment only |
| Managed settings | Image defaults | Actor **Advanced configuration**, environment only |
Use Kubernetes resource quantities, such as `500m`, `1`, and `2Gi`. An actor's limits must fit a worker's available capacity. Adding replicas adds workers; it does not increase the size of each worker. Several actors can share a worker within Substrate's capacity constraints.
Worker settings are not profile overrides. Suspend sessions before changing worker images, selectors, or capacity in ways that may replace pods. Actor settings apply to new executions, including resumes. Updating deployment image defaults does not overwrite saved environments.
## Map Claude accounts to Obot users
Users do not link or unlink their own Claude accounts. An administrator uses **Manage mappings** for the organization:
1. Sign in to Claude with an organization administrator account.
2. Open the URL provided by Obot: `https://claude.ai/api/organizations/ORG_ID/members`.
3. Copy the complete JSON response into **Organization members JSON**.
4. Click **Preview mappings**. Review the email matches and choose a different Obot user where needed.
5. Click **Submit mappings** to save.
Expected input is a JSON array of members whose `account` includes `tagged_id`, `uuid`, `full_name`, and `email_address`. Importing this browser response does not require an Anthropic Admin API key. The administrator is responsible for the identities submitted.
Saved assignments take priority when previewing another import. Accounts without assignments are matched by case-insensitive email only when the match is unique. Previously unmapped accounts remain eligible for matching. Accounts omitted from an import are preserved. Each Obot user can map to one Claude account per organization.
### Just-in-time matching
When a human session request arrives, Obot can create a mapping using the account email supplied through the authenticated orchestrator. It requires exactly one active, non-service Obot user with that email who is not already mapped in that organization. Saved assignments take precedence; administrators can inspect and override automatically created mappings in the same UI.
**Not mapped is not a deny rule.** Clearing an assignment makes it eligible for later email matching. Use environment profiles, user status, or other access controls to deny access. Missing/ambiguous matches or absent profile access stop provisioning before a runner launches. Changing or removing assignments also cleans up affected workspaces and credentials; review the impact before submitting.
## Claude Tag from Slack or GitHub
Claude Tag is a service identity, not the Slack or GitHub sender's personal Obot identity. For each environment:
1. Create the Claude Tag service user in Obot's environment configuration.
2. Include that user in a matching environment profile and grant it the required vMCP access and tool credentials.
3. Enable Claude Tag and save.
4. Configure Claude's Slack/GitHub integration to route Tag sessions to this hosted environment, following Anthropic's current integration instructions.
The service user **must be covered by an environment profile**. Human mappings do not apply to it, and a human with an unknown account never falls back to this identity. Everyone able to trigger that environment's Claude Tag sessions uses the service user's access, not their own personal tool permissions.
Disabling Tag revokes its credentials and removes its workspaces. Deleting the environment also retires its service user. Available Slack sender/channel/thread metadata is displayed for context; it is not used for authorization. GitHub initiator metadata is not documented as captured by this implementation.
## Start and inspect a session
Choose the hosted environment in Claude when starting a cloud session. Obot's environment view also provides a copyable CLI command:
```nu
claude "Describe your task" --environment YOUR_CLAUDE_ENVIRONMENT_ID
```
Use the ID shown by Obot, not its internal database ID. Keep using Claude for chat. In Obot, use **My Claude Sessions** to view your sessions; administrators can use **All Claude Sessions** to inspect, suspend, or delete sessions.
Basic users can inspect allowed egress without seeing infrastructure or secrets. Environment cards show session totals, active sessions, and last usage. See [operations](https://docs.obot.ai/v0.28.0/claude-environments/operations.md) for suspension, retention, and troubleshooting.
---
Document: Network access, secrets, and auditing
Version: v0.28.0
Markdown: https://docs.obot.ai/v0.28.0/claude-environments/security.md
HTML: https://docs.obot.ai/claude-environments/security
# Network access, secrets, and auditing
> **WARNING**
>
> Experimental
>
> These controls are experimental. Validate access restrictions and credential handling with your own tools before relying on them for sensitive workloads. Self-hosted sessions still communicate with Anthropic.
## Allowed destinations
The internal Obot service and `api.anthropic.com` are always allowed for the integration to function, except that Obot blocks Anthropic's `/v2/ccr-sessions//mcp` relay endpoint, and every path beneath it, with HTTP 403. Profiles can enable **Allow Claude MCP** (`allowClaudeMCP`, default `false`) to permit this endpoint. Any matching profile can grant access. Without that grant, this restriction applies even when all web destinations are allowed and is recorded as a denied request in the egress audit log. Other Anthropic requests continue through the normal policy checks. Additional hosts are configured on the environment and its profiles. Profiles add destinations; they cannot remove the environment's destinations. Matching profiles combine by union.
Enter hostnames rather than URLs. A wildcard such as `*.github.com` matches **one subdomain level**, such as `api.github.com`. It does not match `github.com` or `a.b.github.com`; add those separately when needed. The environment and profiles support up to 100 unique additional hosts in total. Remember to allow destinations needed for repository cloning, dependencies, and third-party tools.
**Allow all web destinations** permits HTTP on port 80 and intercepted HTTPS on port 443 to any hostname. The internal Obot HTTP endpoint retains its configured port. This option does not enable arbitrary TCP or UDP. Auditing and destination-specific credential rules still apply. Any matching profile can enable this broader policy. The saved hostname list becomes effective again when this option is disabled everywhere that applies to the user.
Policy changes also reach running sessions. Reconciliation and gateway caching normally take approximately 15 seconds; requests already in flight are not canceled. Test with a new request, not an existing connection or Claude's recollection of an earlier result.
## Obot vMCP credentials
The runner receives vMCP URLs and a placeholder header, not an Obot API key. The egress gateway obtains a short-lived, user-scoped key over mutual TLS and injects it only on canonical `/mcp-connect/…` requests to the internal Obot origin. It refreshes credentials without restarting the runner and rechecks live session access.
Environment profile grants do not bypass vMCP permissions. Obot applies the mapped user's access, or the dedicated Claude Tag user's access. Revocation and disabling a user prevent future credential retrieval. A new execution may be needed to load newly added tools into Claude's tool configuration.
## Injected HTTP secrets
Administrators can configure **Injected secrets** on environments and profiles. Provide:
- An exact lowercase destination hostname, such as `api.example.com`.
- An HTTP header name, such as `Authorization`.
- The complete value, such as `Bearer YOUR_TOKEN`.
Injection applies to **HTTPS port 443**. Secret destinations cannot be wildcards, although an egress wildcard can allow that exact host. Adding a secret does not grant network access. Internal Obot and routing headers cannot be overridden. At most 16 distinct secret header names may be configured for a destination across the environment and profiles.
Profiles override the environment on collisions of hostname and case-insensitive header name. Among matching profiles, the first in displayed order wins. Leave a saved value blank to retain it, supply a replacement to rotate it, or remove the entry to delete it.
Values are write-only and stored on the environment object using Obot's credential encryption mechanism. With encryption disabled, they are stored in plaintext. Actor configuration contains references rather than values, and the gateway fetches values through its authenticated credential-provider connection. Running sessions pick up updates through reconciliation and credential retrieval; do not expect instantaneous changes to in-flight requests.
Keeping a value out of the runner's configuration does not prevent the destination service from echoing it back or granting sensitive capabilities. Only inject credentials into destinations you trust.
## Managed settings
Actor **Advanced configuration → Managed settings JSON** accepts a JSON object up to 64 KiB. Obot checks the object shape and size, not whether individual keys are valid Claude settings. Administrators are responsible for the contents.
The runner writes the object to `/etc/claude-code/managed-settings.json` before starting Claude. Blank input uses the image default; `{}` supplies an empty object. Changes apply to new executions, including resumed sessions. Follow [Anthropic's managed settings and precedence documentation](https://code.claude.com/docs/en/settings); applicable server-managed policy takes precedence according to Claude's rules.
This is configuration delivery, not a tamper-proof filesystem boundary: the current runner operates as root. Do not put injected secrets in managed settings; use destination-specific injection instead.
## Audit access and capture
Open **Audit Logs → Claude Environments** as an administrator. Filter by user, Claude account, environment, session, destination, result, and time. **Details** opens the right-side panel. Membership in the **auditor** group is additionally required to view request/response bodies and headers; administrator or owner status alone does not grant payload access.
HTTP and HTTPS passing through the egress gateway are audited. HTTPS interception uses Substrate's certificate infrastructure and still verifies upstream certificates. Certificate-pinned clients or clients that ignore the provided trust configuration can fail.
HTTPS hostname denials during the TLS handshake are also recorded with outcome **denied** and scheme `tls`. These records include the requested hostname and session identity, but no HTTP method, path, response status, or payload because the connection was rejected before an HTTP request could be read.
Obot buffers streamed captures and persists them in batches after streams close. Graceful shutdown stops handlers and flushes partial captures. Retention is separate from session retention: `config.OBOT_SERVER_EGRESS_AUDIT_LOG_RETENTION_DAYS` defaults to **90 days**, and **0 disables audit cleanup**. Age is measured from the record's last update.
Capture is best effort:
- Bodies are limited to 1 MiB per direction; details report truncation and original byte counts.
- Header credentials and query values are redacted, including configured injected header names. Arbitrary bodies can still contain secrets.
- Abrupt termination can lose in-memory captures. Database failures or the bounded queue filling can also lose records; Obot logs drops.
- DNS is outside this audit stream. WebSocket capture covers the HTTP handshake, not individual messages.
- Long-lived requests may not appear until they close and the batch is flushed.
Enable Obot encryption for sensitive audit storage. A custom encryption configuration must include `egressauditlogs.obot.obot.ai`; see [encryption](https://docs.obot.ai/v0.28.0/security/credentials.md). Review the broader [audit data policy](https://docs.obot.ai/v0.28.0/security/audit-data.md) before granting auditor access.
---
Document: Sessions, maintenance, and troubleshooting
Version: v0.28.0
Markdown: https://docs.obot.ai/v0.28.0/claude-environments/operations.md
HTML: https://docs.obot.ai/claude-environments/operations
# Sessions, maintenance, and troubleshooting
> **WARNING**
>
> Experimental
>
> Snapshots and APIs may change between releases. Suspend sessions and back up durable state before runtime or node changes. Keep important work in source control; a snapshot is not a substitute for a repository backup.
## Acceptance checks
Run these checks before describing a cluster or provider as compatible:
1. Install into the intended cluster and confirm bootstrap Jobs complete, certificate APIs are served, projected certificates mount, and all infrastructure pods become Ready.
2. Create an environment with a small worker pool and a profile granting a test user access. Confirm the worker lands on a node with the matching atelet.
3. Map the account, start a fresh Claude session, and confirm its identity, environment, and running state in Obot.
4. Call an allowed vMCP, deny an unauthorized user, and check that an unlisted egress destination is blocked. Verify audit metadata and auditor-only payload access.
5. Suspend the session, confirm a snapshot is written, and resume it. Verify workspace files, vMCP access, and that Obot retains the same session record.
6. Change an allowed host or injected secret and verify a fresh request from the running session observes the new configuration after reconciliation.
7. Test Claude Tag separately if used, including its service profile and tool credentials.
8. Delete the test session/environment and verify associated actors, templates, credentials, and worker resources are removed. Test snapshot deletion permissions too.
API discovery alone cannot establish node projection, gVisor, storage, or network compatibility. This procedure has not yet been completed for Obot on EKS or AKS.
## Session lifecycle and retention
**My Claude Sessions** lists the current user's sessions. Administrators can list all sessions, inspect their status and associated Obot user, and suspend or delete them. Repository URLs/revisions, last-used time, and available Slack sender, handle, channel, and thread links are displayed. Metadata may be absent until the runner reports it; Slack fields retain their first observed values across resumes.
A suspended session normally indicates an idle runner whose workspace has been checkpointed. Its idle timeout defaults to 5 minutes. Resuming starts a new execution from the saved workspace. A Pending session may instead be waiting for worker capacity, an image, a certificate, or another execution's suspension.
Session cleanup defaults to **30 days after the latest execution finishes**, not 30 days after initial creation. A session active for 31 days is not deleted just because of its original creation time. Cleanup waits for a finished, suspended session. Configure retention per environment/profile; **`-1` disables session-retention cleanup**. This does not disable access-revocation or stuck-runner cleanup. Zero is not a valid effective session-retention value.
Older completed executions are removed after a newer execution safely suspends. The latest execution is retained for reconnects until retention expires or the session is deleted. Cleanup uses finalizers to remove actors, tags, templates, and credentials without deleting tags still needed by another actor. An orphan sweep also handles interrupted cleanup, with a 15-minute grace period. Resource deletion is asynchronous; do not remove finalizers merely to hide a stuck item.
## Orchestrator health
Each Obot replica supervises an orchestrator child per environment. It checks polling progress every 15 seconds and restarts that environment's child after about two minutes without successful progress. An empty work queue is healthy. Running sessions continue independently of this poller.
If no new session appears, confirm Claude selected the intended environment, the environment key is valid, account mapping/profile access is correct, and Obot logs show work orders or poller recovery. Obot's UI reflects admitted sessions, not every request made in Slack or Claude.
## Diagnostics
Use the namespace configured in your installation where it differs from these examples. Commands are read-only:
```nu
kubectl get pods -n ate-system -o wide
kubectl get pods -n podcertificate-controller-system
kubectl get workerpools -n obot-agents
kubectl get pods -n obot-agents -o wide
kubectl get events -n ate-system --sort-by=.lastTimestamp
kubectl get events -n obot-agents --sort-by=.lastTimestamp
kubectl logs -n obot deployment/obot-obot --since=15m
kubectl logs -n ate-system deployment/ate-api-server --since=15m
```
Replace `obot-obot` with your release's Obot Deployment name. To inspect a particular pod, use `kubectl describe pod POD_NAME -n NAMESPACE`. Avoid posting raw environment keys, session tokens, or credential material with diagnostic output.
| Symptom | Check |
| --------------------------------------------------------------- | ------------------------------------------------------------------------------------------------------------------------------------------------------------------------------------------------------ |
| Bootstrap waits for trust bundles; unknown certificate resource | Control-plane API discovery and certificate-controller events. Helm cannot supply missing APIs. |
| `MountVolume.SetUp failed: unimplemented` | Node projection support, not only control-plane version. On GKE 1.36, replace nodes after enabling the APIs. |
| Worker pod Pending | Available node CPU/memory, selectors, taints, image pull failures, and whether atelet runs on the selected node. Requests equal configured worker limits. |
| Session Pending / `ResourceExhausted` | Worker capacity and Substrate actor state. Actors are not individual pods; stale/resuming executions can consume capacity even when the UI shows no running session. Inspect before deleting anything. |
| Obot says Running, Claude says no runner | A running actor does not prove the Claude process registered. Inspect Obot/runner failures, environment key, outbound Anthropic connectivity, and the latest execution. |
| Runner integration failed / HTTP 403 | Mapped user is active, environment profile matches, effective vMCP list is allowed by the vMCP itself, and Claude Tag has its own permissions if applicable. |
| Suspension/resume fails | Snapshot bucket permissions, database health, image compatibility, and retained runtime state. A control-plane restart does not repair incompatible snapshots. |
| Removed hostname still appears accessible | Wait for reconciliation/cache expiry, make a fresh request, and check other matching profiles or Allow all web destinations. Internal Obot and Anthropic remain allowed. |
| No audit body | Auditor membership, request completion/batch delay, truncation, or dropped capture. A WebSocket transcript is not captured. |
## Maintenance, backup, and shutdown
Back up Obot's database and encryption configuration, Substrate's database, snapshot objects, and Substrate's signing pools together. Storage credentials and signing material are not interchangeable with session snapshots.
Before changing worker images, changing node selectors, reducing capacity, or replacing nodes, suspend affected sessions and wait for successful checkpointing. Plan autoscaler and node-upgrade disruption rather than relying on forced eviction to save work. Avoid Spot/preemptible workers for sessions whose state matters. Follow the pinned upstream [upgrade runbook](https://github.com/agent-substrate/substrate/blob/531c935370b9a14463c6588a63102922daebb810/docs/upgrade.md); image tags alone do not establish snapshot compatibility.
Deployment image defaults affect new environments only. Update existing environments explicitly and test a fresh session plus resume. Changing chart-managed storage settings rolls affected components; changes to an independently managed credentials Secret can require a restart.
To retire the feature, delete environments in Obot first and wait for their sessions and worker pools to finish cleanup. Then set `substrate.enabled=false` in your Helm upgrade. Disabling/uninstalling first removes the controllers needed to complete application cleanup.
Helm retains namespaces, CRDs, signing material, and database PVCs to preserve durable state. Review retained resources and their ownership before manually deleting them. PVC deletion follows the volume reclaim policy, so `Retain` volumes need separate cleanup. Uninstalling alone is not a complete purge of snapshots or database records.
## Upgrading from Hosted Agents
The old Hosted Agents backend/UI is removed. At startup, Obot cleans up its legacy Kubernetes deployments, jobs, pods, ReplicaSets, secrets, services, quotas, and pool PVCs in the configured MCP namespace, selected by `obot.ai/managed-by=obot-agent-backend`. Legacy pool PriorityClasses must also belong to that namespace. Normal MCP resources are preserved.
Cleanup completes before retired Hosted Agent tables and stored sandbox credentials are removed. Errors/timeouts fail startup and retry on restart. **Legacy pool data is discarded.** Back it up before upgrading if needed; it is not migrated into Claude Environments.
---
Document: Security overview
Version: v0.28.0
Markdown: https://docs.obot.ai/v0.28.0/security/model.md
HTML: https://docs.obot.ai/security/model
# Security overview
Obot applies controls at the gateway, identity, workload, and device boundaries. Its protection depends on which components a request actually passes through and how the deployment is configured.
| Boundary | Responsibility |
| --------------- | --------------------------------------------------------------------------------------- |
| Identity | Configure authentication and grant appropriate roles and resource access |
| Gateway | Route clients through Obot to apply MCP/model access checks and record gateway activity |
| Hosted code | Isolate packages, containers, and filters on the execution backend |
| Remote services | Evaluate upstream authentication and service behavior; Obot does not host that code |
| User devices | Install and maintain Sentry hooks for supported auditing/enforcement coverage |
| Stored data | Configure field encryption, storage access, retention, exports, and backups |
Power User and Power User+ can deploy server code. Treat them as privileged roles; the [User Roles security model](https://docs.obot.ai/v0.28.0/security/policy-coverage.md#obot-doc-user-roles-security-model) describes why Docker's host socket is appropriate only for trusted evaluation or single-tenant use.
For production, review [Network and workload isolation](https://docs.obot.ai/v0.28.0/security/isolation.md), [Credentials and encryption](https://docs.obot.ai/v0.28.0/security/credentials.md), and [Policy coverage](https://docs.obot.ai/v0.28.0/security/policy-coverage.md). Application encryption is disabled by default and protects selected fields when enabled, not the entire deployment.
Device enforcement is experimental, runs on a device the user controls, and has explicit [client and failure-mode limitations](https://docs.obot.ai/v0.28.0/device-management/enforcement.md#obot-doc-limitations). Gateway policies do not govern traffic that bypasses the gateway.
The MCP Platform is Obot's unified management interface for deploying, managing, and operating MCP servers. It provides role-based access to server management, registries, audit logs, usage tracking, and platform administration.
For detailed permissions and role definitions, see [User Roles](https://docs.obot.ai/v0.28.0/security/policy-coverage.md).
## Roles and Capabilities
The MCP Platform adapts its navigation and available features based on your assigned role.
### Standard User
Standard Users can deploy and use MCP servers that have been made available to them through an MCP Registry. They can interact with MCP servers via external MCP clients but cannot publish or manage servers.
### Power User
Power Users include all Standard User capabilities and can additionally deploy MCP servers for personal use that are not sourced from an MCP Registry. These servers are only visible to the deploying user. They also have access to audit logs metadata and usage stats for the servers they deploy.
### Power User+
Power Users+ include all Power User capabilities and can additionally publish MCP servers to an MCP Registry for use by other users. They control which users or groups can access the servers they publish.
### Admin / Owner
Admins and Owners have full administrative access to the platform, including system-wide configuration, user management, and gateway administration.
Owners can assign the **Owner** and **Auditor** roles; Admins cannot. For more information, see the [Auditor Role](https://docs.obot.ai/v0.28.0/security/policy-coverage.md#obot-doc-user-roles-auditor).
## Learn More
- [Virtual MCPs (vMCPs)](https://docs.obot.ai/v0.28.0/mcp-gateway/server-types.md) - Combine one or more MCP servers behind a governed connection endpoint
- [MCP Servers](https://docs.obot.ai/v0.28.0/functionality/mcp-servers.md) - Deploy, configure, and manage MCP servers
- [MCP Tunnels](https://docs.obot.ai/v0.28.0/functionality/mcp-tunnels.md) - Connect the gateway to remote MCP servers on private networks
- [MCP Access Policies](https://docs.obot.ai/v0.28.0/mcp-gateway/access.md) - Control which servers are available to which users and groups
- [Audit Logs and Usage](https://docs.obot.ai/v0.28.0/security/audit-data.md) - Monitor activity and track consumption
- [Filters](https://docs.obot.ai/v0.28.0/functionality/filters.md) - Inspect and control MCP traffic
- [Guardrails](https://docs.obot.ai/v0.28.0/functionality/guardrails.md) - Block, redact or log sensitive or unwanted content in LLM traffic, and in MCP traffic with guardrail filters
- [Server Scheduling](https://docs.obot.ai/v0.28.0/operations/capacity.md) - Configure pod scheduling behavior for MCP servers
- [Skills](https://docs.obot.ai/v0.28.0/registries/publish-skills.md) - Manage skill sources and browse discoverable skills for agents
- [Skill Access Policies](https://docs.obot.ai/v0.28.0/registries/publish-skills.md) - Control which users and groups can access which skills
- [Device Management](https://docs.obot.ai/v0.28.0/device-management/how-sentry-works.md) - Inventory local AI clients, MCP servers, skills, and plugins, audit local tool calls, and enforce tool call allowlists
- [User Management](https://docs.obot.ai/v0.28.0/security/authentication.md) - Manage users, roles, and authentication
- [Agent Authorization Scopes](https://docs.obot.ai/v0.28.0/functionality/agent-auth-scopes.md) - Create and manage agent authorization scopes for programmatic Obot access
- [Branding](https://docs.obot.ai/v0.28.0/functionality/branding.md) - Customize theme colors and branding
- [User Roles](https://docs.obot.ai/v0.28.0/security/policy-coverage.md) - Detailed permissions and role definitions
---
Document: User sign-in and identity
Version: v0.28.0
Markdown: https://docs.obot.ai/v0.28.0/security/authentication.md
HTML: https://docs.obot.ai/security/authentication
# User sign-in and identity
Enable authentication before onboarding users or deploying servers for shared use.
1. Enable authentication using the [bootstrap setup procedure](https://docs.obot.ai/v0.28.0/configuration/auth-providers.md#obot-doc-enabling-authentication-step-1-set-environment-variables), or use the [preconfigured Local owner](https://docs.obot.ai/v0.28.0/installation/docker-deployment.md#obot-doc-preconfigure-a-local-owner) Docker setup.
2. Configure one [authentication provider](https://docs.obot.ai/v0.28.0/configuration/auth-providers.md), including allowed email domains and provider-specific group lookup requirements.
3. Assign [roles](https://docs.obot.ai/v0.28.0/security/policy-coverage.md) and resource policies for the users who sign in.
4. Use [agent authorization scopes](https://docs.obot.ai/v0.28.0/functionality/agent-auth-scopes.md) for programmatic clients that need API keys.
Local authentication stores passwords as salted hashes and supports administrator-created accounts and required password changes. External providers authenticate through their configured OAuth/OIDC integration. Provider availability depends on [edition](https://docs.obot.ai/v0.28.0/enterprise/overview.md).
Obot login and upstream MCP OAuth are separate authorizations. The [authentication flow](https://docs.obot.ai/v0.28.0/concepts/architecture.md#obot-doc-authentication-flow) explains what the client receives and what Obot retains.
Before switching providers, read the [provider-switch procedure](https://docs.obot.ai/v0.28.0/configuration/auth-providers.md#obot-doc-switching-between-auth-providers). Identities are provider-scoped; a new provider login is not an automatic transfer of the user's existing resources.
After enabling authentication, open **Identity & Access** to manage users, roles, agent identities, and providers.
## Users
Open **Identity & Access > Users**. From this page you can:
- See all registered users and their current roles
- Update individual user roles
- Monitor user activity
For details on updating roles, see [User Roles](https://docs.obot.ai/v0.28.0/security/policy-coverage.md#obot-doc-user-roles-managing-user-roles).
## User Roles
Open **Identity & Access > Roles** to configure the default role assigned to new users. Choose from:
- **Standard User**: Connect to approved MCP servers
- **Power User**: Standard User features plus publish personal MCP servers
- **Power User Plus**: Power User features plus share MCP servers through registries
- **Admin**: Full platform management
For detailed role descriptions and permissions, see [User Roles](https://docs.obot.ai/v0.28.0/security/policy-coverage.md).
## Agent Authorization Scopes
Open **Identity & Access > Agents** to view and manage agent identities and their authorization scopes. Administrators can see which users have created agent authorization scopes and delete any if necessary. For details, see [Agent Authorization Scopes](https://docs.obot.ai/v0.28.0/functionality/agent-auth-scopes.md).
## Auth Providers
Configure identity providers for user authentication. See [Auth Providers](https://docs.obot.ai/v0.28.0/configuration/auth-providers.md) for setup details.
## Authentication setup
Installation and provider configuration are covered in [Configure authentication providers](https://docs.obot.ai/v0.28.0/configuration/auth-providers.md). The links below preserve existing setup bookmarks.
## Step 1: Set Environment Variables
Continue to [Step 1: Set Environment Variables](https://docs.obot.ai/v0.28.0/configuration/auth-providers.md#obot-doc-enabling-authentication-step-1-set-environment-variables).
## Step 2: Start Obot and Login
Continue to [Step 2: Start Obot and Login](https://docs.obot.ai/v0.28.0/configuration/auth-providers.md#obot-doc-enabling-authentication-step-2-start-obot-and-login).
## Step 3: Configure Authentication Provider
Continue to [Step 3: Configure Authentication Provider](https://docs.obot.ai/v0.28.0/configuration/auth-providers.md#obot-doc-enabling-authentication-step-3-configure-authentication-provider).
## Post-Setup
Continue to [Post-Setup](https://docs.obot.ai/v0.28.0/configuration/auth-providers.md#obot-doc-enabling-authentication-post-setup).
## Troubleshooting
Continue to [Troubleshooting](https://docs.obot.ai/v0.28.0/configuration/auth-providers.md#obot-doc-enabling-authentication-troubleshooting).
### Bootstrap Token Not Working
Continue to [Bootstrap Token Not Working](https://docs.obot.ai/v0.28.0/configuration/auth-providers.md#obot-doc-enabling-authentication-bootstrap-token-not-working).
### Authentication Provider Issues
Continue to [Authentication Provider Issues](https://docs.obot.ai/v0.28.0/configuration/auth-providers.md#obot-doc-enabling-authentication-authentication-provider-issues).
## Next Steps
Continue to [Next Steps](https://docs.obot.ai/v0.28.0/configuration/auth-providers.md#obot-doc-enabling-authentication-next-steps).
---
Document: Roles and access policies
Version: v0.28.0
Markdown: https://docs.obot.ai/v0.28.0/security/policy-coverage.md
HTML: https://docs.obot.ai/security/policy-coverage
# Roles and access policies
Roles determine platform capabilities. Resource policies and profiles determine which resources a caller can use. Review both.
| Control | What it governs | Important limit |
| ------------------------------------------------------------------------------------------------------------ | ------------------------------------------------ | ------------------------------------------------------------------------------------------------------------------------------------------------------------------------- |
| [User roles](https://docs.obot.ai/v0.28.0/security/policy-coverage.md#obot-doc-user-roles-available-roles) | Administration, publishing, and audit visibility | Owner/Admin does not automatically include sensitive audit payload access |
| [MCP access policies](https://docs.obot.ai/v0.28.0/mcp-gateway/access.md) | Catalog server access | Does not replace shared-vMCP profiles |
| [vMCP profiles](https://docs.obot.ai/v0.28.0/mcp-gateway/access.md#obot-doc-virtual-mcps-tools-and-profiles) | Shared endpoint and tool grants | Matching grants are additive |
| [Model policies](https://docs.obot.ai/v0.28.0/functionality/model-access-policies.md) | Accessible models | A configured provider alone does not grant model access |
| [Skill policies](https://docs.obot.ai/v0.28.0/registries/publish-skills.md) | Skill discovery and installation | Administrators bypass these grants; downloaded copies remain |
| [Authorization scopes](https://docs.obot.ai/v0.28.0/functionality/agent-auth-scopes.md) | Programmatic credential capabilities | Cannot exceed the owning user's access |
| [Sentry allowlists](https://docs.obot.ai/v0.28.0/device-management/enforcement.md) | Supported local client tool calls | Experimental; runs on the user's device; [limitations](https://docs.obot.ai/v0.28.0/device-management/enforcement.md#obot-doc-limitations) and fail-closed behavior apply |
Use a regular test account with the intended group membership to verify grants. Review broadly matching profiles and policies before concluding a narrow rule is ineffective. [User management](https://docs.obot.ai/v0.28.0/security/authentication.md) describes administrative account controls.
Obot uses role-based access control to manage what users can do in the MCP Platform. Each role has different permissions and sees different parts of the interface.
## Available Roles
### Owner
Full platform management plus the ability to assign the Owner and Auditor roles to users.
### Admin
Full platform management, including server and model configuration, users, and platform settings. Cannot assign the Owner or Auditor roles.
### Power User+
All Power User permissions plus the ability to create MCP Registries and share MCP servers with other users.
### Power User
All Standard User permissions plus publishing custom MCP servers (personal use only) and viewing Audit Logs and Usage statistics for their activity.
### Standard User
Connect to approved MCP servers and use models granted through access policies.
### Auditor
Add-on permission that grants read-only access to sensitive data across the platform. Sensitive data (MCP request/response bodies) can only be viewed by users with this role. All other roles, including Owner, see only metadata for these resources. Can be combined with any other role.
## Role Comparison
| Capability | Standard | Power | Power+ | Admin | Owner |
| ------------------------------------ | -------- | ----- | ------ | ------- | ------- |
| Connect to MCP servers | Yes | Yes | Yes | Yes | Yes |
| View Audit Logs | | Yes\* | Yes\* | Yes\*\* | Yes\*\* |
| View Usage | | Yes\* | Yes\* | Yes | Yes |
| Publish personal MCP servers | | Yes | Yes | Yes | Yes |
| Share MCP servers through registries | | | Yes | Yes | Yes |
| Manage Filters | | | | Yes | Yes |
| Server Scheduling | | | | Yes | Yes |
| User Management | | | | Yes | Yes |
| App Preferences | | | | Yes | Yes |
| Assign Owner/Auditor roles | | | | | Yes |
\* Only for servers they deployed
\*\* Metadata only. Full request/response bodies require the Auditor role. Owners can assign Auditor to themselves, but this is an explicit action to prevent accidental exposure to sensitive data.
## Security Model
Obot's MCP hosting platform runs the MCP servers that users add. The **Power User** and **Power User+** roles can publish and deploy MCP servers — including `npx` (npm) and `uvx` (PyPI) packages, and **containerized** servers that run an arbitrary OCI image with a user-supplied command, arguments, and environment. By design, these roles can therefore cause code to execute on Obot's MCP hosting backend.
Treat Power User and Power User+ as **privileged** roles. Grant them only to users you trust to run code on your infrastructure, and harden the hosting backend so that the code those users deploy stays contained:
- **Docker deployments** bind-mount the host Docker socket, so a containerized MCP server runs on the host Docker daemon — effectively host-level access on that machine. Use Docker deployments only for development or single-machine, single-tenant use. See [Docker Deployment](https://docs.obot.ai/v0.28.0/installation/docker-deployment.md).
- **Kubernetes deployments** isolate each MCP server in its own pod. For multi-tenant or untrusted users, keep the restricted Pod Security Admission policy and the MCP NetworkPolicy enabled (both are on by default), and consider a sandboxed container runtime such as gVisor or Kata Containers. See [MCP Deployments in Kubernetes](https://docs.obot.ai/v0.28.0/configuration/mcp-deployments-in-kubernetes.md).
The [default role for new users](https://docs.obot.ai/v0.28.0/security/policy-coverage.md#obot-doc-user-roles-default-role-for-new-users) is configurable. Do not default new users to Power User or Power User+ unless every user who can sign up is trusted to run code on your infrastructure.
## Managing User Roles
### Updating a User's Role
1. Navigate to **Identity & Access > Users**
2. Click the three vertical dots on the user's current role
3. Click **Update Role**
4. Select the new role
### Default Role for New Users
Configure the default role for new users on the **Identity & Access > Roles** page.
### Pre-Assigning Roles
Obot does not assign roles based on email addresses. To give users a role before they log in, assign the role in Obot to a group that your identity provider supplies, such as a group pushed through [Okta SCIM](https://docs.obot.ai/v0.28.0/configuration/okta-scim.md):
1. Navigate to **Identity & Access > Groups**
2. Click **Add Assignment**
3. Select the group and the role
Members of the group get the role while they belong to it. The role is added to the role stored on each user, so it doesn't appear as a change to their own role. To change a user's own role instead, [update the user's role](https://docs.obot.ai/v0.28.0/security/policy-coverage.md#obot-doc-user-roles-updating-a-users-role) after they log in for the first time.
To provision the first Owner of a deployment that uses the built-in Local provider, set `OBOT_SERVER_LOCAL_AUTH_INITIAL_OWNER_EMAIL`. See [Server Configuration](https://docs.obot.ai/v0.28.0/configuration/server-configuration.md).
---
Document: Encryption and secrets
Version: v0.28.0
Markdown: https://docs.obot.ai/v0.28.0/security/credentials.md
HTML: https://docs.obot.ai/security/credentials
# Encryption and secrets
Obot credentials serve different connections. Manage them according to their owner and use.
| Credential | Configure and revoke |
| ----------------------------------------- | -------------------------------------------------------------------------------------------------------------------------------------------------------------------------- |
| Client API key | [Agent authorization scopes](https://docs.obot.ai/v0.28.0/functionality/agent-auth-scopes.md); deleting a scope invalidates its keys |
| Upstream MCP OAuth application | [Static OAuth](https://docs.obot.ai/v0.28.0/configuration/mcp-server-oauth-configuration.md); changing application credentials can interrupt use |
| Shared or user-supplied MCP configuration | [vMCP configuration policies](https://docs.obot.ai/v0.28.0/mcp-gateway/server-types.md#obot-doc-virtual-mcps-configuration-policies) |
| Externally managed Kubernetes Secret | [Secret bindings](https://docs.obot.ai/v0.28.0/concepts/mcp-hosting.md#obot-doc-mcp-servers-kubernetes-secret-bindings), including the required discovery/resolution label |
| Private image registry credential | [Image Pull Secrets](https://docs.obot.ai/v0.28.0/configuration/image-pull-secrets.md) |
| Tunnel secret | [Tunnel rotation](https://docs.obot.ai/v0.28.0/functionality/mcp-tunnels.md#obot-doc-rotate-a-secret); rotation disconnects old clients |
Application-level encryption is disabled by default. Read the [encryption coverage](https://docs.obot.ai/v0.28.0/security/credentials.md#obot-doc-overview-encrypted-resources-and-fields) before enabling a provider. It protects selected database and credential fields, not entire records, exported logs, or backups. Existing data may require a separate migration.
Preserve key access when restoring encrypted data; losing the key or KMS permissions can make a database backup unusable.
## Create an agent identity and authorization scope
1. Open **Identity & Access > Agents**.
2. Click **Create Agent Identity**.
3. Fill in the required information:
- **Name** (required): A descriptive name that identifies the authorization scope's purpose
- **Description** (optional): Additional context about how the authorization scope is used
- **Expiration Date** (optional): When the authorization scope should automatically expire. Authorization scopes without an expiration date remain valid until deleted.
- **MCP Servers**: Select which MCP servers this authorization scope can access. You can:
- Select **All MCP Servers** to grant access to all servers you currently have access to, including any servers you gain access to in the future
- Select individual servers to restrict the authorization scope to only those specific servers
- Leave this empty when you are creating a capability-only scope
- **API Scopes**: Select any non-MCP capabilities this authorization scope should allow:
- **LLM proxy access**: Call LLM proxy endpoints
- **Skill access**: Discover and download skills
- **Device scan access**: Submit and read device scans
4. Click **Save**.
The UI calls these credentials **agent identities**; each identity has an authorization scope and one or more API keys. For CLI creation and client examples, see the [authorization scope reference](https://docs.obot.ai/v0.28.0/functionality/agent-auth-scopes.md).
After creation, you'll see a dialog displaying an initial new API key to use. **Copy and save this key immediately**—it will only be shown once and cannot be retrieved later.
## Managing Agent Authorization Scopes
### Viewing Your Agent Authorization Scopes
Open **Identity & Access > Agents** to see all your agent authorization scopes. The table displays:
| Column | Description |
| ------------ | ----------------------------------------------------------------------------------- |
| Name | The authorization scope's descriptive name |
| Capabilities | Capabilities enabled for the scope; a **Servers** badge indicates MCP server access |
| Last Used | When an API key generated for the scope was last used |
| Expires | When the scope will expire (or "Never" if it has no expiration date) |
### Deleting an Agent Authorization Scope
1. Open **Identity & Access > Agents**
2. Click the three-dot menu on the authorization scope you want to delete
3. Select **Delete**
4. Confirm the deletion
Deleting an agent authorization scope immediately invalidates its API keys. This action cannot be undone.
## Supported Encryption Providers
Application encryption defaults to `OBOT_SERVER_ENCRYPTION_PROVIDER=none`. Configure one of these providers to enable it:
1. [AWS KMS](https://docs.obot.ai/v0.28.0/configuration/encryption-providers/aws-kms.md)
2. [Azure Key Vault](https://docs.obot.ai/v0.28.0/configuration/encryption-providers/azure-key-vault.md)
3. [Google Cloud KMS](https://docs.obot.ai/v0.28.0/configuration/encryption-providers/google-cloud-kms.md)
4. [Custom](https://docs.obot.ai/v0.28.0/configuration/encryption-providers/custom-provider.md), including a local AES-GCM key
## How Encryption Works
Obot uses the Kubernetes `EncryptionConfiguration` format. Each configured resource has a transformer that encrypts selected fields before storage and decrypts them on retrieval. Cloud KMS providers use a local provider process over a Unix socket; a custom AES-GCM configuration uses the supplied key. Encrypted field values are base64-encoded for storage.
The built-in cloud configurations include the resources below. A custom configuration must include the corresponding resource names to protect those fields.
## Encrypted Resources and Fields
These names identify encryption transformers; they do not mean every field in the resource is encrypted. IDs, timestamps, and other metadata can remain readable.
| Resource | Selected fields protected when configured |
| ------------------------------------ | ---------------------------------------------------------------------------------------------------------------------------------------- |
| `credentials.obot.obot.ai` | Serialized credential secret values, such as API keys and upstream access tokens; credential names and context metadata are not included |
| `users.obot.obot.ai` | `username`, `email`, `displayName`, `iconURL`, `originalEmail`, `originalUsername`; local-auth user `email` also uses this transformer |
| `identities.obot.obot.ai` | `providerUsername`, `email`, `providerUserID`, `providerGroupLookupID`, `iconURL` |
| `mcpoauthtokens.obot.obot.ai` | `accessToken`, `refreshToken`, `clientID`, `clientSecret` |
| `mcpoauthpendingstates.obot.obot.ai` | `state`, `verifier`, `clientID`, `clientSecret` |
| `mcpauditlogs.obot.obot.ai` | MCP request and response bodies and headers, including mutated requests and original responses; local-agent details listed below |
| `llmauditlogs.obot.obot.ai` | Request and response headers and bodies, including `policyModifiedRequestBody` |
| `policyviolations.obot.obot.ai` | `blockedContent` |
| `properties.obot.obot.ai` | Stored property `value` |
### MCP and Local-Agent Audit Details
For MCP traffic, the audit transformer encrypts `requestBody`, `mutatedRequestBody`, `responseBody`, `originalResponseBody`, `requestHeaders`, and `responseHeaders`.
For local-agent tool calls in the same audit store, it encrypts the outcome error, hostname, local username, reported user email, working directory, Git root, Git remotes, Git branch, transcript path, request body, response body, and raw event. Other audit metadata, such as timestamps and tool names, is outside this field-level protection.
### Local Passwords
Local-auth passwords are stored as salted Argon2id hashes regardless of whether an encryption provider is configured. The password hash is not reversibly encrypted. This differs from upstream passwords stored as credential secret values, which must be recoverable for use.
## Enabling Encryption on an Existing Installation
Enabling encryption does not automatically encrypt all existing data. Existing installations may require a separate migration to protect previously stored data.
---
Document: Isolate workloads
Version: v0.28.0
Markdown: https://docs.obot.ai/v0.28.0/security/isolation.md
HTML: https://docs.obot.ai/security/isolation
# Isolate workloads
Different controls apply to gateway destinations, hosted workloads, and tunnel machines.
| Control | Scope |
| ------------------------------------------------- | --------------------------------------------------------------------------------------------------------------- |
| Gateway localhost/private/link-local restrictions | Direct MCP destination validation by Obot |
| Kubernetes MCP NetworkPolicy | Selected MCP pods in the MCP namespace; does not restrict the Obot server itself |
| Pod Security Admission and RuntimeClass | Pod admission and execution isolation on configured Kubernetes nodes |
| Domain egress provider | Per-server hosted MCP domain allowlists; currently Aviatrix, with HTTPS/443 restrictions |
| Tunnel allowed URLs | Destinations reached by the tunnel machine; ordinary direct-gateway destination restrictions do not apply there |
Keep [MCP NetworkPolicy and pod-security settings](https://docs.obot.ai/v0.28.0/configuration/mcp-deployments-in-kubernetes.md) enabled unless a reviewed workload requires an exception. RuntimeClass requires the corresponding runtime to be installed on eligible nodes.
[Domain-based egress](https://docs.obot.ai/v0.28.0/configuration/mcp-server-egress-control.md) is separate from the built-in IP-based policy. Its remote endpoints are not hosted workloads and are not covered by this feature.
Obot itself needs connectivity to its database, identity provider, upstream services, storage, and possibly cloud credential metadata. Scope any operator-managed server-egress policy to those dependencies; do not assume a blanket private-IP block is compatible with your topology.
Docker's mounted socket provides host-level container management. Use it for trusted evaluation. For private remote services, review [tunnel security](https://docs.obot.ai/v0.28.0/functionality/mcp-tunnels.md#obot-doc-security-behavior).
---
Document: MCP image maintenance
Version: v0.28.0
Markdown: https://docs.obot.ai/v0.28.0/security/mcp-images.md
HTML: https://docs.obot.ai/security/mcp-images
# MCP image maintenance
Obot builds selected servers from the [MCP catalog](https://github.com/obot-platform/mcp-catalog) in the [MCP images repository](https://github.com/obot-platform/mcp-images) and publishes them under `ghcr.io/obot-platform/mcp-images/`. These images package npm or Python applications, upstream binaries, source builds, or existing containers. The [repackage manifest](https://github.com/obot-platform/mcp-images/blob/main/repackaging/images.yaml) and [repository-image manifest](https://github.com/obot-platform/mcp-images/blob/main/repository-images.yaml) list the configured builds and upstream versions covered here.
## Why use a packaged image?
Installing a server with npm or uv can resolve different transitive dependencies even when the server's own version is pinned. Lockfiles used by [npm ci](https://docs.npmjs.com/cli/v11/commands/npm-ci/) and [uv](https://docs.astral.sh/uv/concepts/projects/sync/) control dependency selection, but the language runtime and OS libraries still need to be managed separately.
An image packages the installed server, dependencies, and runtime together. Deployments reuse that result without downloading or installing the packaged dependencies at startup. You can evaluate an image once and deploy the same contents across environments.
[Pin by digest](https://docs.docker.com/build/building/best-practices/#pin-base-image-versions) to select the same artifact for a given platform; tags can move. Rebuilding the Dockerfile later may incorporate newer dependencies, so repeatable deployment does not imply byte-identical builds.
## How updates reach the catalog
Changes to configured upstream versions, build recipes, or shared bases trigger [builds of the affected images](https://github.com/obot-platform/mcp-images/blob/main/.github/workflows/publish-images.yml). Maintainers can also request rebuilds. Native AMD64 and ARM64 builds must both succeed before they are published under one image reference.
Versioned server images use `{version}-obotN` tags. For example, rebuilding upstream version `1.2.3` with patched dependencies could advance `1.2.3-obot1` to `1.2.3-obot2`. Each build receives a new revision, and the workflow refuses to replace an existing revision with different contents. Some catalog entries still use older tag formats or `latest`.
After publication, signing, and scanning, automation requests a [catalog-update pull request](https://github.com/obot-platform/mcp-catalog/blob/main/.github/workflows/update-image-tag.yml). Merging it changes the catalog's image reference. Existing Obot-managed vMCPs keep their saved definitions until an owner or administrator applies the update; Git-managed vMCPs refresh through catalog sync. See [Snapshots and updates](https://docs.obot.ai/v0.28.0/mcp-gateway/publish.md#obot-doc-virtual-mcps-snapshots-and-updates).
## Security improvements from repackaging
Repackaging lets Obot update OS packages and runtime dependencies without waiting for a new upstream server release. Recipes support explicit dependency constraints and overrides for targeted fixes.
The shared Node and Python images use Wolfi bases, upgrade OS packages during assembly, and run servers as a non-root user. Other images have individual recipes: [Grafana](https://github.com/obot-platform/mcp-images/blob/main/repackaging/Dockerfile.grafana) refreshes its Alpine packages, while [Tableau](https://github.com/obot-platform/mcp-images/blob/main/mcp-servers/Dockerfile.tableau) installs production dependencies and removes npm and Yarn from the final image. Removing unnecessary tools reduces the software that must be patched.
The [publication workflow](https://github.com/obot-platform/mcp-images/blob/main/.github/workflows/publish-image.yml) signs each image digest with Cosign so consumers can verify the publisher. It also produces a software bill of materials (SBOM) in SPDX JSON format, listing detected components as a build artifact.
Trivy reports known vulnerabilities to GitHub code scanning and can rescan published images without rebuilding them. The workflow does not require zero findings before publication.
---
Document: Audit data and retention
Version: v0.28.0
Markdown: https://docs.obot.ai/v0.28.0/security/audit-data.md
HTML: https://docs.obot.ai/security/audit-data
# Audit data and retention
Audit records, device inventories, and product analytics have different purposes and access rules.
| Data | Guidance |
| ------------------------------------- | ------------------------------------------------------------------------------------------------------------------------------------------------------------------------------------------ |
| MCP/LLM request metadata and payloads | [MCP audit logs](https://docs.obot.ai/v0.28.0/security/audit-data.md#obot-doc-audit-logs-and-usage-mcp-audit-logs) and [LLM audit logs](https://docs.obot.ai/v0.28.0/llm-gateway/audit.md) |
| One-time and scheduled exports | [Audit Log Exports](https://docs.obot.ai/v0.28.0/configuration/audit-log-export.md) |
| Device scans and captured files | [Inventory and local auditing](https://docs.obot.ai/v0.28.0/device-management/inventory.md) |
| Aggregate telemetry and consent | [Product Analytics](https://docs.obot.ai/v0.28.0/configuration/product-analytics.md) |
| Encrypted fields | [Encryption coverage](https://docs.obot.ai/v0.28.0/security/credentials.md) |
MCP audit logs, LLM audit logs, and device scans have separate retention settings in [Server Configuration](https://docs.obot.ai/v0.28.0/configuration/server-configuration.md). Their documented defaults are 90 days; setting the corresponding retention value to zero disables its automatic cleanup. Export records before expiration when longer retention is required.
Admin and Owner can view audit metadata; sensitive gateway request/response payloads require the Auditor add-on role. Export permissions follow the same distinction. Device scan access and captured-file behavior are documented separately—do not assume every collected field has identical restrictions.
Captured configuration files can contain sensitive content even when structured scan fields omit secret values. Field encryption does not protect exported objects or all metadata; configure destination storage permissions and encryption separately.
Product-analytics consent is separate from update checks. See the analytics guide for what is collected and the relevant configuration controls.
The MCP Platform provides visibility into MCP and LLM gateway activity through audit logs and usage tracking. These features help with monitoring, compliance, and understanding how MCP servers and LLM gateway models are being used.
> **INFO**
>
> Auditor Role
>
> Sensitive data (MCP request/response bodies) can **only** be viewed by users with the Auditor role. All other roles, including Owner and Admin, see only metadata for these resources. The Auditor role is an add-on permission that can be combined with any other role, granting read-only access to sensitive data across the platform. See [User Roles](https://docs.obot.ai/v0.28.0/security/policy-coverage.md#obot-doc-user-roles-auditor) for details.
## MCP Audit Logs
Audit logs capture all MCP interactions that flow through the gateway.
### What's Logged
- **MCP Requests**: Tool calls, resource access, and other MCP operations
- **MCP Responses**: Results returned from MCP servers
- **User Information**: Who made the request
- **Timestamps**: When the request occurred
- **Server Information**: Which MCP server handled the request
### Viewing Audit Logs
Navigate to **Operations > Audit Logs**, then select **MCP** in the MCP Platform.
The audit log view shows:
- Timestamp
- User
- MCP Server
- Operation type
- Status (success/failure)
### Detailed View
Click on any log entry to see additional details:
- Request and response metadata
- Error details (if applicable)
- Full request/response payloads and headers (Auditor role required)
### Filtering
Filter logs by:
- Date range
- User
- MCP Server
- Operation type
- Status
### Retention
Audit logs are automatically deleted after **90 days** by default. To preserve logs beyond this period, use the export functionality before they are deleted. See [Server Configuration](https://docs.obot.ai/v0.28.0/configuration/server-configuration.md) for retention settings.
### Exporting Audit Logs
MCP audit logs can be exported for external analysis, compliance requirements, or long-term retention. See [Audit Log Export](https://docs.obot.ai/v0.28.0/configuration/audit-log-export.md) for configuration options.
## Usage
Usage tracking provides aggregate statistics about MCP server activity.
### Metrics Available
- **Request counts**: Total requests per server
- **User activity**: Which users are using which servers
- **Tool usage**: Most frequently called tools
- **Error rates**: Success/failure ratios
- **Response times**: Performance metrics
### Viewing Usage
Navigate to **Operations > Usage** in the MCP Platform.
### Use Cases
- **Cost management**: Understand which servers are most used
- **Capacity planning**: Identify servers that may need scaling
- **Adoption tracking**: See which tools are popular
- **Troubleshooting**: Identify servers with high error rates
## Access by Role
**Power User / Power User+**
- View audit logs and usage for their own activity
- Metadata only (no request/response content)
**Admin / Owner**
- View audit logs and usage for all users
- Export MCP and LLM audit logs
- Metadata only (no request/response content)
**Auditor (add-on)**
- View full request/response payloads and headers
- Export audit logs with full content
- Read-only access to admin views
## Privacy Considerations
Audit logs may contain sensitive information from MCP requests/responses and LLM gateway requests/responses. Consider:
- **Data retention**: Configure how long logs are kept (see [Retention](https://docs.obot.ai/v0.28.0/security/audit-data.md#obot-doc-audit-logs-and-usage-retention))
- **Access control**: Limit who can view detailed logs
- **Export security**: Secure any exported log data
- **Compliance**: Ensure logging meets regulatory requirements
## Creating Exports
Configure [export storage and credentials](https://docs.obot.ai/v0.28.0/configuration/audit-log-export.md#obot-doc-storage-configuration) first. MCP and LLM exports share the storage configuration.
### One-Time Exports
One-time exports allow you to export MCP or LLM audit logs for a specific time range with optional filters.
1. **Navigate to Audit Logs**:
- For MCP audit logs, go to Operations → Audit Logs → MCP
- For LLM audit logs, go to Operations → Audit Logs → Model
- Apply any desired filters
2. **Create Export**:
- Click "Create Export" → "Create One-time Export"
- If filters are applied, you'll be asked whether to include them
3. **Configure Export**:
- **Name**: Descriptive name for the export
- **Bucket**: Storage bucket name where exports will be saved
- **Key Prefix**: Path prefix within the bucket. If empty, defaults to `mcp-audit-logs/YYYY/MM/DD/` for MCP exports and `llm-audit-logs/YYYY/MM/DD/` for LLM exports, based on the current date.
- **Time Range**: Start and end dates/times
- **Filters**: Additional filters to apply
4. **Submit Export**:
- Click "Create Export" to start the process
- Monitor progress in the exports list
### Scheduled Exports
Scheduled exports run automatically at specified intervals.
1. **Create Schedule**:
- Click "Create Export" → "Create Export Schedule"
- Configure the same options as one-time exports
2. **Schedule Configuration**:
- **Frequency**: Hourly, Daily, Weekly, or Monthly
- **Time**: Specific time to run (for daily/weekly/monthly)
- **Day**: Day of week (weekly) or month (monthly)
- **Bucket**: Storage bucket name where exports will be saved
- **Key Prefix**: Path prefix within the bucket. If empty, defaults to `mcp-audit-logs/YYYY/MM/DD/` for MCP exports and `llm-audit-logs/YYYY/MM/DD/` for LLM exports, based on the current date.
3. **Manage Schedules**:
- View and manage schedules in the "Export Schedules" tab
- Enable/disable schedules as needed
- Edit schedule configuration
---
Document: Deployment overview
Version: v0.28.0
Markdown: https://docs.obot.ai/v0.28.0/installation/overview.md
HTML: https://docs.obot.ai/installation/overview
# Deployment overview
This guide helps you choose the right deployment method for your use case. Before selecting a deployment option, it’s useful to understand the core components that make up an Obot installation:
- **Obot Server**: The core application server, distributed as a container image.
- **MCP Server Hosting Platform**: The environment where Obot deploys users’ MCP servers. This matches the platform on which Obot itself is deployed (Docker or Kubernetes).
- **PostgreSQL Database**: The primary database for Obot. PostgreSQL 17+ is required.
Below you’ll find an overview of the available deployment options, along with system requirements and links to reference architectures.
## Docker Deployment
Docker provides the fastest way to get Obot running on your local machine or a single server for development, testing, and proof-of-concept use cases.
- Simple setup using `docker run`
- Includes a built-in PostgreSQL database and local file storage
- Deploys MCP servers as Docker containers using the host’s Docker socket
For more details, see the [Docker Deployment Guide](https://docs.obot.ai/v0.28.0/installation/docker-deployment.md).
## Kubernetes Deployment
Kubernetes provides the best way to run Obot reliably at scale in production environments.
- Helm chart available at [charts.obot.ai](https://charts.obot.ai/)
- Integrates with cloud-native services such as KMS
- Requires an external PostgreSQL database; configure file storage for the features you enable
For more details, see the [Kubernetes Deployment Guide](https://docs.obot.ai/v0.28.0/installation/kubernetes-deployment.md).
## Production System Requirements
For production deployments, the following components are required:
- **Kubernetes**: A production-grade Kubernetes cluster with capacity for Obot and the MCP servers it will manage
- **External PostgreSQL database**: PostgreSQL 17+
- **Encryption provider**: AWS KMS, Google Cloud KMS, or Azure Key Vault
- **Authentication provider**: See our supported [Authentication Providers](https://docs.obot.ai/v0.28.0/configuration/auth-providers.md)
- **TLS/SSL certificates**: For secure HTTPS access
- **Backup strategy**: Regular backups for the database and any file or object storage in use
## Cloud Platform Reference Architectures
If you plan to deploy Obot on a managed Kubernetes service, these reference architectures provide infrastructure guidance and best practices:
- [GCP GKE Reference Architecture](https://docs.obot.ai/v0.28.0/installation/reference-architectures/gcp-gke.md)
- [AWS EKS Reference Architecture](https://docs.obot.ai/v0.28.0/installation/reference-architectures/aws-eks.md)
- [Azure AKS Reference Architecture](https://docs.obot.ai/v0.28.0/installation/reference-architectures/azure-aks.md)
## Next Steps
1. Choose a deployment method above
2. Follow the corresponding deployment guide
3. [Set up the local Obot CLI](https://docs.obot.ai/v0.28.0/reference/cli-api.md)
4. [Configure authentication](https://docs.obot.ai/v0.28.0/configuration/auth-providers.md)
5. [Add LLM providers](https://docs.obot.ai/v0.28.0/configuration/model-providers.md)
6. Review the [server configuration options](https://docs.obot.ai/v0.28.0/configuration/server-configuration.md)
## Getting Help
- See the [FAQ](https://docs.obot.ai/v0.28.0/faq.md)
---
Document: Docker (evaluation)
Version: v0.28.0
Markdown: https://docs.obot.ai/v0.28.0/installation/docker-deployment.md
HTML: https://docs.obot.ai/installation/docker-deployment
# Docker (evaluation)
Deploy Obot using Docker for local development, testing, and proof-of-concept scenarios.
## Overview
Docker deployment is the fastest way to get Obot running. It's ideal for:
- Local development and testing
- Single-machine deployments
- Proof-of-concept and evaluation
- Small team usage
For production deployments, see [Kubernetes Deployment](https://docs.obot.ai/v0.28.0/installation/kubernetes-deployment.md).
## Prerequisites
- Docker installed
- 2+ CPU cores and 4GB RAM available
- 10GB disk space
## Quick Start
### Basic Deployment (Built-in PostgreSQL)
Run Obot with the built-in PostgreSQL instance (suitable for development and testing):
```bash
docker run -d \
--name obot \
-v obot-data:/data \
-v /var/run/docker.sock:/var/run/docker.sock \
-p 8080:8080 \
ghcr.io/obot-platform/obot:latest
```
> **IMPORTANT**
>
> Running Obot without authentication is not recommended unless you are behind a secure firewall, as unauthenticated users could launch MCP servers by sending requests to port 8080 on your system.
> **WARNING**
>
> Host access and trusted users
>
> This deployment bind-mounts the host Docker socket (`-v /var/run/docker.sock:/var/run/docker.sock`) so Obot can run MCP servers as sibling containers. Any MCP server Obot launches — including a **containerized** server, which runs an arbitrary container image with a user-supplied command — therefore runs on the host Docker daemon, which is equivalent to host-level access on that machine.
>
> Users with the **Power User** or **Power User+** role can deploy MCP servers, so on this deployment they can effectively run code on the host. Use Docker deployment only for development, evaluation, or single-tenant use where all such users are trusted. For multi-tenant deployments or untrusted users, use the [Kubernetes deployment](https://docs.obot.ai/v0.28.0/installation/kubernetes-deployment.md), which runs each MCP server in its own pod and supports stronger isolation controls you configure (restricted Pod Security Admission, a NetworkPolicy, and sandboxed runtimes such as gVisor or Kata Containers). See [User Roles — Security Model](https://docs.obot.ai/v0.28.0/security/policy-coverage.md#obot-doc-user-roles-security-model).
#### With Authentication (Recommended)
```bash
docker run -d \
--name obot \
-v obot-data:/data \
-v /var/run/docker.sock:/var/run/docker.sock \
-p 8080:8080 \
-e OBOT_SERVER_ENABLE_AUTHENTICATION=true \
-e OBOT_BOOTSTRAP_TOKEN=your-bootstrap-token \
ghcr.io/obot-platform/obot:latest
```
#### Using a Custom Port
If you want to expose Obot on a different port (e.g., `-p 9999:8080`), you must also set `OBOT_SERVER_HOSTNAME` so that authentication redirects and MCP server connection URLs work correctly:
```bash
docker run -d \
--name obot \
-v obot-data:/data \
-v /var/run/docker.sock:/var/run/docker.sock \
-p 9999:8080 \
-e OBOT_SERVER_HOSTNAME=localhost:9999 \
-e OBOT_SERVER_ENABLE_AUTHENTICATION=true \
-e OBOT_BOOTSTRAP_TOKEN=your-bootstrap-token \
ghcr.io/obot-platform/obot:latest
```
## Accessing Obot
Once started, access Obot at [http://localhost:8080](http://localhost:8080).
If you enabled authentication, log in with your bootstrap token, create the owner account, and then set up an authentication provider. See [Setting up Authentication](https://docs.obot.ai/v0.28.0/configuration/auth-providers.md#obot-doc-setting-up-authentication). If you didn't supply a bootstrap token, a random one will be generated and can be found in the container's logs by searching for "Bootstrap token".
### Preconfigure a Local owner
For an unattended initial deployment, configure Local authentication with an owner email and a one-time setup token. This is an alternative to bootstrap-token login; use a new data volume for a new evaluation installation.
```bash
export OBOT_SERVER_LOCAL_AUTH_INITIAL_OWNER_EMAIL="owner@example.com"
export OBOT_SERVER_LOCAL_AUTH_INITIAL_OWNER_SETUP_TOKEN="$(openssl rand -hex 32)"
docker run -d \
--name obot \
-v obot-data:/data \
-v /var/run/docker.sock:/var/run/docker.sock \
-p 8080:8080 \
-e OBOT_SERVER_ENABLE_AUTHENTICATION=true \
-e OBOT_SERVER_LOCAL_AUTH_INITIAL_OWNER_EMAIL \
-e OBOT_SERVER_LOCAL_AUTH_INITIAL_OWNER_SETUP_TOKEN \
ghcr.io/obot-platform/obot:main
```
This preconfiguration requires a build that includes the Local owner setup flow. The example uses the development `main` image for the unreleased documentation; record its digest when you need a reproducible evaluation.
Open `http://localhost:8080/activate#token=` in your browser, substituting the generated token. Set and confirm a password of at least 12 characters. After activation, sign in with the owner email and that password; the setup token is revoked when password setup completes. Treat the setup link as a credential and do not include it in shared screenshots or logs.
The Local provider is configured automatically. Bootstrap-token login is disabled for this initial-owner setup. See [authentication configuration](https://docs.obot.ai/v0.28.0/security/authentication.md) for setup-link expiration and [Local authentication](https://docs.obot.ai/v0.28.0/configuration/auth-providers.md#obot-doc-local) for account management.
## Next Steps
1. **Configure Authentication**: Set up [auth providers](https://docs.obot.ai/v0.28.0/security/authentication.md) for secure access
2. **Add LLM Providers**: Add providers (OpenAI, Anthropic, etc.) under **LLM Gateway** → **Providers**. See [Configure providers and models](https://docs.obot.ai/v0.28.0/configuration/model-providers.md).
3. **Set Up MCP Servers**: Configure [MCP servers](https://docs.obot.ai/v0.28.0/functionality/mcp-servers.md) for extended functionality
## Related Documentation
- [Installation Overview](https://docs.obot.ai/v0.28.0/installation/overview.md)
- [Kubernetes Deployment](https://docs.obot.ai/v0.28.0/installation/kubernetes-deployment.md)
- [Server Configuration](https://docs.obot.ai/v0.28.0/configuration/server-configuration.md)
---
Document: Kubernetes (production)
Version: v0.28.0
Markdown: https://docs.obot.ai/v0.28.0/installation/kubernetes-deployment.md
HTML: https://docs.obot.ai/installation/kubernetes-deployment
# Kubernetes (production)
Deploy Obot on Kubernetes for production-grade reliability, scalability, and high availability.
> **INFO**
>
> Helm Chart Reference
>
> For a complete list of all available Helm chart configuration values, see [charts.obot.ai](https://charts.obot.ai/).
> **WARNING**
>
> Experimental Claude Environments
>
> The optional Claude Environments integration has additional certificate API, worker-node, and storage requirements. Review [cluster compatibility](https://docs.obot.ai/v0.28.0/claude-environments/cluster-requirements.md) before enabling it; the general Obot requirements below are not sufficient on their own.
## Prerequisites
- **Helm**
- **PostgreSQL 17+**
- **StorageClass** (if using persistent volumes)
- **Encryption provider** (AWS KMS, GCP KMS, or Azure Key Vault recommended)
### Minimum Cluster Requirements
- **Nodes**: 1+ nodes
- **CPU**: 2 cores
- **Memory**: 4GB
### Recommended Cluster Requirements
- **HA Cluster**
- **CPU**: 4 cores for Obot
- **Memory**: 8GB for Obot
## Helm Installation
Obot provides a Helm chart for easy deployment [here](https://charts.obot.ai).
The chart has sane defaults for a test cluster.
### Production Installation
Create a `values.yaml` file with your production configuration:
```yaml
# Optionally customize replica count for high availability
# replicaCount: 2
# Enable ingress or use a service of type loadbalancer to expose Obot
ingress:
enabled: true
hosts:
-
# Disable local persistence only if no enabled feature needs files retained under /data
persistence:
enabled: false
# In this example, we will be using AWS KMS for encryption.
# Sensitive values must be configured under secret.
secret:
# this should have IAM permissions for KMS
AWS_ACCESS_KEY_ID:
AWS_SECRET_ACCESS_KEY:
# This should be set to avoid ratelimiting certain actions that interact with github, such as server sources
GITHUB_AUTH_TOKEN:
# optional - this will be generated automatically if you do not set it
OBOT_BOOTSTRAP_TOKEN:
# Point this to your postgres database
OBOT_SERVER_DSN: postgres://:@/
# Optional. These configure the LLM gateway's OpenAI and Anthropic providers at startup.
# You can set either, neither or both, or add providers later under LLM Gateway > Providers.
OPENAI_API_KEY:
ANTHROPIC_API_KEY:
# Non-sensitive values must be configured under config.
config:
AWS_REGION:
# Enable encryption
OBOT_SERVER_ENCRYPTION_PROVIDER: aws
OBOT_AWS_KMS_KEY_ARN:
OBOT_SERVER_HOSTNAME:
```
### High Availability
To enable a high availability setup, uncomment the `replicaCount` line and set it to `2` or higher. Use an external PostgreSQL database with its own availability and recovery plan.
If enabled features require shared files under `/data`, configure a `ReadWriteMany` volume accessible to every replica. A shared `ReadWriteOnce` claim is not a multi-replica storage solution. See [Persistent Storage](https://docs.obot.ai/v0.28.0/installation/kubernetes-persistent-storage.md) and [High availability](https://docs.obot.ai/v0.28.0/operations/high-availability.md).
For configuration options, see [Server Configuration](https://docs.obot.ai/v0.28.0/configuration/server-configuration.md) and [Encryption Providers](https://docs.obot.ai/v0.28.0/configuration/encryption-providers/aws-kms.md).
## Cloud-Specific Guides
For detailed cloud-specific deployment instructions:
- [Google Kubernetes Engine (GKE)](https://docs.obot.ai/v0.28.0/installation/reference-architectures/gcp-gke.md)
- [Amazon Elastic Kubernetes Service (EKS)](https://docs.obot.ai/v0.28.0/installation/reference-architectures/aws-eks.md)
- [Azure Kubernetes Service (AKS)](https://docs.obot.ai/v0.28.0/installation/reference-architectures/azure-aks.md)
## Security Configuration
### Network Policy for MCP Servers
For production deployments, ensure the NetworkPolicy is enabled to restrict network access from MCP server pods:
```yaml
mcpNamespace:
networkPolicy:
enabled: true # This is already enabled by default
dnsNamespace: kube-system # Adjust if your DNS is in a different namespace
```
When enabled, this policy:
- Restricts MCP servers to only communicate with Obot, DNS, and public internet
- Blocks access to private IP ranges and internal cluster resources
- Prevents potential lateral movement if an MCP server is compromised
For details, see [MCP Deployments in Kubernetes - Network Policy](https://docs.obot.ai/v0.28.0/configuration/mcp-deployments-in-kubernetes.md#obot-doc-network-policy).
### Pod Security Admission for MCP Servers
Obot applies Pod Security Standards to the MCP namespace using Pod Security Admission (PSA). The default configuration uses the **restricted** policy level for maximum security:
```yaml
mcpNamespace:
podSecurity:
enforce: restricted # Can be: privileged, baseline, or restricted
enforceVersion: latest
audit: restricted
auditVersion: latest
warn: restricted
warnVersion: latest
```
The restricted policy follows current Pod hardening best practices and provides the highest level of security. If you need more permissive settings, you can change to **baseline** or **privileged** levels.
For details, see [MCP Deployments in Kubernetes - Pod Security Admission](https://docs.obot.ai/v0.28.0/configuration/mcp-deployments-in-kubernetes.md#obot-doc-pod-security-admission).
### Restricting Obot Server Egress
The [Network Policy for MCP Servers](https://docs.obot.ai/v0.28.0/installation/kubernetes-deployment.md#obot-doc-network-policy-for-mcp-servers) above restricts the **MCP server pods**. It does not restrict the **Obot server** itself, which makes its own outbound connections as part of normal operation. In multi-tenant deployments or deployments with untrusted users, you may want to constrain which destinations the Obot server can reach, as a defense-in-depth measure.
If you want to constrain the Obot server's egress as a defense-in-depth measure, scope it tightly to your specific deployment — there is no safe blanket blocklist. Depending on your setup, the Obot server legitimately needs to reach private ranges (its database and in-cluster services such as a self-hosted model provider or the MCP namespace) and, with some cloud authentication methods, the cloud instance metadata endpoint (`169.254.169.254`), where it obtains credentials for integrations such as KMS. See [Network requirements](https://docs.obot.ai/v0.28.0/installation/network-requirements.md) for the external destinations the Obot server connects to.
## Next Steps
1. **Configure Authentication**: Set up [auth providers](https://docs.obot.ai/v0.28.0/configuration/auth-providers.md)
2. **Add LLM Providers**: Add providers under **LLM Gateway** → **Providers**. See [Configure providers and models](https://docs.obot.ai/v0.28.0/configuration/model-providers.md).
3. **Set Up MCP Servers**: Configure [MCP servers](https://docs.obot.ai/v0.28.0/functionality/mcp-servers.md)
4. **Configure Monitoring**: Set up logging and metrics
5. **Review Security**: Enable authentication and encryption
## Related Documentation
- [Installation Overview](https://docs.obot.ai/v0.28.0/installation/overview.md)
- [Server Configuration](https://docs.obot.ai/v0.28.0/configuration/server-configuration.md)
- [Settings for Hosted MCP Server Deployments](https://docs.obot.ai/v0.28.0/configuration/mcp-deployments-in-kubernetes.md)
---
Document: Network requirements
Version: v0.28.0
Markdown: https://docs.obot.ai/v0.28.0/installation/network-requirements.md
HTML: https://docs.obot.ai/installation/network-requirements
# Network requirements
This page lists the outbound connections Obot makes to hosts outside your deployment, what each one is for, and how to
change or avoid it. Use it to write firewall or egress rules, or to plan an installation with restricted internet
access.
Connections inside your deployment, such as to PostgreSQL, the Kubernetes API, and MCP server pods, aren't listed.
With some cloud authentication methods, Obot also reaches the cloud instance metadata endpoint (`169.254.169.254`).
## Connections from the Obot server
The Obot server makes these connections on a default installation, whichever MCP runtime you use.
To allow all of them, allow outbound HTTPS to:
- `license.obot.ai`
- `upgrade-server.obot.ai`
- `github.com`, `release-assets.githubusercontent.com`, and `objects.githubusercontent.com`
- `model-service.obot.ai`
### License validation
- **Destination:** `https://license.obot.ai`
- **When:** At startup, every 24 hours, and when a key is added, changed, or rechecked. Only when a license key is
configured.
- **If it fails:** Obot keeps the entitlements from the last successful check until the license's last known expiration date. See
[How Obot validates a license](https://docs.obot.ai/v0.28.0/enterprise/overview.md#obot-doc-how-obot-validates-a-license).
- **To change or avoid it:** Required to use a license key. Air-gapped installations can't validate a key yet.
Support for offline license key validation is coming soon.
### Update checks, registration, and product analytics
- **Destination:** `https://upgrade-server.obot.ai`
- **When:** Update checks every 24 hours. [Community registration](https://docs.obot.ai/v0.28.0/enterprise/overview.md#obot-doc-registering-obot-community)
when an administrator registers. [Product analytics](https://docs.obot.ai/v0.28.0/configuration/product-analytics.md) once a day, with
administrator consent, or always when `OBOT_SERVER_PRODUCT_ANALYTICS_MODE=on`.
- **If it fails:** Not fatal. Registration fails with an error.
- **To change or avoid it:** `OBOT_SERVER_DISABLE_UPDATE_CHECK=true` stops update checks, and
`OBOT_SERVER_PRODUCT_ANALYTICS_MODE=off` stops analytics. `OBOT_UPGRADE_SERVER_URL` changes the host for all three.
### Default MCP catalogs
- **Destination:** `https://github.com` (`obot-platform/mcp-catalog` and `obot-platform/system-mcp-catalog`)
- **When:** At startup and every hour.
- **If it fails:** The catalog keeps its existing entries and shows a sync error.
- **To change or avoid it:** Set `OBOT_SERVER_DEFAULT_MCPCATALOG_PATH` and `OBOT_SERVER_DEFAULT_SYSTEM_MCPCATALOG_PATH`
to a local directory or an internal Git mirror before first startup. They only take effect when the catalogs are first
created. On a host other than GitHub, GitLab, or Bitbucket, the repository path in a mirror URL must end in `.git`,
optionally followed by `/`. Otherwise Obot fetches it as a single file instead of cloning it. Without a
branch, Obot uses `main`, but the default catalogs use the `v2-schema` branch, so include it, for example
`https://git.example.com/obot/mcp-catalog.git/v2-schema`.
### Default skill repository
- **Destination:** `https://github.com` (`obot-platform/skills`)
- **When:** Every hour. The repository is created on first startup.
- **If it fails:** The repository shows a sync error.
- **To change or avoid it:** Set `OBOT_DEFAULT_SKILL_REPO_URL` to the HTTPS URL of an internal Git mirror before first
startup, or delete the skill repository in the admin UI. On a host other than GitHub, GitLab, or Bitbucket, the URL
must end in `.git`, for example `https://git.example.com/obot/skills.git`. A local path isn't supported, and Obot
doesn't start if the value isn't an HTTPS Git URL.
### Obot Sentry MDM assets
- **Destination:** `https://github.com`, `https://release-assets.githubusercontent.com`, and
`https://objects.githubusercontent.com` (the `obot-platform/obot-sentry` release tarball)
- **When:** When the source changes, and every hour until it succeeds.
- **If it fails:** Not fatal. [Obot Sentry](https://docs.obot.ai/v0.28.0/device-management/how-sentry-works.md) MDM assets aren't available until
it succeeds.
- **To change or avoid it:** Set `OBOT_SERVER_MDM_ASSET_SOURCE` to a local directory, a local tar archive, or an
internal URL.
### Model pricing
- **Destination:** `https://upgrade-server.obot.ai/v1/model-data` (`pricing.json` and `model-parameters.json`)
- **When:** At startup and every 6 hours.
- **If it fails:** Not fatal. The LLM gateway keeps its current model prices. Obot's published images and release
binaries include a copy of them.
- **To change or avoid it:** Set `OBOT_SERVER_LLM_GATEWAY_MODEL_DATA_URL` to an HTTP(S) URL for an internal mirror
that serves the same files, or to `off` to use only the included copy. `OBOT_UPGRADE_SERVER_URL` doesn't change it.
### MCP server tester model
- **Destination:** `https://model-service.obot.ai`
- **When:** When a user runs the [MCP server tester](https://docs.obot.ai/v0.28.0/mcp-gateway/inspector.md), and when an admin opens
**Platform > Settings** to show model service usage. Only when the LLM gateway has no providers, a valid license is
present, and **Enable Model Proxy** is on under **Platform > Settings > Model Proxy**.
- **If it fails:** The tester can't generate, and **Platform > Settings** shows model service usage as N/A.
- **To change or avoid it:** Add a provider to the LLM gateway, turn off **Enable Model Proxy**, or set
`OBOT_SERVER_MODEL_PROXY_URL` to an empty string to turn it off.
Startup doesn't depend on any of these. Obot starts without internet access, and the affected features recover once
the destination is reachable.
## Connections for MCP servers
Where MCP server traffic comes from depends on the MCP runtime: the Docker host when Obot runs MCP servers with
Docker, or the cluster's nodes and pods when it runs them on Kubernetes. Both runtimes need:
| Destination | Purpose | When | How to change or avoid it |
| ---------------------------------------------------------- | -------------------------------------------------------------------------------- | ----------------------------------------- | ----------------------------------------------------------------------------------------------------------------------------------------------------------------------------------------------------------------------------------- |
| `ghcr.io` | MCP server base images (`ghcr.io/obot-platform/mcp-images/*`) | Each time an MCP server starts | Mirror the images and set `OBOT_SERVER_MCPBASE_IMAGE`, `OBOT_SERVER_MCPHTTPWEBHOOK_BASE_IMAGE`, and `OBOT_SERVER_MCPOPEN_APIIMAGE`. See [Server configuration](https://docs.obot.ai/v0.28.0/configuration/server-configuration.md). |
| The registry of each containerized MCP server's image | The MCP server's image | Each time the MCP server starts | Use images from a registry you can reach |
| `registry.npmjs.org`, `pypi.org`, `files.pythonhosted.org` | Packages for `npx` and `uvx` MCP servers, downloaded by the MCP server container | Each time one of those MCP servers starts | Set a registry env var on each `npx` or `uvx` server, for example a static `NPM_CONFIG_REGISTRY` or `UV_INDEX_URL` value. Obot has no global setting for this. Or use containerized MCP servers with images in your registry. |
| Whatever each MCP server calls | The MCP server's own work, such as a SaaS API | While the MCP server runs | Depends on the MCP server |
If an MCP server's image or packages can't be downloaded, that MCP server doesn't start. Other MCP servers and the rest
of Obot keep working.
### Docker runtime
- The Docker daemon pulls the images, so it needs registry access and uses its own proxy configuration, not Obot's.
Obot asks for a pull each time an MCP server starts, and falls back to a local copy only when the registry refuses
the pull, not when it can't be reached.
- Short-lived setup containers also use `OBOT_SERVER_MCPBASE_IMAGE`. They're needed for every `npx` and `uvx` server
and for any MCP server with file configuration, including containerized servers. Setup pulls the image only if the
Docker host doesn't already have it. Mirror and configure this image even if you don't use `npx` or `uvx` servers.
- MCP server containers reach the internet through the Docker host's network.
### Kubernetes runtime
- The kubelet on each node pulls the images, with `imagePullPolicy: Always`, so nodes need registry access each time
an MCP server pod starts. For private registries, use
[image pull secrets](https://docs.obot.ai/v0.28.0/configuration/mcp-deployments-in-kubernetes.md#obot-doc-image-pull-secrets).
- MCP server pods reach the internet through the cluster's network. Restrict it with the
[network policy for MCP servers](https://docs.obot.ai/v0.28.0/installation/kubernetes-deployment.md#obot-doc-network-policy-for-mcp-servers) or
[MCP server egress control](https://docs.obot.ai/v0.28.0/configuration/mcp-server-egress-control.md).
- The Obot container image, and the images for any other part of your deployment, are pulled by the cluster from
`ghcr.io`, not by Obot.
## Connections that depend on your configuration
These connections only happen when you configure the feature, and go to the destination you configure.
| Feature | Destination |
| --------------------------------------------------------------------------------------------------- | ----------------------------------------------------------------------------------------------------------------------------------------------------------------------------------------------------------------------------- |
| [Auth providers](https://docs.obot.ai/v0.28.0/configuration/auth-providers.md) | Your identity provider: GitHub, Google, Entra, Okta, JumpCloud, Keycloak, or Auth0 |
| [LLM gateway providers](https://docs.obot.ai/v0.28.0/configuration/model-providers.md) | The configured model API, for example `api.openai.com`, `api.anthropic.com`, Azure OpenAI and Azure AI Foundry endpoints, or `bedrock-mantle..api.aws` |
| [Guardrails](https://docs.obot.ai/v0.28.0/functionality/guardrails.md) | The guardrail service you configure, such as Lakera, Azure AI Content Safety, Google Model Armor, or a self-hosted Presidio. LLM judge guardrails use the LLM gateway's providers. |
| Remote MCP servers | The server's URL, plus its OAuth authorization server for discovery, dynamic client registration, and token exchange |
| MCP catalogs and skill repositories added by an admin | The repository host over HTTPS, usually `github.com`, `gitlab.com`, or `bitbucket.org`. For GitHub and GitLab, Obot also calls `api.github.com` or `gitlab.com/api/v4` to check the repository size before cloning. |
| OAuth clients connecting to Obot | The client's Client ID Metadata Document URL and `jwks_uri`, when the client uses them |
| [Encryption providers](https://docs.obot.ai/v0.28.0/configuration/encryption-providers/overview.md) | AWS KMS, Google Cloud KMS, or Azure Key Vault. Obot doesn't start if the provider can't be reached. |
| Audit log storage and exports | Amazon S3 or an S3-compatible endpoint, Google Cloud Storage, or Azure Blob Storage |
| Image pull secrets for Amazon ECR (Kubernetes only) | AWS STS and ECR, about an hour before each token expires |
| MCP server egress control (Kubernetes only) | The Helm repository in `OBOT_SERVER_MCPNETWORK_POLICY_PROVIDER_CHART_REPO`, at startup. Obot doesn't start if it can't fetch the chart. Set `OBOT_SERVER_MCPNETWORK_POLICY_PROVIDER_CHART_PATH` to use a local chart instead. |
| [Claude Environments](https://docs.obot.ai/v0.28.0/claude-environments/overview.md) | Anthropic, your container registry, and your snapshot storage. See [Cluster requirements](https://docs.obot.ai/v0.28.0/claude-environments/cluster-requirements.md). |
## Connections from users' browsers
The Obot UI loads these from the user's browser:
- Fonts from `fonts.googleapis.com` and `fonts.gstatic.com`
- Code highlighting styles from `cdnjs.cloudflare.com`
- MCP server icons from the URLs in the catalog. The Obot server also fetches an icon URL when the MCP registry API
needs its image type and the file extension doesn't show it.
- Embedded videos from YouTube in in-app guides
The UI works without them, with fallback fonts and missing icons.
## Using an HTTP proxy
The Obot server honors the standard `HTTPS_PROXY`, `HTTP_PROXY`, and `NO_PROXY` environment variables for its own
requests, including license validation, update checks, catalog and skill syncs, model pricing, the LLM gateway's
calls to every provider, and remote MCP servers. The encryption providers and Claude Environments also receive them.
Obot sets the proxy on every LLM gateway provider, unless `NO_PROXY` excludes the provider's endpoint or the provider
has its own proxy.
Some connections don't go through the proxy:
- **Auth providers** run as separate processes that don't inherit the proxy variables.
- **MCP servers** don't receive the proxy variables. Set them in each MCP server's environment if they need them.
- **Image pulls** use your container runtime's proxy configuration, not Obot's.
Proxy support for auth providers and MCP servers is coming soon.
Remote MCP servers, MCP OAuth, OpenAPI imports, and catalogs fetched from a plain URL go through Obot's
protection against requests to local and private networks. For those connections:
- Obot resolves the destination hostname with its own DNS before sending the request through the proxy, so it needs
DNS resolution for external hosts.
- A proxy on a private IP address is blocked unless `OBOT_SERVER_DISALLOW_PRIVATE_IPMCP` is `false`, and a proxy on
localhost is blocked unless `OBOT_SERVER_DISALLOW_LOCALHOST_MCP` is `false`. Either setting also allows remote MCP
servers on those addresses.
License validation, update checks, model pricing, and Git clones don't have these restrictions.
## Restricted and air-gapped installations
To run Obot without internet access:
1. Before first startup, point `OBOT_SERVER_DEFAULT_MCPCATALOG_PATH` and `OBOT_SERVER_DEFAULT_SYSTEM_MCPCATALOG_PATH`
at local copies or internal Git mirrors of the catalogs, and `OBOT_DEFAULT_SKILL_REPO_URL` at the HTTPS URL of an
internal Git mirror of the skills repository. Mirror repository paths must end in `.git`, followed by the
`v2-schema` branch for the catalogs.
2. Point `OBOT_SERVER_MDM_ASSET_SOURCE` at a local copy or an internal URL, and set
`OBOT_SERVER_LLM_GATEWAY_MODEL_DATA_URL` to `off` or to an internal HTTP(S) mirror.
3. Set `OBOT_SERVER_DISABLE_UPDATE_CHECK=true`, `OBOT_SERVER_PRODUCT_ANALYTICS_MODE=off`, and
`OBOT_SERVER_MODEL_PROXY_URL=""`.
4. Mirror the MCP base images and set the image variables. With the Docker runtime, include `OBOT_SERVER_MCPBASE_IMAGE`
for setup containers even if you only use containerized MCP servers with file configuration.
5. Use containerized MCP servers with images in your registry, or set a registry env var, such as
`NPM_CONFIG_REGISTRY` or `UV_INDEX_URL`, on each `npx` and `uvx` server.
6. Use an auth provider and LLM gateway providers that you can reach.
Setting a URL variable to an empty string doesn't turn the feature off, except for `OBOT_SERVER_MODEL_PROXY_URL`: Obot
ignores empty values and uses the default. Point the variable at an internal mirror instead, or at a local path where
that setting supports one.
A license key can't be validated without access to `https://license.obot.ai`, so an air-gapped installation runs as
unregistered Obot Community for now. Support for offline license key validation for air-gapped installations is
coming soon. See [Editions and licensing](https://docs.obot.ai/v0.28.0/enterprise/overview.md#obot-doc-when-the-license-service-cant-be-reached).
---
Document: Configure authentication providers
Version: v0.28.0
Markdown: https://docs.obot.ai/v0.28.0/configuration/auth-providers.md
HTML: https://docs.obot.ai/configuration/auth-providers
# Configure authentication providers
Authentication providers allow your Obot installation to authenticate users with the identity provider of your choice.
Administrators must configure an authentication provider before users can log in. Only one authentication provider can be configured at a time.
To replace it later, see [Switching Between Auth Providers](https://docs.obot.ai/v0.28.0/configuration/auth-providers.md#obot-doc-switching-between-auth-providers).
> **NOTE**
>
> In order for authentication to be enabled, the Obot server must be run with the environment variable set:
>
> `OBOT_SERVER_ENABLE_AUTHENTICATION=true`.
## Setting up Authentication
Configure either the built-in Local provider or an external identity provider. Use the bootstrap user only to complete setup, then sign in with a regular account.
> **NOTE**
>
> If any MCP servers were created with authentication disabled, they will be deleted when authentication is enabled.
### Step 1: Set Environment Variables
Enabling authentication begins with launching Obot with additional configuration options in the form of environment variables. See the [Docker](https://docs.obot.ai/v0.28.0/installation/docker-deployment.md) or [Kubernetes](https://docs.obot.ai/v0.28.0/installation/kubernetes-deployment.md) deployment guides for full setup details.
**Docker**
Add these settings to the environment file used by your [Docker deployment](https://docs.obot.ai/v0.28.0/installation/docker-deployment.md):
```dotenv
OBOT_SERVER_ENABLE_AUTHENTICATION=true
OBOT_BOOTSTRAP_TOKEN=
```
Generate the bootstrap secret with `openssl rand -hex 32`. Keep the environment file private.
**Kubernetes**
```yaml
config:
# Required: Enable authentication
OBOT_SERVER_ENABLE_AUTHENTICATION: "true"
secret:
# Optional: generated automatically when omitted from the chart-managed Secret
OBOT_BOOTSTRAP_TOKEN: "your-secret-token"
```
| Variable | Required | Description |
| ------------------------------------------------------------------- | -------- | -------------------------------------------------------------------------------------------------------------------------------------------------------------------------------------- |
| `OBOT_SERVER_ENABLE_AUTHENTICATION` | Yes | Enables authentication |
| `OBOT_BOOTSTRAP_TOKEN` | No | Token used for bootstrap login while no auth provider is configured or no non-bootstrap owner user exists. If not set, a token will be generated and printed to the logs. |
| `OBOT_SERVER_LOCAL_AUTH_INITIAL_OWNER_EMAIL` | No | Initial local-auth owner's email. Must be set with the setup token. |
| `OBOT_SERVER_LOCAL_AUTH_INITIAL_OWNER_SETUP_TOKEN` | No | At least 32 characters of high-entropy, randomly generated secret material used to activate the initial owner. Store as a secret; `openssl rand -hex 32` is the recommended generator. |
| `OBOT_SERVER_LOCAL_AUTH_INITIAL_OWNER_SETUP_TOKEN_EXPIRATION_HOURS` | No | Setup-link validity in hours. Defaults to `168`. |
### Step 2: Start Obot and Login
Start (or restart) your Obot deployment with the new environment variables. Navigate to your Obot installation and log in with the bootstrap token. Obot then walks you through creating the owner account:
1. Accept the license agreement.
2. In **Set Up Owner Account**, create the owner as a [Local](https://docs.obot.ai/v0.28.0/configuration/auth-providers.md#obot-doc-local) account, with an email address and password.
3. Sign in with that account. You continue as the owner, and the bootstrap login is no longer needed.
If you [preconfigured a Local owner](https://docs.obot.ai/v0.28.0/installation/docker-deployment.md#obot-doc-preconfigure-a-local-owner), there is no bootstrap login. Activate the owner from the setup link instead.
### Step 3: Configure Authentication Provider
Local is now the active provider. To use Local accounts, you're done; see [Local](https://docs.obot.ai/v0.28.0/configuration/auth-providers.md#obot-doc-local) to manage them.
To use a different provider, switch to it:
1. Go to **Identity & Access > Auth Providers**.
2. Click **Configure** on the provider. Local, GitHub, and Google are available without registration; Entra, Okta, OneLogin, JumpCloud, Keycloak, and Auth0 require free Obot Community registration or an Enterprise license.
3. Configure the provider, sign in with it to verify your account, and complete the switch. See [Switching Between Auth Providers](https://docs.obot.ai/v0.28.0/configuration/auth-providers.md#obot-doc-switching-between-auth-providers) for each step.
> **IMPORTANT**
>
> The account you sign in with during the switch becomes the owner. The Local owner account doesn't carry over, so switch before you set up anything as the Local owner.
For detailed provider configuration, see the [Auth Providers](https://docs.obot.ai/v0.28.0/configuration/auth-providers.md) documentation.
### Post-Setup
Once you have configured an authentication provider:
1. Users can login using the configured authentication provider
2. Each identity from an auth provider is its own user. Obot does not combine identities from different auth providers into one user, even when they share an email address.
Owners and admins can assign the admin role to additional users through the User pages. Only owners can assign the owner role.
### Troubleshooting
### Bootstrap Token Not Working
- Ensure `OBOT_SERVER_ENABLE_AUTHENTICATION=true` is set
- Check that you're using the correct token
- If an auth provider has already been configured and a non-bootstrap owner user exists, set `OBOT_SERVER_FORCE_ENABLE_BOOTSTRAP=true` to re-enable bootstrap login
### Authentication Provider Issues
- Verify callback URLs match between Obot and your OAuth provider
- Check that client ID and secret are correct
- Ensure proper scopes and permissions are configured
#### Locked Out After Changing Provider Settings
Changes to the active auth provider take effect immediately. If the provider can't start with the new settings, such as an issuer it can't reach or rejects, nobody can sign in, even when the dialog reports that the change couldn't be saved.
To recover:
1. Remove both `OBOT_SERVER_LOCAL_AUTH_INITIAL_OWNER_EMAIL` and `OBOT_SERVER_LOCAL_AUTH_INITIAL_OWNER_SETUP_TOKEN` from the deployment configuration if they are still set. These initial Local-owner provisioning variables disable bootstrap authentication even when force-enabled; removing only one prevents Obot from starting.
2. Restart Obot with `OBOT_SERVER_FORCE_ENABLE_BOOTSTRAP=true`. Open Obot in a private or incognito window, or clear your browser's cookies for Obot first, and sign in with the bootstrap token. A browser that is still signed in from before the lockout shows an error instead of the bootstrap token option.
3. Fix the provider's settings in **Identity & Access > Auth Providers**.
4. Restart Obot without `OBOT_SERVER_FORCE_ENABLE_BOOTSTRAP`.
The provider's reason for failing is in the Obot server log.
## Next Steps
- Review [Auth Providers configuration](https://docs.obot.ai/v0.28.0/configuration/auth-providers.md) for detailed provider setup
### Bootstrap Token
When launching Obot for the first time, the server will print a randomly generated bootstrap token to the console.
> **INFO**
>
> When installing via Helm, this token is saved inside a kubernetes secret `-config`.
This token can be used to authenticate as an admin user in the UI.
You will then be able to configure authentication providers.
Bootstrap login remains available until at least one authentication provider is configured and at least one non-bootstrap owner user exists.
Once both are true, the bootstrap token will no longer be valid.
> **TIP**
>
> Custom Bootstrap Token
>
> You can use the `OBOT_BOOTSTRAP_TOKEN` environment variable to provide a specific value for the token,
> rather than having one generated for you. If you do this, the value will **not** be printed to the console.
>
> Obot will persist the value of the bootstrap token on its first launch (whether randomly generated or
> supplied by `OBOT_BOOTSTRAP_TOKEN`), and all future server launches will use that same value.
> `OBOT_BOOTSTRAP_TOKEN` can always be used to override the stored value.
## Access Control
### Restricting Access by Email Domain
All authentication providers support restricting access to specific email domains, using the "Email Domains" field in the configuration UI.
You can:
- Use `*` to allow all email domains
- Specify a comma-separated list of domains to restrict access
**Example:** `example.com,example.org` would only allow users with email addresses ending in `example.com` or `example.org`.
## Available Auth Providers
| Providers | Availability |
| ------------------------------------------------- | ----------------------------------------------------------------- |
| Local, GitHub, Google | Available in every edition, without registration |
| Entra, Okta, OneLogin, JumpCloud, Keycloak, Auth0 | Require free Obot Community registration or an Enterprise license |
To register or add an Enterprise license key, use the **License** page in the admin UI. If the license later becomes invalid, these providers stay configured but Obot limits functionality until it's resolved. See [License compliance](https://docs.obot.ai/v0.28.0/enterprise/overview.md#obot-doc-license-compliance).
Obot supports the built-in [Local](https://docs.obot.ai/v0.28.0/configuration/auth-providers.md#obot-doc-local) provider, as well as the following providers that authenticate against an external identity provider using OAuth2. For the OAuth2 providers, you will need to follow the instructions in the auth provider for setting up a new app before getting started. You can get the callback URL from the Obot Admin -> Auth Providers -> \ -> Configure page. The configuration form will also have fields for the data required.
### Local
Local passwords are stored as salted Argon2id hashes, independently of optional [database field encryption](https://docs.obot.ai/v0.28.0/security/credentials.md#obot-doc-overview-local-passwords).
The Local provider authenticates users with an email address and password stored in Obot's own database. It requires no external identity provider, which makes it a good fit for evaluations, air-gapped installations, and small deployments.
Passwords are hashed with [argon2id](https://en.wikipedia.org/wiki/Argon2) and are never stored, logged, or returned by the API.
To set it up:
1. Go to Admin -> Auth Providers and configure the **Local** provider, setting the email domains that local users are allowed to have (`*` allows any domain).
2. During bootstrap setup, create your first local account. Bootstrap can create only one account at a time.
3. Save the account and sign in with its email and password. It becomes **Owner** automatically, and you continue in the same session without confirming a handoff or signing in again.
4. After signing in as Owner, head to the **Users** section to create additional users. You can assign their roles after their first sign-in.
The first bootstrap-created account's password is ready to use by default. You can select the option to require a password change before completing setup. Other new and administrator-reset local passwords require a password change at next sign-in by default; the administrator can turn this off in the users management. Until the change is complete, the backend restricts that session to the password-change flow. A successful change signs out the user's other sessions while preserving the current one.
Local users cannot currently rotate their password voluntarily after completing a required change. An administrator must reset it from the **Users** page; the user will then be prompted to choose a new password at their next sign-in.
Deleting a local user prevents them from signing in again, but it does not delete the Obot user account they created by signing in. Delete that from the Users page, as you would for any other user.
### GitHub
You will need to create an OAuth App in GitHub following these [instructions](https://docs.github.com/en/apps/oauth-apps/building-oauth-apps/creating-an-oauth-app).
You can view the source code for GitHub provider in this [repo](https://github.com/obot-platform/tools).
### Google
Follow the instructions [here](https://developers.google.com/identity/protocols/oauth2/web-server#creatingcred) to create the OAuth app for Obot.
You can view the source code for Google provider in this [repo](https://github.com/obot-platform/tools).
### Entra
Obot can get users and groups from Entra in one of two ways:
- **SCIM:** Entra's provisioning service sends Obot only the users and groups you assign to the app. Skip the **application** permissions below, and follow [Provision users and groups from Microsoft Entra ID with SCIM](https://docs.obot.ai/v0.28.0/configuration/entra-scim.md).
- **Microsoft Graph:** Obot reads each user's groups from Microsoft Graph when they sign in. Follow all the steps below, and when you configure Entra in Obot, set **Directory integration** to **Microsoft Graph**. The **application** permissions are only needed for this option.
> **TIP**
>
> Create the app as an enterprise app if you may use SCIM
>
> Only an app created under **Enterprise applications** can provision users with SCIM. An app created under **App registrations**, as described below, can't, so you would need a second app for provisioning. To use one app for both sign-in and provisioning:
>
> 1. Go to **Entra ID > Enterprise apps > New application > Create your own application**, select **Integrate any other application you don't find in the gallery (Non-gallery)**, and select **Create**. Don't set up **Single sign-on** on the new app; see the troubleshooting note below.
> 2. Go to **App registrations**, and open the registration with the same name, which Entra created with the app. If you don't see it under **Owned applications**, look under **All applications**.
> 3. Under **Authentication**, select **Add Redirect URI** (**Add a platform** in the older view), select **Web**, enter the redirect URI provided in Obot's Auth Provider configuration dialog, and select **Configure**.
> 4. On the registration's **Overview** page, check that **Supported account types** allows accounts in this organizational directory only.
> 5. Continue below from the **API permissions** step, skipping the new registration form.
Within the [Microsoft Entra admin center](https://entra.microsoft.com), go to App registrations and click New registration.
Under Supported account types, ensure `Accounts in this organizational directory only` is selected. In the Redirect URI section, set the platform to `Web` and enter the redirect URI provided in Obot's Auth Provider configuration dialog.
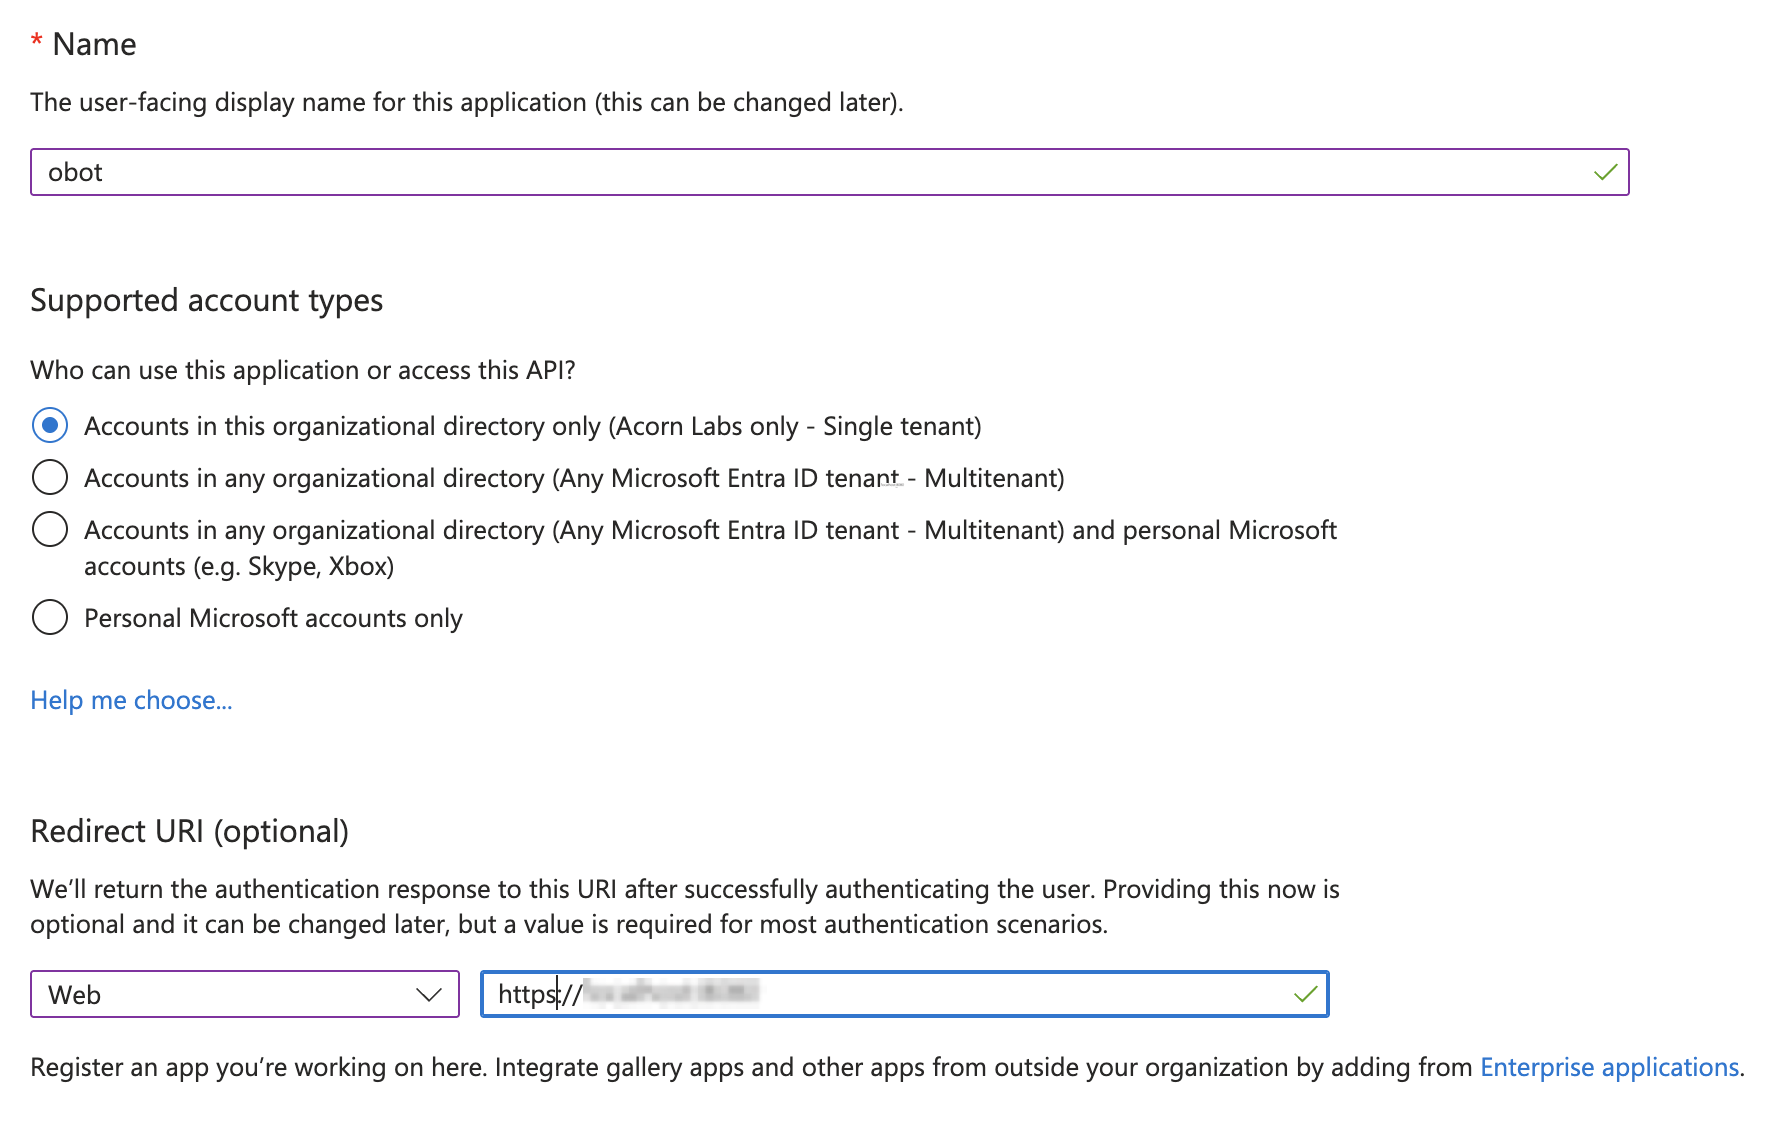
After completing the form, click Register.
Next, go to the API permissions tab and add the following **delegated** permissions:
- `User.Read`
- `ProfilePhoto.Read.All` *requires admin approval*
If Obot will read groups from Microsoft Graph, rather than use SCIM, then add the following **application** permissions:
- `GroupMember.Read.All` *requires admin approval*
- `User.Read.All` *requires admin approval*
After all permissions are approved, your App's Configured permissions section should look something like this:
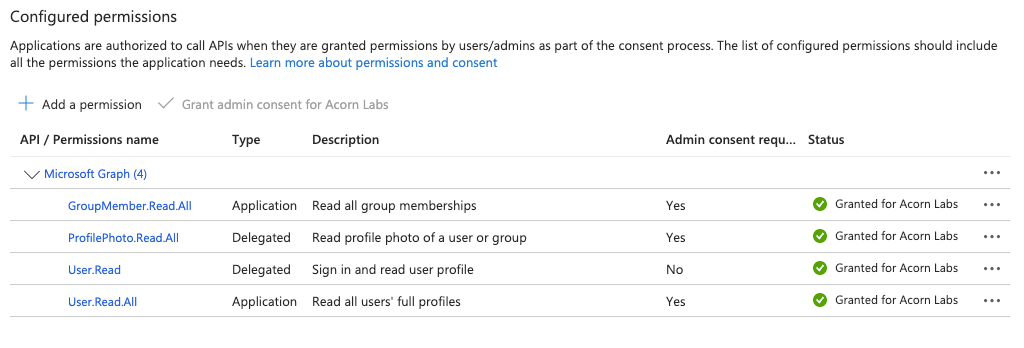
Head to the Certificates & secrets tab and click New Client secret.
Select a desired expiration date and click `Add`.
Copy the exposed secret from the `Value` column to a safe location. You will not be able to retrieve the secret value after this point.

Finally, navigate to the Overview tab and copy the values of `Application (client) ID` and `Directory (tenant) ID` for reference.
You can now return to Obot and finish configuring Entra. Use the table below to determine the values to use for each field:
| Obot | Entra | Entra App Tab |
| ------------- | ----------------------- | ---------------------- |
| Client ID | Application (client) ID | Overview |
| Client Secret | Secret `Value` column | Certificates & secrets |
| Tenant ID | Directory (tenant) ID | Overview |
> **WARNING**
>
> Troubleshooting sign-in
>
> If you followed these instructions and users cannot sign in, SAML SSO may have been enabled by default on the enterprise application associated with Obot. To check, navigate to **Entra ID > Enterprise apps > All applications** in the Entra admin center, select the application associated with Obot, and open **Single sign-on**.
>
> Obot does not currently support SAML SSO on its Entra enterprise application. If SAML is enabled, disable it or use a separate app registration for Obot. See [Microsoft's troubleshooting guide](https://learn.microsoft.com/en-us/troubleshoot/entra/entra-id/app-integration/troubleshooting-signature-validation-errors#scenario-2-the-application-is-enabled-for-saml-sso) for more information.
#### Restricting Login to Specific Users and Groups (Optional)
You can restrict login access to specific Entra users and groups by taking the following steps:
1. Navigate to the [Microsoft Entra admin center](https://entra.microsoft.com)
2. Select `Enterprise apps`, then select `All applications`
3. Select the application corresponding to your Obot instance
4. On the application's `Overview` page, under the `Manage` section, select `Properties`
5. Toggle the `Assignment required?` setting to `Yes`
6. Select `Save` in the top bar
7. Under `Manage`, select `Users and Groups` and then select `Add user/group`
8. Search for and add the desired Entra users and groups to the application
For more details, [see Entra's docs](https://learn.microsoft.com/en-us/entra/identity-platform/howto-restrict-your-app-to-a-set-of-users).
### Okta
> **NOTE**
>
> Only the org-level authorization server is supported (no custom authorization servers).
Create an OAuth app of type `OIDC` in Okta following these [instructions](https://developer.okta.com/docs/guides/implement-oauth-for-okta/main/#create-an-oauth-2-0-app-in-okta).
Make sure to add the redirect URL displayed in Obot to the list of Sign-in redirect URIs in your Okta application settings.
Take note of the Client ID and Client Secret. You will need to provide these to Obot.
Obot can get users and groups from Okta in one of two ways:
- **SCIM:** Okta sends Obot only the users and groups you choose. Skip the API Services app below, and follow [Provision users and groups from Okta with SCIM](https://docs.obot.ai/v0.28.0/configuration/okta-scim.md).
- **API Services app:** Obot reads each user's groups from Okta when they sign in. Continue with the steps below, and when you configure Okta in Obot, set **Directory integration** to **Okta API**.
Next, create another OAuth app, this time of type `API Services`. Grant it the API scopes `okta.users.read` and `okta.groups.read`.
Assign an administrator role to this app that has, at a minimum, `okta.users.read` and `okta.groups.read` permissions.
You can use an existing administrator role (such as Read-Only Administrator), or create a custom one.
Next, change the client authentication method on your API Services app from `Client secret` to `Public key / Private key`.
Then, add a new key to your app. Ensure that your app has only one key in total. You can generate the key on your own,
or have Okta do it for you. Make sure you save the private key in PEM format, as you will need to provide that to Obot,
in addition to the Client ID for this app. When you are done with that, the `Client Credentials` section should look similar to this:
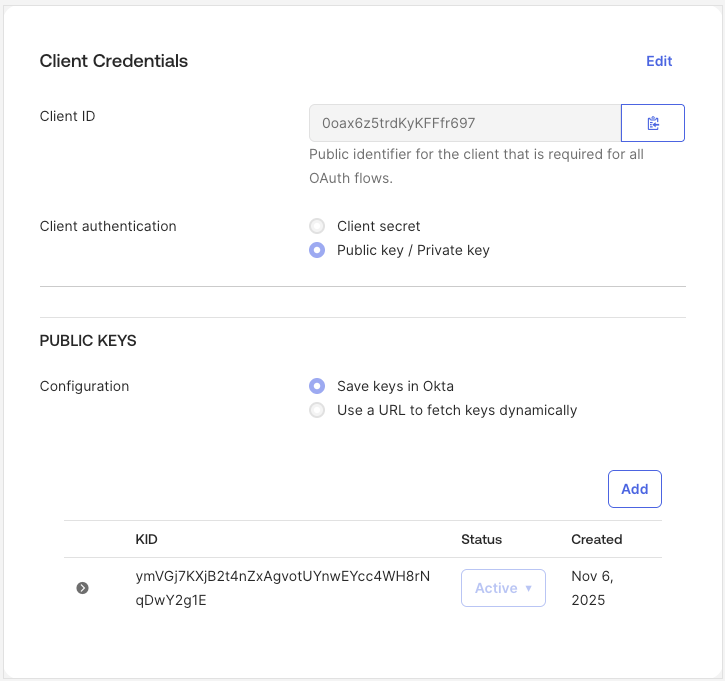
#### Restricting Login to Specific Users and Groups (Optional)
You can restrict login access to specific Okta users and groups by taking the following steps:
1. While creating the `OIDC` App for Obot, select the `Skip group assignment for now` option in the `Assignments` configuration section
2. After the App is created, go to the App's configuration page
3. In the `Assignments` tab, click on the `Assign` button and select `Assign to Groups` in the dropdown menu
4. Select `Assign` on groups you want to allow Obot access to
5. Once you've made your selections, click `Done`
### JumpCloud
Create a **Custom OIDC App** in the [JumpCloud Admin Portal](https://console.jumpcloud.com/). When configuring the app:
1. Set the **Redirect URI / Callback URL** to the redirect URI displayed in Obot's Auth Provider configuration dialog
2. Ensure the application can issue the scopes `openid`, `email`, `profile`, and `offline_access`
3. Take note of the app's **Client ID** and **Client Secret**
4. Configure the app to include group membership claims:
- Enable **Include Group Attribute** and set the exact attribute name to `memberOf`. This is required for group-based authorization in Obot.
- Set group assignment to **User groups assigned to this app**
5. Assign the JumpCloud user groups that should be allowed to sign in to this application. Users who are not assigned to the app through a group assignment will not be able to log in.
You will also need JumpCloud management API credentials for JumpCloud management API access. These credentials are separate from the OIDC app credentials used for login.
Obot uses the JumpCloud management API to:
- look up the authenticated JumpCloud system user
- verify the user is active and not suspended
- list JumpCloud user groups for admin selection
- map OIDC `memberOf` claim values to known JumpCloud groups
You must provide one of the following in the Obot Auth Provider configuration:
- a JumpCloud service account client ID and client secret. This is the preferred option for JumpCloud group lookup and assignment in Obot.
- or an API key with access to read users and user groups
If you use a service account:
1. Create a JumpCloud API service account for Obot in the JumpCloud admin console
2. Generate or reveal its **Client ID** and **Client Secret**
3. Read-only permissions are sufficient
If you use service-account credentials and your JumpCloud region requires a different admin OAuth endpoint, override the token URL in Obot as well.
You can now return to Obot and finish configuring JumpCloud. Use the table below to determine the values to use for each field:
| Obot | JumpCloud |
| ------------------------------------ | ------------------------------------------------------------------------------------------------------------------------------------ |
| Client ID | OIDC app Client ID |
| Client Secret | OIDC app Client Secret |
| Service Account Client ID | JumpCloud service account client ID. Preferred instead of `API Key`. |
| Service Account Client Secret | JumpCloud service account client secret. Preferred instead of `API Key`. |
| API Key | Admin Portal API key. Required if `Service Account Client ID` and `Service Account Client Secret` are not configured. |
| Service Account Token URL (Optional) | Optional admin OAuth token endpoint. Defaults to `https://admin-oauth.id.jumpcloud.com/oauth2/token`. |
| Issuer URL (Optional) | Optional OIDC issuer URL. Defaults to `https://oauth.id.jumpcloud.com/`. |
| API Base URL (Optional) | Optional JumpCloud API base URL. Defaults to `https://console.jumpcloud.com`; use `https://console.eu.jumpcloud.com` for EU tenants. |
> **IMPORTANT**
>
> Account Status Requirement
>
> The JumpCloud user must resolve to an active, non-suspended JumpCloud system user. Suspended or inactive users will be blocked from logging in.
### Keycloak
Use Keycloak 24 or later. Create two clients in the same realm: one lets users sign in to Obot, and the other lets Obot read users and groups for access control.
#### Setup
**Create the sign-in client**
1. In Keycloak, create an **OpenID Connect** client for signing in to Obot.
2. Enable **Client authentication** and **Standard flow**. Disable the other authentication flows and service accounts.
3. Set **Valid redirect URIs** to the callback URL shown in Obot.
4. In the client's **Client scopes**, make sure `profile`, `email`, and `offline_access` are available. Keep the default `profile` and `email` scopes.
5. Assign users the `offline_access` realm role. If you restrict the client's role scope mappings, include this role.
**Create the directory client**
1. Create a second **OpenID Connect** client for reading users and groups.
2. Enable **Client authentication** and **Service accounts roles**. Disable the other authentication flows.
3. Assign the service account the **`view-users`** role from **`realm-management`**. This is the only role it needs.
4. In the directory client's scope settings, turn **Full Scope Allowed** off and include **`view-users`** in the allowed roles. Keep the default `roles` client scope.
**Set up email verification**
By default, users must have a verified email address in Keycloak to sign in to Obot. Enable **Verify email** under **Realm settings > Login** to have users verify their addresses. For existing accounts, check their **Email verified** setting.
If your organization does not verify email addresses, enable **Allow Unverified Emails** in Obot.
> **IMPORTANT**
>
> When allowing unverified emails, remember that email-domain restrictions depend on users having trustworthy email addresses.
In **Identity & Access > Auth Providers**, configure **Keycloak**:
| Obot field | Keycloak value |
| ------------------------------------ | ----------------------------------------------------------------------------------------------------------------------------------------------------------------------------------------------------- |
| Realm Issuer URL | Realm URL, such as `https://id.example.com/realms/employees`; include `/auth` if used |
| Client ID / Client Secret | Sign-in client credentials |
| Directory Service Client ID / Secret | Directory client credentials |
| Allowed E-Mail Domains | Allowed domains, or `*` for all domains |
| Admin URL (optional) | Leave blank unless your Keycloak administrator provides a separate address for the Admin API. For example, `https://keycloak-admin.internal`; include `/auth` if used, but not `/admin` or `/realms`. |
Changes to the Realm Issuer URL or Admin URL of the active provider take effect immediately. If Keycloak can't be reached or rejects the new value, nobody can sign in. See [Locked Out After Changing Provider Settings](https://docs.obot.ai/v0.28.0/configuration/auth-providers.md#obot-doc-locked-out-after-changing-provider-settings).
For optional avatars, map a `picture` user attribute to the OIDC `picture` claim in UserInfo. Use HTTPS URLs restricted to a trusted image host. See Keycloak's [avatar guide](https://www.keycloak.org/ui-customization/avatars).
#### Sessions
**Token Refresh Duration** controls how often Obot refreshes authentication tokens for active sessions. The default is 1 hour.
Set **Token Refresh Duration** shorter than the realm's **Access Token Lifespan**, under **Realm settings > Tokens**. Keycloak's default lifespan is 5 minutes, so a value such as `4m` works. If tokens expire before Obot refreshes them, updates to users' display names and avatars fail until the next refresh.
Keep **Revoke Refresh Token** off in the realm, so that parallel refreshes from the same browser succeed.
### Auth0
Create a **Regular Web Application** in the [Auth0 Dashboard](https://manage.auth0.com) by navigating to Applications > Applications > Create Application.
In the application's Settings tab:
1. Set the **Allowed Callback URLs** to the redirect URI displayed in Obot's Auth Provider configuration dialog
2. Take note of the **Domain**, **Client ID**, and **Client Secret**
> **IMPORTANT**
>
> Email Verification
>
> Auth0 users must have a verified email address to log in to Obot. If a user's email is not verified, the login will fail with a 500 error.
>
> You can verify a user's email in the Auth0 Dashboard under **User Management > Users** by selecting the user and confirming their email is marked as verified. Alternatively, ensure your Auth0 connection is configured to automatically verify emails.
>
> If your Auth0 tenant does not support email verification (e.g. certain social or enterprise connections), you can set the `OBOT_AUTH0_AUTH_PROVIDER_INSECURE_ALLOW_UNVERIFIED_EMAIL` configuration option to `true` in the Auth Provider configuration dialog. Note that this weakens account and email-domain validation.
You can now return to Obot and finish configuring Auth0. Use the table below to determine the values to use for each field:
| Obot | Auth0 | Auth0 Dashboard Location |
| ------------- | ------------- | ------------------------ |
| Auth0 Domain | Domain | Application Settings |
| Client ID | Client ID | Application Settings |
| Client Secret | Client Secret | Application Settings |
#### Machine to Machine Application
A **Machine to Machine** application is required for Obot to read user and role information from Auth0.
Create one in the Auth0 Dashboard by navigating to Applications > Applications > Create Application and selecting **Machine to Machine**.
1. Authorize the app for the **Auth0 Management API** with the following scopes:
- `read:users`
- `read:roles`
- `read:role_members`
2. Take note of the **Client ID** and **Client Secret** for this application
Use the table below to determine the values to use for each field in Obot's Auth Provider configuration dialog:
| Obot | Auth0 | Auth0 Dashboard Location |
| -------------------------------- | ------------- | ------------------------ |
| Machine to Machine Client ID | Client ID | Application Settings |
| Machine to Machine Client Secret | Client Secret | Application Settings |
#### Restricting Login to Specific Users (Optional)
You can restrict which users can log in to Obot through Auth0 using connection-level access control or organizations.
##### Using Connection-Level Access Control
You can limit which Auth0 connections (identity providers) are allowed to log in to Obot.
1. In the Auth0 Dashboard, navigate to **Applications > Applications**
2. Select your Obot application
3. Open the **Connections** tab
4. Disable any connections that should not be allowed to log in to Obot
5. Leave enabled only the connections for users who should have access
##### Using Auth0 Organizations
If your Auth0 tenant supports [Organizations](https://auth0.com/docs/manage-users/organizations), you can restrict access to users who belong to specific organizations.
1. In the Auth0 Dashboard, navigate to **Organizations**
2. Create a new organization
3. Add the desired users as members
4. Under the organization's **Connections** tab, enable the connections users should use to log in
5. In **Applications > Applications**, select your Obot application
6. Open the **Organizations** tab and configure the application to require organization membership
### OneLogin
In the OneLogin admin console, go to **Applications > Applications > Add App**, and add **OpenId Connect (OIDC)**. Configure it:
| Tab | Setting | Value |
| ------------- | ------------------------------------- | ------------------------------------------------------------------------------------------------ |
| Configuration | Login Url | Your Obot URL, such as `https://obot.example.com` |
| Configuration | Redirect URIs | The redirect URI displayed in Obot's Auth Provider configuration dialog |
| SSO | Application Type | **Web** |
| SSO | Token Endpoint, Authentication Method | **Basic** |
| SSO | Refresh Token Timeout | How long users stay signed in to Obot without signing in to OneLogin again. Blank means 30 days. |
| Access | Roles | The roles whose users may sign in to Obot. Users without one of these roles can't sign in. |
Take note of the **Client ID**, **Client Secret**, and issuer URL on the **SSO** tab.
Obot can get users and groups from OneLogin in one of two ways:
- **SCIM:** OneLogin sends Obot only the users and roles you choose. Skip the API credential below, and follow [Provision users and groups from OneLogin with SCIM](https://docs.obot.ai/v0.28.0/configuration/onelogin-scim.md).
- **API credential:** Obot reads each user's roles from the OneLogin API when they sign in, and refreshes them periodically. Continue with the steps below.
Go to **Developers > API Credentials > New Credential** and create a credential with the **Read users** scope. Take note of its **Client ID** and **Client Secret**.
Obot uses OneLogin **roles** as groups. Each role appears in Obot as a group that you can use in roles and access policies. OneLogin's own groups are not used.
You can now return to Obot and finish configuring OneLogin. Use the table below to determine the values to use for each field:
| Obot | OneLogin |
| ----------------------- | -------------------------------------------------------------------------------------------------------------------------------------------------------------------- |
| Client ID | OIDC app Client ID |
| Client Secret | OIDC app Client Secret |
| Issuer URL | `https://.onelogin.com/oidc/2` |
| API Client ID | API credential Client ID. Leave empty to use SCIM. |
| API Client Secret | API credential Client Secret. Leave empty to use SCIM. |
| API Base URL (Optional) | Defaults to `https://.onelogin.com`. Set it only to use a regional API host, such as `https://api.us.onelogin.com` or `https://api.eu.onelogin.com`. |
> **IMPORTANT**
>
> Removing a user's access
>
> OneLogin stops suspended, locked, and unlicensed users from signing in, but Obot keeps their existing access for a while: their browser session lasts until it next needs OneLogin, and their Obot API keys keep working. To remove someone's access immediately, delete them on Obot's **Users** page, or use [SCIM](https://docs.obot.ai/v0.28.0/configuration/onelogin-scim.md).
## Switching Between Auth Providers
This section describes the steps involved in switching authentication providers in Obot. In this example, the provider is switched from **GitHub** to **Microsoft Entra**.
### Prerequisites
- Authentication is already enabled.
- GitHub is configured as the active authentication provider.
- You are logged in as an **Owner**.
- You have registered Obot Community or added an Enterprise license key, either of which includes Entra. See [Editions and licensing](https://docs.obot.ai/v0.28.0/enterprise/overview.md).
### Step 1: Configure Microsoft Entra
1. Navigate to **Identity & Access** and select the **Auth Providers** tab.
2. Locate **Microsoft Entra** and click **Configure**. The **Switch to Microsoft Entra** dialog opens.
3. Follow the documentation to create and configure the Entra application from [Entra Instructions](https://docs.obot.ai/v0.28.0/configuration/auth-providers.md#obot-doc-entra).
4. Click **Continue**.
### Step 2: Sign In Using Microsoft Entra
1. Click **Sign in with Microsoft Entra**.
2. Authenticate using your Microsoft Entra credentials.
3. You are returned to the **Auth Providers** page, and the dialog shows the email address you signed in with as **Verified**.
> **IMPORTANT**
>
> The account you sign in with is granted the **Owner** role. Use the account that should own Obot after the switch.
### Step 3: Complete the Switch
1. Click **Switch to Microsoft Entra**.
2. Microsoft Entra becomes the active provider and GitHub is deconfigured.
All users authenticated via GitHub are immediately logged out and must log in again through Entra. You remain logged in as the Entra account you verified with.
> **NOTE**
>
> User identities are scoped to the authentication provider used during login. Signing in through Entra creates a new user record, so the work and settings belonging to a user's GitHub account are lost.
### Leaving and Resuming a Switch
You can close the dialog at any point. The staged provider's card shows **Staged** with a **Resume switch** button that returns you to where you left off, and the dialog also reopens on its own the next time an owner visits the **Auth Providers** tab.
To abandon a switch, click **Unstage**. The staged settings are discarded and the active provider is unchanged.
Only one provider can be staged at a time, and the remaining providers cannot be configured until the switch finishes or is unstaged.
---
Document: Provision users and groups from Okta with SCIM
Version: v0.28.0
Markdown: https://docs.obot.ai/v0.28.0/configuration/okta-scim.md
HTML: https://docs.obot.ai/configuration/okta-scim
# Provision users and groups from Okta with SCIM
With SCIM, Okta sends Obot your users, groups, and group memberships, and tells
Obot when a user should lose access. You decide in Okta exactly which users and
groups Obot can see, and Obot no longer needs read access to your Okta
directory.
Users still sign in through the Okta OIDC app described in
[Okta](https://docs.obot.ai/v0.28.0/configuration/auth-providers.md#obot-doc-okta). SCIM uses a second Okta app that only sends
user and group changes to Obot. It is never used to sign in.
Only an Owner can set up SCIM.
> **NOTE**
>
> Okta must be able to reach Obot
>
> Okta sends SCIM requests to Obot from Okta's own servers, so
> `https:///scim/v2` and all routes under it must be reachable from
> Okta. If Obot is on a private network or behind a firewall, allow Okta to reach
> those routes, or provisioning will fail.
## How SCIM changes user management
- **Okta controls who has access.** Assigning a user to the SCIM app in Okta
gives them an Obot account. Removing the assignment deactivates them in Obot:
they are signed out, and their API keys and other credentials stop working.
Their account and data are kept, and assigning them again restores access.
- **Only groups you push from Okta appear in Obot.** Group membership changes in
Okta reach Obot right away, instead of when users next sign in.
- **Enforcing SCIM limits sign-in to provisioned users.** Until you enforce
SCIM, anyone who can sign in through the Okta OIDC app can still use Obot.
- **SCIM stays on.** You can't switch Okta back to fetching groups at sign-in
without removing the Okta auth provider. See [Stop using
SCIM](https://docs.obot.ai/v0.28.0/configuration/okta-scim.md#obot-doc-stop-using-scim).
> **WARNING**
>
> Suspending a user in Okta does not remove their access
>
> Okta doesn't notify Obot when a user is suspended. To remove someone's access to
> Obot, unassign them from the SCIM app in Okta.
## Choose your setup path
- If you haven't configured Okta in Obot yet, follow [Set up Okta with
SCIM](https://docs.obot.ai/v0.28.0/configuration/okta-scim.md#obot-doc-set-up-okta-with-scim).
- If Okta is already your auth provider, configured with an API Services app,
follow [Move an existing Okta setup to
SCIM](https://docs.obot.ai/v0.28.0/configuration/okta-scim.md#obot-doc-move-an-existing-okta-setup-to-scim).
## Set up Okta with SCIM
### Step 1: Configure Okta without an API Services app
1. Create the Okta OIDC app as described in [Okta](https://docs.obot.ai/v0.28.0/configuration/auth-providers.md#obot-doc-okta).
Skip the API Services app.
2. In Obot, go to **Identity & Access > Auth Providers** and configure **Okta**.
3. Fill in **Client ID**, **Client Secret**, **Org URL**, and **Allowed E-Mail
Domains**. Leave **Directory integration** set to **SCIM**, which tells Obot not
to use an API Services app.
4. Sign in to Obot through Okta as the account that will be the Owner.
### Step 2: Generate the SCIM token
1. Go to **Identity & Access > Auth Providers > SCIM**.
2. Select **Generate token**.
3. Copy the **Base URL** and the token. The token is shown only once.
### Step 3: Create the SCIM app in Okta
Follow [Create the SCIM app in Okta](https://docs.obot.ai/v0.28.0/configuration/okta-scim.md#obot-doc-create-the-scim-app-in-okta) using the
base URL and token from step 2. Make sure your own account is assigned to the
app.
### Step 4: Push groups
In the SCIM app's **Push Groups** tab, push the Okta groups you want to grant
roles and policies to. You can push more groups at any time. See [Push
groups](https://docs.obot.ai/v0.28.0/configuration/okta-scim.md#obot-doc-push-groups).
Pushed groups appear in Obot, where you can use them in roles and access
policies like any other group.
### Step 5: Enforce SCIM
1. Return to **Identity & Access > Auth Providers > SCIM**.
2. Review the users Okta has provisioned. Users listed under **Not provisioned**
will be disabled when you enforce. Assign them to the SCIM app in Okta if
they should keep access.
3. Select **Enforce SCIM**.
From now on, only users that Okta has provisioned can sign in. Enforcing can't
be undone.
## Move an existing Okta setup to SCIM
Moving to SCIM keeps your existing users, groups, roles, and policies. Users
keep their accounts and data, and groups keep their roles and policy assignments
once Okta pushes them.
### Step 1: Review the move in Obot
Go to **Identity & Access > Auth Providers > SCIM**. The **Move Okta to SCIM**
panel lists anything you need to fix first, and what will change.
- **Replace the `Everyone` group.** Okta can't push its built-in `Everyone`
group. Change any role, policy, or
[vMCP profile](https://docs.obot.ai/v0.28.0/mcp-gateway/access.md#obot-doc-virtual-mcps-tools-and-profiles) that
uses it to **All Obot Users** instead.
- **Resolve duplicate group names.** If two groups that roles, policies, or vMCP
profiles use have the same name, remove the references to all but one, or
rename one of them in Okta. Obot matches pushed groups by name, so names must
be unique.
### Step 2: Enable SCIM
1. Select **Enable SCIM** and confirm.
2. Copy the **Base URL** and the token. The token is shown only once.
When you enable SCIM:
- Everyone can still sign in.
- Obot stops fetching groups from Okta at sign-in. Until you push a group, it
keeps its current members, including anyone you remove from it in Okta. Push
your groups soon after enabling.
- Okta groups that no role, policy, or vMCP profile uses are removed from Obot.
They grant nothing, so no one loses access, and you can push them later if you
need them.
Enabling SCIM can't be undone.
### Step 3: Create the SCIM app in Okta
Follow [Create the SCIM app in Okta](https://docs.obot.ai/v0.28.0/configuration/okta-scim.md#obot-doc-create-the-scim-app-in-okta) using the
base URL and token from step 2. Assign it to the same users and groups as your
Obot OIDC app, and make sure your own account is assigned.
### Step 4: Push the groups Obot lists
In the SCIM app's **Push Groups** tab, push every group listed under
**Referenced groups not pushed yet** on the Obot SCIM page, using the exact name
shown there. Each group links to its page in Okta. See [Push
groups](https://docs.obot.ai/v0.28.0/configuration/okta-scim.md#obot-doc-push-groups).
If a group was renamed in Okta since Obot last saw it, its name in Obot is out
of date. Rename the group in Okta to the name Obot shows, push it, and then
rename it back. Obot picks up the new name.
If you no longer need a listed group, remove it from the roles, policies, and
vMCP profiles that use it instead.
### Step 5: Enforce SCIM
1. Return to **Identity & Access > Auth Providers > SCIM** and review the
**Enforce** step. It lists anything that still blocks enforcing, such as
groups that haven't been pushed.
2. Review the users under **Not provisioned**. They will be disabled when you
enforce. Assign them to the SCIM app in Okta if they should keep access.
Disabled users keep their accounts and data, and assigning them later
re-enables them.
3. Select **Enforce SCIM**.
To enforce, you must have signed in through Okta and be assigned to the SCIM
app. This makes sure you can still sign in afterward.
### Step 6: Remove the API Services credentials (optional)
Obot no longer uses the API Services app. Modify the Okta auth provider to clear
**API Services Client ID** and **API Services Private Key**, then delete the API
Services app in Okta.
## Create the SCIM app in Okta
You'll need your Obot URL, and the SCIM base URL and token from Obot.
1. In the Okta Admin Console, go to **Applications and Resources > Applications**
and select **Create App Integration**.
2. Select **SWA - Secure Web Authentication** and select **Next**. Okta requires
an app type, but this app is never used to sign in.
3. Configure the app:
- **App name:** Any name, such as `Obot SCIM`.
- **App's login page URL:** `https:///scim-provisioning`. This page
tells anyone who opens the app to sign in through your regular Obot sign-in
instead, since this app is used only for SCIM provisioning and not for sign-in.
- **App visibility:** Select **Do not display application icon to users**.
4. Select **Finish**.
5. In the app's **General** tab, under **App Settings**, select **Edit**, set
**Provisioning** to **SCIM**, and select **Save**.
6. In the **Sign On** tab, under **Credentials Details**, set **Application
username format** to **Email**.
7. In the **Provisioning** tab, under **Integration**, select **Edit** and set:
- **SCIM connector base URL:** The base URL from Obot.
- **Unique identifier field for users:** `userName`
- **Supported provisioning actions:** **Push New Users**, **Push Profile
Updates**, and **Push Groups**. Leave the import options unselected.
- **Authentication Mode:** **HTTP Header**, with the token from Obot as the
bearer token.
> **IMPORTANT**
>
> The SCIM connector base URL must end with a trailing slash, such as
> `https:///scim/v2/`. Obot shows it with the slash.
8. Select **Test Connector Configuration**, then **Save**.
9. In the **Provisioning** tab, under **To App**, select **Edit**, enable
**Create Users**, **Update User Attributes**, and **Deactivate Users**, and
select **Save**. Leave **Sync Password** off.
10. In the **Assignments** tab, assign the users and groups who should be able
to use Obot. Okta then provisions those users in Obot.
On the Obot SCIM page, the **SCIM app** step is marked done once Obot receives
its first request from Okta.
### Push groups
1. In the SCIM app, open the **Push Groups** tab.
2. Select **Push Groups > Find groups by name**.
3. Enter the group's name, select it, keep **Push group memberships
immediately** selected, and select **Save**.
## Manage users and groups with SCIM
| Desired Action | Do this in Okta |
| ----------------------------------------- | ------------------------------------------------------- |
| Give someone access | Assign them to the SCIM app. |
| Remove someone's access | Unassign them from the SCIM app. |
| Add a group to Obot | Push it from the SCIM app's **Push Groups** tab. |
| Change group membership or rename a group | Make the change in Okta. Obot is updated automatically. |
A provisioned user's status in Obot is managed by Okta and can't be changed on
the **Users** page. To delete a user's Obot account and data permanently, first
unassign them in Okta, then delete them from the **Users** page in Obot.
### Rotate the SCIM token
The SCIM token expires after one year. Obot shows a banner when it's about to
expire.
1. On the Obot SCIM page, select **Rotate token** and copy the new token.
2. In the SCIM app in Okta, update the token under **Provisioning >
Integration**.
3. Optionally, select **Revoke previous token** in Obot. Otherwise, the previous
token stops working after one day, or on its original expiration date if
that comes first. If you rotate a token that is about to expire, update it in
Okta right away.
If the token has leaked, select **Revoke current token** instead. Both the
current and previous tokens stop working immediately, so provisioning fails
until you update the token in Okta.
### Retry failed changes
If Obot can't apply a change from Okta, for example because Obot was
unavailable, Okta may not retry it automatically.
- **Deactivations:** In Okta, go to **Dashboard > Tasks > Application accounts
need deprovisioning** and select **Retry Selected**. Don't select **Mark
Selected Complete**, which closes the task without deactivating the user in
Obot.
- **Group changes:** In the SCIM app's **Push Groups** tab, select **Retry All
Groups**.
If Okta sends a SCIM payload that Obot deems invalid, the failure will
appear in the **Activity** section on the SCIM configuration page in Obot.
## Stop using SCIM
Switching to another auth provider removes the SCIM setup:
- Okta groups, their memberships, and their role assignments are deleted, and
the groups are removed from access policies.
- Users are kept. Users that SCIM disabled stay disabled until an administrator
enables them on the **Users** page.
- Requests from the SCIM app fail. Turn off provisioning in the SCIM app in
Okta, or delete the app.
To go back to fetching groups at sign-in, temporarily switch to the Local auth provider,
then configure Okta again with **Directory integration** set to **Okta API**, and fill in the
**API Services Client ID** and **API Services Private Key**.
To use SCIM again later, start over with a new token.
---
Document: Provision users and groups from OneLogin with SCIM
Version: v0.28.0
Markdown: https://docs.obot.ai/v0.28.0/configuration/onelogin-scim.md
HTML: https://docs.obot.ai/configuration/onelogin-scim
# Provision users and groups from OneLogin with SCIM
With SCIM, OneLogin sends Obot your users, their roles, and their account
status. You decide in OneLogin exactly which users and roles Obot can see, and
Obot does not need an API credential for your OneLogin account.
Users still sign in through the OneLogin OIDC app described in
[OneLogin](https://docs.obot.ai/v0.28.0/configuration/auth-providers.md#obot-doc-onelogin). SCIM uses a second OneLogin app that
only sends user and role changes to Obot. It is never used to sign in.
SCIM requires OneLogin Identity Lifecycle Management. Only an Obot Owner can set
it up.
> **NOTE**
>
> OneLogin must be able to reach Obot
>
> OneLogin sends SCIM requests to Obot from OneLogin's own servers, so
> `https:///scim/v2` and all routes under it must be reachable from
> OneLogin. If Obot is on a private network or behind a firewall, allow OneLogin
> to reach those routes, or provisioning will fail.
## How SCIM changes user management
- **OneLogin controls who has access.** Giving a user access to the SCIM app
gives them an Obot account. Removing their access, suspending them, or
deleting them in OneLogin deactivates them in Obot: they are signed out, and
their API keys and other credentials stop working. Their account, data, and
groups are kept, and restoring their access reactivates the same account.
- **OneLogin roles become groups in Obot.** Only roles that you push from OneLogin
appear in Obot. Role changes reach Obot within seconds, instead of when users
next sign in.
- **Enforcing SCIM limits sign-in to provisioned users.** Until you enforce
SCIM, anyone who can sign in through the OneLogin OIDC app can still use Obot.
- **SCIM stays on.** You can't switch OneLogin back to an API credential without
removing the OneLogin auth provider. See [Stop using SCIM](https://docs.obot.ai/v0.28.0/configuration/onelogin-scim.md#obot-doc-stop-using-scim).
> **WARNING**
>
> Unlicensing a user does not remove their access
>
> OneLogin doesn't notify Obot when a user is unlicensed. The user can't sign in
> to OneLogin, but stays active in Obot, and their existing sessions and API keys
> keep working. To remove someone's access to Obot, remove their access to the
> SCIM app, or suspend them.
## Choose your setup path
- If you haven't configured OneLogin in Obot yet, follow [Set up OneLogin with
SCIM](https://docs.obot.ai/v0.28.0/configuration/onelogin-scim.md#obot-doc-set-up-onelogin-with-scim).
- If OneLogin is already your auth provider, configured with an API credential,
follow [Move an existing OneLogin setup to
SCIM](https://docs.obot.ai/v0.28.0/configuration/onelogin-scim.md#obot-doc-move-an-existing-onelogin-setup-to-scim).
## Set up OneLogin with SCIM
### Step 1: Configure OneLogin without an API credential
1. Create the OneLogin OIDC app as described in
[OneLogin](https://docs.obot.ai/v0.28.0/configuration/auth-providers.md#obot-doc-onelogin). Skip the API credential.
2. In Obot, go to **Identity & Access > Auth Providers** and configure
**OneLogin**.
3. Fill in **Client ID**, **Client Secret**, **Issuer URL**, and **Allowed
E-Mail Domains**. Leave **API Client ID** and **API Client Secret** empty.
Leaving them empty tells Obot to use SCIM.
4. Sign in to Obot through OneLogin as the account that will be the Owner.
### Step 2: Generate the SCIM token
1. Go to **Identity & Access > Auth Providers > SCIM**.
2. Select **Generate token**.
3. Copy the **Base URL** and the token. The token is shown only once.
### Step 3: Create the SCIM app in OneLogin
Follow [Create the SCIM app in OneLogin](https://docs.obot.ai/v0.28.0/configuration/onelogin-scim.md#obot-doc-create-the-scim-app-in-onelogin) using
the base URL and token from step 2. Make sure your own account has access to the
app.
### Step 4: Push roles
Set up the rule that pushes roles as groups. See [Push roles](https://docs.obot.ai/v0.28.0/configuration/onelogin-scim.md#obot-doc-push-roles).
Pushed roles appear in Obot as groups, which you can use in roles and access
policies like any other group.
### Step 5: Enforce SCIM
1. Return to **Identity & Access > Auth Providers > SCIM**.
2. Review the users OneLogin has provisioned. Users listed under **Not
provisioned** will be disabled when you enforce. Give them access to the SCIM
app in OneLogin if they should keep access.
3. Select **Enforce SCIM**.
From now on, only users that OneLogin has provisioned can sign in. Enforcing
can't be undone.
## Move an existing OneLogin setup to SCIM
Moving to SCIM keeps your existing users, groups, roles, and policies. Users
keep their accounts and data, and groups keep their roles and policy assignments
once OneLogin pushes them.
### Step 1: Review the move in Obot
Go to **Identity & Access > Auth Providers > SCIM**. The **Move OneLogin to
SCIM** panel lists anything you need to fix first, and what will change.
If two OneLogin roles that roles, policies, or
[vMCP profiles](https://docs.obot.ai/v0.28.0/mcp-gateway/access.md#obot-doc-virtual-mcps-tools-and-profiles) use
have the same name, remove the references to all but one, or rename one of them
in OneLogin. Obot compares names ignoring case and surrounding whitespace, so
names must be unique under that comparison. After renaming, allow up to 15
minutes for Obot's OneLogin provider to refresh its role names, then have a
member of the renamed role sign in to Obot. Verify that the duplicate-name
blocker disappears before enabling SCIM.
### Step 2: Enable SCIM
1. Select **Enable SCIM** and confirm.
2. Copy the **Base URL** and the token. The token is shown only once.
When you enable SCIM:
- Everyone can still sign in.
- Obot stops reading roles from OneLogin. Until a role is pushed, its group
keeps its current members, including anyone you remove from the role in
OneLogin. Push your roles soon after enabling.
- Groups from OneLogin that no role, policy, or vMCP profile uses are removed from
Obot. They grant nothing, so no one loses access, and they come back when
OneLogin pushes them.
Enabling SCIM can't be undone.
### Step 3: Create the SCIM app in OneLogin
Follow [Create the SCIM app in OneLogin](https://docs.obot.ai/v0.28.0/configuration/onelogin-scim.md#obot-doc-create-the-scim-app-in-onelogin) using
the base URL and token from step 2. Give it access to the same roles as your
Obot OIDC app.
### Step 4: Push the roles Obot lists
Set up the rule in [Push roles](https://docs.obot.ai/v0.28.0/configuration/onelogin-scim.md#obot-doc-push-roles) so that it pushes every role listed
under **Referenced groups not pushed yet** on the Obot SCIM page. Each one links
to its page in OneLogin.
OneLogin never pushes a role that has no members. If a listed role is empty,
give it a member in OneLogin, or remove it from the roles, policies, and vMCP
profiles that use it.
### Step 5: Enforce SCIM
1. Return to **Identity & Access > Auth Providers > SCIM** and review the
**Enforce** step. It lists anything that still blocks enforcing, such as
roles that haven't been pushed.
2. Review the users under **Not provisioned**. They will be disabled when you
enforce. Give them access to the SCIM app in OneLogin if they should keep
access. Disabled users keep their accounts and data, and provisioning them
later re-enables them.
3. Select **Enforce SCIM**.
To enforce, you must have signed in through OneLogin and been provisioned by the
SCIM app. This makes sure you can still sign in afterward.
### Step 6: Remove the API credential (optional)
Obot no longer uses the API credential. Modify the OneLogin auth provider to
clear **API Client ID** and **API Client Secret**, then delete the credential in
OneLogin.
## Create the SCIM app in OneLogin
You'll need your Obot URL, and the SCIM base URL and token from Obot.
> **WARNING**
>
> Finish this setup before giving anyone access
>
> OneLogin doesn't apply later changes to these settings to users it has already
> provisioned. If any of them is wrong, OneLogin's provisioning events show an
> error from Obot that says which setting to fix.
1. In the OneLogin admin console, go to **Applications > Applications > Add
App**, and add **SCIM Provisioner with SAML (SCIM v2 Core)**.
2. On the **Info** tab, turn off **Visible in portal**. The app never signs
anyone in, and opening it from the OneLogin portal shows an error from Obot.
3. On the **Configuration** tab:
- Set every SAML field to `https:///scim-provisioning`.
OneLogin requires them, but Obot doesn't use them. If someone opens this
page, it explains that the app is for provisioning only and links to the
regular Obot sign-in.
- Set **SCIM Base URL** to the base URL from Obot, and **SCIM Bearer Token**
to the token.
- In the **SCIM JSON Template**, add `"externalId": "{$user.id}",` after the
`userName` line. Leave the `userName` line as it is. Obot uses `externalId`
to match each user to their OneLogin sign-in.
- Save, then select **Enable** under **API Connection**.
4. On the **Provisioning** tab:
- Turn on **Enable provisioning**.
- Set both **When users are deleted in OneLogin, or the user's app access is
removed** and **When user accounts are suspended in OneLogin** to
**Suspend**. Obot doesn't delete OneLogin users over SCIM. To delete a
suspended user, delete them on Obot's **Users** page. With **Do Nothing**,
users you suspend in OneLogin stay active in Obot.
- Turn off **Require admin approval** for each action, unless you want to
approve every change by hand.
5. On the **Parameters** tab:
- Set **SCIM Username** to **OneLogin ID**.
- Open **Groups** and turn on **Include in User Provisioning**.
6. Set up the rule in [Push roles](https://docs.obot.ai/v0.28.0/configuration/onelogin-scim.md#obot-doc-push-roles).
7. On the **Access** tab, select the roles whose users should be able to use
Obot. Give the OIDC app the same roles, or provisioned users can't sign in.
On the Obot SCIM page, the **SCIM app** step is marked done once Obot receives
its first request from OneLogin.
### Push roles
OneLogin pushes a user's roles as groups through a rule.
1. On the SCIM app's **Rules** tab, add a rule with the action **Set Groups in
\**, mapped from OneLogin, for each **role** with a value that
matches a pattern. Use a pattern with no capture group, such as `.*` for
every role, or `obot-(?:admins|users)` for some. A capture group, such as
`obot-(admins|users)`, changes the names of the pushed groups, so they no
longer match existing groups in Obot.
2. Save the rule, then select **More Actions > Reapply entitlement mappings**.
Run it again after every change to the rule.
## Manage users and groups with SCIM
| Desired Action | Do this in OneLogin |
| ----------------------- | ------------------------------------------------------------------ |
| Give someone access | Give them a role that has access to the SCIM app. |
| Remove someone's access | Remove their access to the SCIM app, suspend them, or delete them. |
| Add a role to Obot | Make sure the rule matches it, and give it at least one member. |
| Change a user's roles | Make the change in OneLogin. Obot is updated within seconds. |
A provisioned user's status in Obot is managed by OneLogin and can't be changed
on the **Users** page. To delete a user's Obot account and data permanently,
first remove their access in OneLogin, then delete them from the **Users** page
in Obot.
### What OneLogin doesn't send
- **Role renames.** Renaming a role sends nothing until you select **More
Actions > Reapply entitlement mappings** on the SCIM app. The reapply creates
a new group in Obot and moves the members, leaving the old group empty. Until
then, the old group keeps its members and grants. Roles, policies, and vMCP
profiles that use the old group don't move to the new one, so update them to
use the new group.
- **Role deletes.** Deleting a role empties its group in Obot after the next
**Reapply entitlement mappings**. The empty group stays in Obot and grants
nothing.
- **Empty roles.** A role with no members is never pushed.
- **Roles removed while a user's access is removed.** If a user loses a role
while their access to the SCIM app is removed, OneLogin never sends the
change, even after their access is restored, so they stay in that group in
Obot. After restoring a user's access, give them each role they lost back,
then remove it again. Roles they gained in that time are sent when their
access is restored. Suspended users are not affected.
### Retry failed changes
OneLogin retries a failed change only if Obot asked it to slow down. Every other
failure waits until you retry it, and blocks that user's later changes until
then. The **Activity** section of the Obot SCIM page lists recent failures.
To retry, select **Retry** on the user in the SCIM app's **Users** tab, or on the
app in the user's **Applications** tab.
Common errors:
- **"Obot does not delete users."** **When users are deleted in OneLogin, or
the user's app access is removed** is set to Delete. Set it to **Suspend** as
described in [Create the SCIM app](https://docs.obot.ai/v0.28.0/configuration/onelogin-scim.md#obot-doc-create-the-scim-app-in-onelogin), then
retry each affected user. The retry deactivates them.
- **"This app uses a connector Obot does not support."** Create a new app with
the **SCIM Provisioner with SAML (SCIM v2 Core)** connector, and move access
to it.
- **"externalId" or "userName" errors.** Fix the template or the SCIM Username
parameter as the error says, then retry.
- **"a user with userName … already exists" when restoring access.** The
template's `userName` line was changed while **SCIM Username** stayed on
Username. Set **SCIM Username** to **OneLogin ID** and restore the template's
`userName` line to `{$parameters.scimusername}`, then retry the user. The
retry finds the existing user and reactivates them.
### Rotate the SCIM token
The SCIM token expires after one year. Obot shows a banner when it's about to
expire.
1. On the Obot SCIM page, select **Rotate token** and copy the new token.
2. In the SCIM app in OneLogin, update **SCIM Bearer Token** on the
**Configuration** tab.
3. Optionally, select **Revoke previous token** in Obot. Otherwise, the previous
token stops working after one day, or on its original expiration date if
that comes first.
If the token has leaked, select **Revoke current token** instead. Both the
current and previous tokens stop working immediately, so provisioning fails
until you update the token in OneLogin.
## Stop using SCIM
Deconfiguring the OneLogin auth provider, or switching to another auth provider,
removes the SCIM setup:
- OneLogin groups, their memberships, and their role assignments are deleted,
and the groups are removed from access policies.
- Users are kept. Users that SCIM disabled stay disabled until an administrator
enables them on the **Users** page.
- Requests from the SCIM app fail. Turn off provisioning in the SCIM app in
OneLogin, or delete the app.
To go back to reading roles from the OneLogin API, configure OneLogin again with
**API Client ID** and **API Client Secret**. To use SCIM again later, start over
with a new token.
---
Document: Provision users and groups from Microsoft Entra ID with SCIM
Version: v0.28.0
Markdown: https://docs.obot.ai/v0.28.0/configuration/entra-scim.md
HTML: https://docs.obot.ai/configuration/entra-scim
# Provision users and groups from Microsoft Entra ID with SCIM
With SCIM, Microsoft Entra ID sends Obot your users, groups, and group
memberships, and tells Obot when a user should lose access. You decide in Entra
exactly which users and groups Obot can see, and Obot no longer needs the
Microsoft Graph application permissions that let it read your whole directory.
Users still sign in through the Entra app described in
[Entra](https://docs.obot.ai/v0.28.0/configuration/auth-providers.md#obot-doc-entra). Entra's provisioning service sends user and
group changes to Obot from an enterprise app. That can be the same app users
sign in with, if it was created as an enterprise app. See [Set up provisioning
in the enterprise app](https://docs.obot.ai/v0.28.0/configuration/entra-scim.md#obot-doc-set-up-provisioning-in-the-enterprise-app).
Only an Obot Owner can set up SCIM.
> **NOTE**
>
> Entra must be able to reach Obot
>
> Entra sends SCIM requests to Obot from Microsoft's own servers, so
> `https:///scim/v2` and all routes under it must be reachable from
> the internet. If Obot is on a private network or behind a firewall, allow Entra
> to reach those routes, or provisioning will fail.
## How SCIM changes user management
- **Entra controls who has access.** Assigning a user to the enterprise app,
directly or through an assigned group, gives them an Obot account. Unassigning
them, blocking their sign-in, or soft-deleting them deactivates them in Obot:
they are signed out, and their API keys and other credentials stop working.
Their account and data are kept, and restoring them in Entra reactivates the
same account.
- **Deleting an assigned user permanently in Entra deletes them in Obot.**
Their Obot account is deleted along with their agents, MCP servers, vMCPs,
and API keys.
Entra also deletes a soft-deleted user permanently after 30 days. See [Keep
deleted users' data](https://docs.obot.ai/v0.28.0/configuration/entra-scim.md#obot-doc-keep-deleted-users-data) to prevent this.
- **Only groups you assign to the enterprise app appear in Obot.** Group IDs in
Obot are the same as when Obot read groups from Microsoft Graph, so existing
roles and policies keep working.
- **Changes reach Obot on Entra's schedule.** Entra sends changes in cycles that
run every 20 to 40 minutes. **Provision on demand** sends a single user or
group right away.
- **Enforcing SCIM limits sign-in to provisioned users.** Until you enforce
SCIM, anyone who can sign in through the Entra app can still use Obot.
- **SCIM stays on.** You can't switch Entra back to reading groups from
Microsoft Graph without removing the Entra auth provider. See [Stop using
SCIM](https://docs.obot.ai/v0.28.0/configuration/entra-scim.md#obot-doc-stop-using-scim).
> **WARNING**
>
> Unassigning a group removes its access
>
> When you unassign a group from the enterprise app, Entra tells Obot to delete
> it, and its members lose the access it grants.
>
> - **Before you enforce SCIM,** Obot empties the group and keeps it. If roles,
> policies, or vMCP profiles use it, Enforce is blocked until you assign it
> again or remove those references. Otherwise, Enforce deletes it.
> - **Once SCIM is enforced,** Obot deletes the group, its role assignments, and
> its place in access policies. Assigning it again brings back the same group
> and its members, but not its role assignments or access policies. vMCP
> profiles that still name the group grant access again, but what members lost
> when the group was deleted, described below, doesn't come back.
>
> When a user loses a group, Obot also removes what depended on the access that
> only that group, or a role it gave them, granted:
>
> - their connections to shared vMCPs whose profiles no longer include them;
> - tools they selected on a shared vMCP that their remaining profiles don't
> grant;
> - the entries in their personal vMCPs that their MCP access policies no longer
> let them use. A personal vMCP left with no entries is deleted.
## Choose your setup path
- If you haven't configured Entra in Obot yet, follow [Set up Entra with
SCIM](https://docs.obot.ai/v0.28.0/configuration/entra-scim.md#obot-doc-set-up-entra-with-scim).
- If Entra is already your auth provider, reading groups from Microsoft Graph,
follow [Move an existing Entra setup to
SCIM](https://docs.obot.ai/v0.28.0/configuration/entra-scim.md#obot-doc-move-an-existing-entra-setup-to-scim).
## Set up Entra with SCIM
### Step 1: Configure Entra with SCIM
1. Create the Entra app as described in [Entra](https://docs.obot.ai/v0.28.0/configuration/auth-providers.md#obot-doc-entra). Create
it under **Enterprise applications**, so that it can also provision users,
and skip the Microsoft Graph application permissions.
2. In Obot, go to **Identity & Access > Auth Providers** and configure
**Microsoft Entra**.
3. Fill in **Client ID**, **Client Secret**, **Tenant ID**, and **Allowed E-Mail
Domains**. Leave **Directory integration** set to **SCIM**.
4. Sign in to Obot through Entra as the account that will be the Owner.
### Step 2: Generate the SCIM token
1. Go to **Identity & Access > Auth Providers > SCIM**. This page walks through
the rest of the setup in steps.
2. Select **Generate token**.
3. Copy the **Base URL** and the token. The token is shown only once.
### Step 3: Set up provisioning in Entra
Follow [Set up provisioning in the enterprise
app](https://docs.obot.ai/v0.28.0/configuration/entra-scim.md#obot-doc-set-up-provisioning-in-the-enterprise-app) using the base URL and token
from step 2. When you assign users and groups, include your own account.
Assigned groups appear in Obot, where you can use them in roles and access
policies like any other group.
### Step 4: Enforce SCIM
1. Return to **Identity & Access > Auth Providers > SCIM**.
2. Review the users Entra has provisioned. Users listed under **Not provisioned**
will be disabled when you enforce. Assign them to the enterprise app in Entra
if they should keep access.
3. Select **Enforce SCIM**.
To enforce, you must have signed in through Entra, and Entra must have
provisioned your own account and not deactivated it.
From now on, only users that Entra has provisioned can sign in. Enforcing can't
be undone.
## Move an existing Entra setup to SCIM
Moving to SCIM keeps your existing users, groups, roles, and policies. Users
keep their accounts and data. Groups keep their IDs, roles, and policy
assignments, because Entra sends each group's object ID and Obot matches it to
the group it already has. While Entra adds members back to each group, though,
some vMCP connections and selections can be lost. See [Step 1: Review the move
in Obot](https://docs.obot.ai/v0.28.0/configuration/entra-scim.md#obot-doc-step-1-review-the-move-in-obot) for how to prevent that.
### Step 1: Review the move in Obot
Go to **Identity & Access > Auth Providers > SCIM**. The **Move Microsoft Entra
to SCIM** panel lists anything you need to fix first, and what will change.
- **Users whose object IDs Obot hasn't recorded.** Obot
matches each Entra user to their Obot account by the user's object ID, which
Obot records when they sign in. If the panel lists users whose IDs Obot
hasn't recorded, each of them must sign in to Obot in a browser, or be deleted
in Obot, before you can enable SCIM. A disabled user must be enabled on the
**Users** page before they can sign in.
- **Duplicate group names.** If two Entra groups that roles, policies, or
[vMCP profiles](https://docs.obot.ai/v0.28.0/mcp-gateway/access.md#obot-doc-virtual-mcps-tools-and-profiles) use
have the same name, remove the references to all but one, or rename one of
them in Entra. Obot requires the names of provisioned groups to be unique.
Obot learns a group's new name the next time one of its members signs in.
Before you enable SCIM, know what changes for group members:
- **Members of each group lose its access until Entra adds them back.** When
Entra provisions a group, it creates the group empty, then adds its members
one at a time. Obot replaces the group's members with the ones Entra sends,
so until Entra's first cycle adds them back, members lose the access that the
group grants. The more members you assign, the longer the first cycle takes.
**Provision on demand** doesn't shorten this: it sends a group with only the
members you select.
- **Some vMCP access is lost for good.** While members are out of a group, Obot
removes what depended on access that only the group, or a role it gives them,
granted:
- their connections to shared vMCPs whose profiles no longer include them;
- tools they selected on a shared vMCP that their remaining profiles don't
grant;
- the entries in their personal vMCPs that their MCP access policies no
longer let them use. A personal vMCP left with no entries is deleted.
None of this comes back when Entra adds the members back. To prevent it,
before you enable SCIM, add those users individually to the
[vMCP profiles](https://docs.obot.ai/v0.28.0/mcp-gateway/access.md#obot-doc-virtual-mcps-tools-and-profiles) and
[MCP access policies](https://docs.obot.ai/v0.28.0/mcp-gateway/access.md#obot-doc-mcp-access-policies-overview)
that include them through groups or roles.
- **Nested groups no longer grant access.** When Obot read groups from
Microsoft Graph, it included each user's nested group memberships. Entra
provisions only the direct members of assigned groups. Access that came
through a nested group ends once Entra provisions the group. Assign the
nested groups too, or add their members to the parent group directly.
### Step 2: Enable SCIM
1. Select **Enable SCIM** and confirm.
2. Copy the **Base URL** and the token. The token is shown only once.
When you enable SCIM:
- Everyone can still sign in.
- Obot stops reading groups from Microsoft Graph. Until Entra provisions a
group, it keeps its current members, including anyone you remove from it in
Entra.
Enabling SCIM can't be undone.
### Step 3: Set up provisioning in Entra
Follow [Set up provisioning in the enterprise
app](https://docs.obot.ai/v0.28.0/configuration/entra-scim.md#obot-doc-set-up-provisioning-in-the-enterprise-app) using the base URL and token
from step 2. When you assign users and groups, assign:
- the same users and groups that can sign in to Obot, including your own
account;
- every group listed under **Referenced groups not pushed yet** on the Obot SCIM
page. Each group links to its page in the Microsoft Entra admin center.
If you no longer need a listed group, remove it from the roles, policies, and
vMCP profiles that use it instead.
After you start provisioning, wait for Entra's first cycle to finish. The
enterprise app's **Provisioning** page shows its progress.
### Step 4: Enforce SCIM
1. Return to **Identity & Access > Auth Providers > SCIM** and review the
**Enforce** step. It lists anything that still blocks enforcing, such as
groups that haven't been provisioned.
2. Review the users under **Not provisioned**. They will be disabled when you
enforce. Assign them to the enterprise app in Entra if they should keep
access. Disabled users keep their accounts and data, and assigning them
later re-enables them.
3. Select **Enforce SCIM**.
To enforce, you must have signed in through Entra, and Entra must have
provisioned your account and not deactivated it. This makes sure you can still
sign in afterward.
### Step 5: Remove the application permissions (optional)
Obot no longer reads users and groups from Microsoft Graph. In the app
registration's **API permissions** tab, remove the **application** permissions
`GroupMember.Read.All` and `User.Read.All`. Keep the **delegated** permissions:
Obot still uses them when users sign in.
## Set up provisioning in the enterprise app
You'll need the SCIM base URL and token from Obot.
Only an app created under **Enterprise applications** can be used for
provisioning. If you created Obot's sign-in app under **App registrations**,
create a separate app for provisioning instead: in the Microsoft Entra admin
center, go to **Entra ID > Enterprise apps > New application > Create your own
application**, select **Integrate any other application you don't find in the
gallery (Non-gallery)**, and select **Create**. Users still sign in through the
original app. If that app has **Assignment required** set to **Yes**, assign
the same users and groups to both apps.
> **WARNING**
>
> Finish this setup before you start provisioning
>
> With Entra's default attribute mapping, Obot can't match users to their
> sign-ins and refuses them. Finish every step below before you select **Start
> provisioning** or **Provision on demand**.
1. In the Microsoft Entra admin center, go to **Entra ID > Enterprise apps** and
open the app.
2. Under **Manage**, select **Provisioning**, then **New configuration**.
3. Set **Tenant URL** to the base URL from Obot, and **Secret Token** to the
token. Select **Test Connection**, then **Create**.
4. Under **Attribute mapping**, select **Provision Microsoft Entra ID Users**.
Edit the mapping whose target attribute is `externalId`, change its source
attribute from `mailNickname` to `objectId`, and save. Obot matches each user
to their Entra sign-in by object ID.
5. Decide what happens when users are deleted in Entra. See [Keep deleted users'
data](https://docs.obot.ai/v0.28.0/configuration/entra-scim.md#obot-doc-keep-deleted-users-data).
6. Under **Settings**, set **Scope** to **Sync only assigned users and
groups**.
7. Under **Manage > Users and groups**, assign the users and groups who should
be able to use Obot.
8. On the **Overview** page, select **Start provisioning**.
On the Obot SCIM page, the **SCIM app** step is marked done once Obot receives
its first request from Entra, which **Test Connection** already sends.
Entra's first cycle provisions every assigned user and group. It can take a
while, since Entra adds each group's members one at a time.
### Keep deleted users' data
By default, Entra tells Obot to delete a user when the user is permanently
deleted in Entra, and when Entra permanently deletes a soft-deleted user after 30
days. Obot then deletes the user's account, agents, MCP servers, vMCPs, and API
keys.
To keep deleted users' data in Obot instead, edit the **Provision Microsoft
Entra ID Users** mapping, clear **Delete** under **Target object actions**, and
save. Entra then sends nothing when it deletes a user. Soft-deleted users stay
deactivated in Obot, and you can delete them from the **Users** page in Obot.
If provisioning is already running, saving the mapping starts a new initial
cycle.
Obot refuses to delete its last Owner, or its last Admin when there is no other
Owner. Entra's request fails until you give another user that role, and Entra
retries it later, possibly hours later. This doesn't protect the account from
being deactivated: unassigning, blocking, or soft-deleting the last Owner in
Entra still signs them out of Obot.
## Manage users and groups with SCIM
| Desired Action | Do this in Entra |
| ----------------------------------------- | ---------------------------------------------------------------------------------------------------------------------------------------------------------------------------------------------------------------------------------------------------------- |
| Give someone access | Assign them, or a group they're in, to the enterprise app. |
| Remove someone's access | Unassign them, block their sign-in, or soft-delete them. A permanent delete, including Entra's own 30 days after a soft delete, also [deletes their Obot data](https://docs.obot.ai/v0.28.0/configuration/entra-scim.md#obot-doc-keep-deleted-users-data). |
| Add a group to Obot | Assign it to the enterprise app. |
| Change group membership or rename a group | Make the change in Entra. Obot is updated in the next cycle. |
Entra treats a user who is in an assigned group as assigned. Unassigning that
user directly doesn't remove their access. Remove them from the group too.
A provisioned user's status in Obot is managed by Entra and can't be changed on
the **Users** page. To delete a user's Obot account and data, either delete
them permanently in Entra while they are still assigned to the enterprise app,
or remove their access in Entra and then delete them from the **Users** page in
Obot. Once a user is unassigned, Entra stops managing them and doesn't tell
Obot when they are deleted.
### What Entra sends for each change
| Change in Entra | Result in Obot |
| ------------------------------------------------------------------------ | ------------------------------------------------------------------------------------------------------------------------------------------------------------------------------------------------------------------------------------------------------ |
| Unassign a user, block their sign-in, or soft-delete them | The user is deactivated. A soft delete also removes them from their groups. |
| Unblock or restore a user | The user is reactivated. A restore also adds them back to their groups. |
| Delete an assigned user permanently, or 30 days pass after a soft delete | The user and their data are deleted, unless you [cleared **Delete**](https://docs.obot.ai/v0.28.0/configuration/entra-scim.md#obot-doc-keep-deleted-users-data). |
| Rename a group | The group is renamed and keeps its ID, members, and grants. |
| Unassign a group | Before you enforce, the group is emptied and kept. Once SCIM is enforced, it is deleted with its role assignments and access policies. |
| Assign a group again | The same group comes back, with its members. Role assignments and access policies it lost when it was deleted don't come back. vMCP profiles that still name it grant access again, but members' lost vMCP connections and selections aren't restored. |
### Limitations
- **Group names must be unique** among the groups assigned to the enterprise
app. Entra can have several groups with the same name, but Obot refuses to
provision a second one.
- **Nested groups aren't flattened.** Entra provisions only the direct members
of assigned groups.
- **Changes are not immediate.** Entra's cycles run every 20 to 40 minutes.
### Restart provisioning after an outage
If Entra's requests fail for two cycles in a row, for example because Obot is
unreachable or its Entra auth provider isn't configured, Entra quarantines the
provisioning job. That can take as little as about 20 minutes. A quarantined
job can stay quarantined for hours, even once Obot is back.
On the enterprise app's **Provisioning** page, select **Restart provisioning**.
Entra's first request follows about 20 minutes later.
The Obot SCIM page warns you when Entra hasn't sent a request for about 90
minutes, longer than its usual cycle.
### Retry failed changes
Entra retries failed changes, but not always in the next cycle. A retry can
come hours later. Its **Provisioning logs** show each failure with Obot's error
message, which says what to fix.
Common errors:
- **"externalId must be the user's Entra object ID."** The user mapping still
sends `mailNickname`. Change it as described in [Set up provisioning in the
enterprise app](https://docs.obot.ai/v0.28.0/configuration/entra-scim.md#obot-doc-set-up-provisioning-in-the-enterprise-app). Saving the
mapping starts a new initial cycle, which provisions the refused users.
- **"The externalId mapping changed."** The user mapping sends a value other
than the object ID that Obot matched the user by. Map `objectId` to
`externalId` again.
- **"this user is Obot's last owner" or "last admin".** Give another user that
role in Obot. Entra retries the delete later.
- **"a group named … already exists".** Two assigned groups have the same name.
Rename one of them in Entra.
### Rotate the SCIM token
The SCIM token expires after one year. Obot shows a banner when it's about to
expire.
1. On the Obot SCIM page, select **Rotate token** and copy the new token.
2. On the enterprise app's **Provisioning** page, update **Secret Token** under
**Admin Credentials**, select **Test Connection**, and save.
3. Optionally, select **Revoke previous token** in Obot. Otherwise, the previous
token stops working after one day, or on its original expiration date if
that comes first.
If the token has leaked, select **Revoke current token** instead. Both the
current and previous tokens stop working immediately, so provisioning fails
until you update the token in Entra. If Entra quarantined the job in the
meantime, select **Restart provisioning** after updating it.
## Stop using SCIM
Switching to another auth provider removes the SCIM setup:
- Entra groups, their memberships, and their role assignments are deleted, and
the groups are removed from access policies.
- Users are kept. Users that SCIM disabled stay disabled until an administrator
enables them on the **Users** page.
- Requests from Entra fail. Stop provisioning on the enterprise app's
**Provisioning** page.
To go back to reading groups from Microsoft Graph, temporarily switch to the
Local auth provider, then configure Entra again with **Directory integration**
set to **Microsoft Graph**, and grant the app registration the application
permissions described in [Entra](https://docs.obot.ai/v0.28.0/configuration/auth-providers.md#obot-doc-entra). To use SCIM again
later, start over with a new token.
---
Document: Amazon EKS
Version: v0.28.0
Markdown: https://docs.obot.ai/v0.28.0/installation/reference-architectures/aws-eks.md
HTML: https://docs.obot.ai/installation/reference-architectures/aws-eks
# Amazon EKS
Deploying Obot to Amazon Elastic Kubernetes Service follows the standard Helm workflow. As a prerequisite, you'll need the following resources set up in your AWS environment:
- AWS account
- VPC with subnets
- Amazon RDS instance running PostgreSQL 17+.
- VPC Security Groups configured to allow connectivity between your EKS cluster and RDS instance
- (Optional) AWS KMS key for encrypting sensitive information
- (Optional) IAM role and policy for service account (IRSA) if you're using AWS services like KMS for encryption
- kubectl and Helm installed and configured to connect to your EKS cluster
- EKS cluster with at least 2 CPU cores and 4GB of RAM per node. Production workloads may require more. The cluster should have IAM roles for service accounts (IRSA) configured if you're using AWS services like KMS for encryption.
If you plan on using AWS KMS, here is some example terraform that creates the key and the necessary IAM policies:
```hcl
resource "aws_kms_key" "this" {
description = "Obot credentials encryption key"
deletion_window_in_days = 10
enable_key_rotation = true
}
resource "aws_kms_alias" "this" {
name = "alias/obot-credentials"
target_key_id = aws_kms_key.this.key_id
}
data "aws_iam_policy_document" "obot_kms" {
statement {
effect = "Allow"
actions = [
"kms:Decrypt",
"kms:Encrypt",
"kms:GenerateDataKey",
"kms:DescribeKey"
]
resources = [aws_kms_key.this.arn]
}
}
resource "aws_iam_policy" "obot_kms" {
name = "obot-kms-policy"
description = "Policy for Obot to use KMS for encryption"
policy = data.aws_iam_policy_document.obot_kms.json
}
# Attach this policy to the IAM role used by the Obot service account
resource "aws_iam_role_policy_attachment" "obot_kms" {
role = ""
policy_arn = aws_iam_policy.obot_kms.arn
}
```
More information on the AWS KMS setup can be found [here](https://docs.obot.ai/v0.28.0/configuration/encryption-providers/aws-kms.md).
Once you have these resources set up, install the Obot helm chart with:
```bash
helm repo add obot https://charts.obot.ai
helm install obot obot/obot -f
```
Here is an example `values.yaml` file for deploying Obot on EKS:
```yaml
# These settings are required for EKS when using the AWS Load Balancer Controller.
service:
type: NodePort
ingress:
enabled: true
className: alb
annotations:
alb.ingress.kubernetes.io/scheme: internet-facing
alb.ingress.kubernetes.io/target-type: ip
hosts:
-
serviceAccount:
# This is important for configuring IAM roles for service accounts (IRSA), which we use for AWS KMS access
create: true
name: ""
annotations:
eks.amazonaws.com/role-arn: ""
# Sensitive values belong under secret; the chart rejects them under config.
secret:
# database configuration for external db
OBOT_SERVER_DSN: "postgresql://:@:/?sslmode="
# Optional: generated automatically when omitted from the chart-managed Secret
OBOT_BOOTSTRAP_TOKEN: ""
# Optional: configures the LLM gateway's OpenAI provider at startup
OPENAI_API_KEY: ""
# Non-sensitive configuration
config:
# configures encryption with AWS KMS. optional, but recommended for production
OBOT_SERVER_ENCRYPTION_PROVIDER: "aws"
OBOT_AWS_KMS_KEY_ARN: "arn:aws:kms:::key/"
# Enable authentication
OBOT_SERVER_ENABLE_AUTHENTICATION: true
```
With the default configuration on EKS, this will set up ingress to expose Obot through an Application Load Balancer using the AWS Load Balancer Controller. Make sure you have the AWS Load Balancer Controller installed in your cluster. You should also consider adding TLS termination to your ALB for secure HTTPS access.
---
Document: Azure AKS
Version: v0.28.0
Markdown: https://docs.obot.ai/v0.28.0/installation/reference-architectures/azure-aks.md
HTML: https://docs.obot.ai/installation/reference-architectures/azure-aks
# Azure AKS
Deploying Obot to Azure Kubernetes Service follows the standard Helm workflow. As a prerequisite, you'll need the following resources set up in your Azure environment:
- Azure subscription
- Virtual Network with subnets
- Azure Database for PostgreSQL running PostgreSQL 17+.
- Network Security Groups configured to allow connectivity between your AKS cluster and PostgreSQL instance
- Private Azure Storage Account with Blob Storage container for workspace data
- (Optional) Azure Key Vault key for encrypting sensitive information
- (Optional) Managed Identity with necessary permissions if you're using Azure Key Vault for encryption
- kubectl and Helm installed and configured to connect to your AKS cluster
- AKS cluster with at least 2 CPU cores and 4GB of RAM per node. Production workloads may require more. The cluster should have Microsoft Entra Workload ID configured if you're using Azure services like Key Vault for encryption.
If you plan on using Azure Key Vault, here is some example terraform that creates the key vault, key, and the necessary access policies:
```hcl
resource "azurerm_key_vault" "this" {
name = "obot-credentials-kv"
location = azurerm_resource_group.this.location
resource_group_name = azurerm_resource_group.this.name
tenant_id = data.azurerm_client_config.current.tenant_id
sku_name = "standard"
enabled_for_disk_encryption = true
purge_protection_enabled = true
}
resource "azurerm_key_vault_key" "this" {
name = "obot-credentials"
key_vault_id = azurerm_key_vault.this.id
key_type = "RSA"
key_size = 2048
key_opts = [
"decrypt",
"encrypt",
"sign",
"unwrapKey",
"verify",
"wrapKey",
]
}
resource "azurerm_user_assigned_identity" "obot" {
name = "obot-identity"
location = azurerm_resource_group.this.location
resource_group_name = azurerm_resource_group.this.name
}
resource "azurerm_key_vault_access_policy" "obot" {
key_vault_id = azurerm_key_vault.this.id
tenant_id = data.azurerm_client_config.current.tenant_id
object_id = azurerm_user_assigned_identity.obot.principal_id
key_permissions = [
"Get",
"Decrypt",
"Encrypt",
"UnwrapKey",
"WrapKey",
]
}
# Configure federated identity credential for workload identity
resource "azurerm_federated_identity_credential" "obot" {
name = "obot-federated-identity"
resource_group_name = azurerm_resource_group.this.name
parent_id = azurerm_user_assigned_identity.obot.id
audience = ["api://AzureADTokenExchange"]
issuer = azurerm_kubernetes_cluster.this.oidc_issuer_url
subject = "system:serviceaccount::"
}
```
More information on the Azure Key Vault setup can be found [here](https://docs.obot.ai/v0.28.0/configuration/encryption-providers/azure-key-vault.md).
Once you have these resources set up, install the Obot helm chart with:
```bash
helm repo add obot https://charts.obot.ai
helm install obot obot/obot -f
```
Here is an example `values.yaml` file for deploying Obot on AKS:
```yaml
# These settings are required for AKS when using the Azure Application Gateway Ingress Controller or NGINX Ingress Controller.
service:
type: ClusterIP
ingress:
enabled: true
className: azure-application-gateway # or nginx, depending on your ingress controller
annotations:
appgw.ingress.kubernetes.io/backend-path-prefix: "/"
hosts:
-
serviceAccount:
# This is important for configuring Azure Workload Identity, which we use for Azure Key Vault access
create: true
name: ""
annotations:
azure.workload.identity/client-id: ""
# Sensitive values belong under secret; the chart rejects them under config.
secret:
# database configuration for external db
OBOT_SERVER_DSN: "postgresql://:@:/?sslmode="
# Optional: generated automatically when omitted from the chart-managed Secret
OBOT_BOOTSTRAP_TOKEN: ""
# Optional: configures the LLM gateway's OpenAI provider at startup
OPENAI_API_KEY: ""
# Non-sensitive configuration
config:
# configures encryption with Azure Key Vault. optional, but recommended for production
OBOT_SERVER_ENCRYPTION_PROVIDER: "azure"
OBOT_AZURE_KEY_VAULT_NAME: ""
OBOT_AZURE_KEY_NAME: ""
OBOT_AZURE_KEY_VERSION: ""
# Enable authentication
OBOT_SERVER_ENABLE_AUTHENTICATION: true
```
With the default configuration on AKS, this will set up ingress to expose Obot through an Application Gateway or NGINX Ingress Controller. Make sure you have the appropriate ingress controller installed in your cluster. You should also consider adding TLS termination to your ingress for secure HTTPS access.
---
Document: Google GKE
Version: v0.28.0
Markdown: https://docs.obot.ai/v0.28.0/installation/reference-architectures/gcp-gke.md
HTML: https://docs.obot.ai/installation/reference-architectures/gcp-gke
# Google GKE
Deploying Obot to Google Kubernetes Engine follows the standard Helm workflow. As a prerequisite, you'll need the following resources set up in your Google Cloud environment:
- GCP project
- VPC Network
- Google Cloud SQL instance running PostgreSQL 17+.
- VPC Network Peering between your VPC Network and the Cloud SQL instance
- (Optional) Google Cloud KMS key for encrypting sensitive information
- (Optional) IAM role with necessary permissions if you're using Google Cloud KMS for encryption
- kubectl and Helm installed and configured to connect to your GKE cluster
- GKE cluster with at least 2 CPU cores and 4GB of RAM per node. Production workloads may require more. The cluster should have workload identity configured if you're using Google Cloud services like Cloud KMS for encryption.
To use the load balancer that Google will create when you deploy the chart, you will need to create your own BackendConfig. Here is an example of a terraform resource that can create the proper BackendConfig:
```hcl
resource "kubernetes_manifest" "obot-backendconfig" {
manifest = {
"apiVersion" = "cloud.google.com/v1"
"kind" = "BackendConfig"
"metadata" = {
"name" = ""
"namespace" = ""
}
"spec" = {
"timeoutSec" = 600
"healthCheck" = {
"checkIntervalSec" = 10
"timeoutSec" = 5
"healthyThreshold" = 1
"unhealthyThreshold" = 3
"type" = "HTTP"
"requestPath" = "/api/healthz"
"port" = 8080
}
}
}
}
```
If you plan on using Google Cloud KMS, here is some example terraform that creates the keyring, key, and the necessary IAM bindings:
```hcl
resource "google_kms_key_ring" "this" {
name = "obot-credentials"
location = "us-central1"
project = ""
}
resource "google_kms_crypto_key" "this" {
name = "obot-credentials"
key_ring = google_kms_key_ring.this.id
purpose = "ENCRYPT_DECRYPT"
}
resource "google_kms_crypto_key_iam_binding" "this" {
crypto_key_id = google_kms_crypto_key.this.id
role = "roles/cloudkms.cryptoKeyEncrypterDecrypter"
members = [
"principal://iam.googleapis.com/projects//locations/global/workloadIdentityPools/.svc.id.goog/subject/ns//sa/",
]
}
```
More information on the Google Cloud KMS setup can be found [here](https://docs.obot.ai/v0.28.0/configuration/encryption-providers/google-cloud-kms.md).
Once you have these resources set up, install the Obot helm chart with:
```bash
helm repo add obot https://charts.obot.ai
helm install obot obot/obot -f
```
Here is an example `values.yaml` file for deploying Obot on GKE:
```yaml
# These settings are required for GKE when using the default Ingress controller.
service:
type: NodePort
annotations:
cloud.google.com/neg: '{"ingress": true}'
cloud.google.com/backend-config: '{"ports":{"80":""}}'
ingress:
enabled: true
hosts:
-
serviceAccount:
# This is important for configuring Google Workload Identity, which we use for Google Cloud KMS access
create: true
name: ""
# Sensitive values belong under secret; the chart rejects them under config.
secret:
# database configuration for external db
OBOT_SERVER_DSN: "postgresql://:@:/?sslmode="
# Optional: generated automatically when omitted from the chart-managed Secret
OBOT_BOOTSTRAP_TOKEN: ""
# Optional: configures the LLM gateway's OpenAI provider at startup
OPENAI_API_KEY: ""
# Non-sensitive configuration
config:
# configures encryption with Google Cloud KMS. optional, but recommended for production
OBOT_SERVER_ENCRYPTION_PROVIDER: "GCP"
OBOT_GCP_KMS_KEY_URI: "projects//locations//keyRings//cryptoKeys/"
# Enable authentication
OBOT_SERVER_ENABLE_AUTHENTICATION: true
```
With the default configuration on GKE, this will set up ingress to expose Obot through a load balancer. You should also consider adding TLS termination to your load balancer for secure HTTPS access.
---
Document: Customize branding
Version: v0.28.0
Markdown: https://docs.obot.ai/v0.28.0/functionality/branding.md
HTML: https://docs.obot.ai/functionality/branding
# Customize branding
Branding allows administrators to customize the visual appearance of the Obot platform. Access this page from **Platform > Branding**.
## Theme
Select **Theme** in the configuration sidebar to customize colors and typography.
### Mode (Light / Dark)
Use **Mode** to choose which color scheme you are editing. The preview updates immediately so you can tune light and dark appearances separately.
### Surfaces (Custom / Tinted)
Under **Surfaces**, choose how page and panel backgrounds are set:
#### Custom
- **Background**: Page background
- **Surface 1, 2, 3**: Layered UI surfaces (cards, panels, nested regions)
Use the color swatch or enter a value in the text field. Supported formats include hex (`#rrggbb`), `hsl()` / `hsla()`, and `oklch()`.
#### Tinted
Derive surfaces from Obot’s built-in default surface ramp using three sliders for the active mode:
- **Hue**: Shifts the overall surface hue
- **Tint**: Adds color tint (0–100%)
- **Shade**: Lightens or darkens the ramp; the center position is neutral
### Per-Theme Colors
The **Per-Theme Colors** toggle controls whether accent, button/indicator, and text colors are editable separately. This is beneficial if you need to make individual adjustments to the colors below per theme.
### Accent Color
The primary brand color used for primary buttons, links, highlights, and similar emphasis.
### Buttons & Indicators
Colors for non-primary actions and status styling in the active mode:
- **Secondary**: Secondary buttons (for example **Cancel**)
- **Success**: Success states and success buttons
- **Warning**: Warning states and warning buttons
- **Error**: Error states and error buttons
### Text
Typography and text-on-color settings for the active mode:
- **Base Font Color**: Default body and UI text
- **On-Accent Button Text**: Text on primary (accent) buttons
- **Success Button Text**: Text on success buttons
- **Warning Button Text**: Text on warning buttons
- **Error Button Text**: Text on error buttons
- **Font Family**: UI font stack—**Poppins** (default), **Helvetica Neue**, or **System Default**
## Logos
Select **Logos** in the configuration sidebar to replace icons and full logos.
### Icons
These apply across light and dark mode:
- **Default Icon**: The standard icon shown in the UI
- **Error Icon**: Icon displayed for error states
- **Warning Icon**: Icon displayed for warning states
### Full Logos
Full logos depend on the selected **Mode** (light or dark):
- **Full Logo**: The main logo shown in the navbar (separate versions for light and dark schemes)
- **Full Enterprise Logo**: Logo used when running enterprise version of Obot
Changes preview live in the main area; they are not stored until you click **Save**.
## Restoring Defaults
Click **Restore Default** to reset all preferences to the original Obot theme.
---
Document: Capacity
Version: v0.28.0
Markdown: https://docs.obot.ai/v0.28.0/operations/capacity.md
HTML: https://docs.obot.ai/operations/capacity
# Capacity
Size Obot and its hosted workloads separately. A higher Obot replica count does not make every backing MCP server multi-replica.
## Application replicas and storage
See [High availability](https://docs.obot.ai/v0.28.0/operations/high-availability.md#obot-doc-application-replicas-and-storage) for this configuration.
## Hosted workload capacity
Use [scheduling configuration](https://docs.obot.ai/v0.28.0/operations/capacity.md#obot-doc-server-scheduling-configuration) and [MCP Kubernetes settings](https://docs.obot.ai/v0.28.0/configuration/mcp-deployments-in-kubernetes.md) to configure affinity, tolerations, requests, limits, and maximums. Per-catalog resource requirements can override corresponding defaults. Each MCP deployment currently has one replica.
Capacity depends on simultaneously active per-user deployments, shared servers, request volume, and audit retention. Measure a representative workload; the installation guide's minimum CPU and memory are not a throughput guarantee. Review database connection-pool settings as replica count grows.
## Failure behavior
See [High availability](https://docs.obot.ai/v0.28.0/operations/high-availability.md#obot-doc-failure-behavior) for this configuration.
## Configure workload placement
Scheduling settings apply only to Kubernetes deployments. They do not apply to Docker.
Server scheduling configures pod placement for MCP server deployments in Kubernetes. These settings map directly to Kubernetes Deployment spec fields and control where and how MCP server pods run.
Use this feature to:
- Control which nodes MCP servers run on
- Define which taints pods can tolerate
- Set resource requests and limits
- Align deployments with cluster topology and capacity planning
All settings are applied to `spec.template.spec` of Kubernetes Deployments. Changes take effect on the next deployment or pod restart.
Open **Platform > MCP Config** on a Kubernetes installation. Adjust affinity, tolerations, and resource settings, then save. Settings supplied through Helm are read-only in the UI; change the corresponding Helm values instead.
## Configuration
### Affinity
Defines the affinity field for pods in every MCP deployment. This value sets `spec.template.spec.affinity` on Kubernetes deployments and must be a valid [Affinity](https://kubernetes.io/docs/reference/generated/kubernetes-api/v1.26/#affinity-v1-core) object.
See the [Kubernetes affinity documentation](https://kubernetes.io/docs/concepts/scheduling-eviction/assign-pod-node/#affinity-and-anti-affinity) for details.
### Tolerations
Defines the tolerations field for pods in every MCP deployment. This value sets `spec.template.spec.tolerations` on Kubernetes deployments and must be a valid list of [Toleration](https://kubernetes.io/docs/reference/generated/kubernetes-api/v1.26/#toleration-v1-core) objects.
See the [Kubernetes taints and tolerations documentation](https://kubernetes.io/docs/concepts/scheduling-eviction/taint-and-toleration/) for details.
### Resource Limits & Requests
Defines the CPU and memory requests and limits for pods in every MCP deployment.
See the [Kubernetes resource management documentation](https://kubernetes.io/docs/concepts/configuration/manage-resources-containers/#requests-and-limits) for details.
---
Document: High availability
Version: v0.28.0
Markdown: https://docs.obot.ai/v0.28.0/operations/high-availability.md
HTML: https://docs.obot.ai/operations/high-availability
# High availability
High availability requires the Obot application, database, and storage to remain available together. Configure and test each layer before adding replicas.
## Application replicas and storage
The [Kubernetes deployment guide](https://docs.obot.ai/v0.28.0/installation/kubernetes-deployment.md#obot-doc-high-availability) describes `replicaCount` and external PostgreSQL. If replicas need the same local files, use a ReadWriteMany Obot data volume. A shared ReadWriteOnce claim is not a multi-replica storage solution.
## Failure behavior
[Tunnel peers](https://docs.obot.ai/v0.28.0/functionality/mcp-tunnels.md#obot-doc-multiple-obot-replicas) route requests to connected tunnel clients across replicas. Failed in-flight requests are not replayed automatically. Peer-token rotation can temporarily interrupt tunneled traffic during a rolling update.
Validate application restart, workload rescheduling, database availability, and storage recovery in a staging environment. Keep [backup and recovery](https://docs.obot.ai/v0.28.0/operations/backup.md) procedures separate from availability configuration.
## Plan each layer
| Layer | Required planning |
| -------------- | ---------------------------------------------------------------------------------------------------------------------------------------- |
| Obot replicas | Configure the Helm replica count, capacity, and ingress routing. Review pod placement so one node failure does not remove every replica. |
| PostgreSQL | Use an external production database with its own availability and recovery plan. Additional Obot replicas do not replicate the database. |
| MCP workloads | Assess their own restart behavior and persistent storage. More Obot replicas do not make each workload highly available. |
| Tunnel clients | Operate clients where they can reach the private service; test client and Obot replica loss. |
## Verify failover
In a staging environment, establish a client connection and perform a read-only tool call. Replace an Obot pod, reconnect, and verify a new call and its audit record. Separately test database failover and access to any shared files from each replica. Inspect failed in-flight requests; do not assume the gateway retries them.
For workload sizing, see [Capacity](https://docs.obot.ai/v0.28.0/operations/capacity.md). For recovery after data loss, see [Backup and recovery](https://docs.obot.ai/v0.28.0/operations/backup.md).
---
Document: Monitoring
Version: v0.28.0
Markdown: https://docs.obot.ai/v0.28.0/operations/monitoring.md
HTML: https://docs.obot.ai/operations/monitoring
# Monitoring
Monitor Obot, its external database, and the workloads it launches. Gateway usage reports describe user activity; they do not replace infrastructure monitoring.
## What to monitor
| Component | Signals to collect |
| ------------------------------ | --------------------------------------------------------------------------------- |
| Obot application | `/api/healthz`, request failures, pod/container restarts, CPU and memory pressure |
| External PostgreSQL | Availability, connection usage, storage growth, and backup success |
| Hosted MCP and agent workloads | Pending or failed pods, restarts, resource limits, and failed tool calls |
| Persistent and object storage | Capacity, access failures, and backup/export failures |
| Private-network tunnels | Client connectivity and a representative permitted request to the private service |
| Gateway traffic | MCP and model audit outcomes, usage, and expected user attribution |
## Establish checks and alerts
1. Collect application and workload logs using the logging system for your Docker host or Kubernetes cluster.
2. Monitor the Obot health endpoint and the public ingress separately. A healthy process does not prove that clients can reach it through TLS and authentication.
3. Alert on repeated restarts, unavailable storage or databases, resource pressure, and failed exports or backups.
4. Run representative permitted requests to check the upstream services that matter to your installation. Use a dedicated account with the appropriate grants.
5. Review [MCP audit data](https://docs.obot.ai/v0.28.0/security/audit-data.md) and [model usage](https://docs.obot.ai/v0.28.0/llm-gateway/audit.md) for failures and unexpected activity.
Choose alert thresholds from measured workload behavior. See [Capacity](https://docs.obot.ai/v0.28.0/operations/capacity.md) for sizing and [High availability](https://docs.obot.ai/v0.28.0/operations/high-availability.md) for replica and failure planning.
## Check the failing component
Use the [Troubleshooting symptom table](https://docs.obot.ai/v0.28.0/operations/troubleshooting.md#obot-doc-locate-the-failure) to investigate a failed check. For failed image pulls, check [image pull secrets](https://docs.obot.ai/v0.28.0/configuration/image-pull-secrets.md). Remove credentials and sensitive payloads before sharing logs.
---
Document: Troubleshooting
Version: v0.28.0
Markdown: https://docs.obot.ai/v0.28.0/operations/troubleshooting.md
HTML: https://docs.obot.ai/operations/troubleshooting
# Troubleshooting
Start with the component that failed. Record the time, affected user, endpoint, and any request or correlation ID before changing configuration.
## Locate the failure
| Symptom | Starting point |
| ------------------------------- | -------------------------------------------------------------------------------------------------------------------------------------------------------------------- |
| Obot is unreachable | Container/pod state, ingress/TLS, and `/api/healthz` |
| Sign-in fails | [Authentication troubleshooting](https://docs.obot.ai/v0.28.0/configuration/auth-providers.md#obot-doc-enabling-authentication-troubleshooting) |
| Hosted MCP pod does not start | Pod events, resource capacity, admission policy, and [image pull secrets](https://docs.obot.ai/v0.28.0/configuration/image-pull-secrets.md#obot-doc-troubleshooting) |
| Obot data PVC stays pending | [Persistent storage validation](https://docs.obot.ai/v0.28.0/installation/kubernetes-persistent-storage.md#obot-doc-validation) |
| Remote MCP call fails | [Gateway troubleshooting](https://docs.obot.ai/v0.28.0/mcp-gateway/troubleshooting.md) |
| Domain allowlist does not apply | [Egress provider verification](https://docs.obot.ai/v0.28.0/configuration/mcp-server-egress-control.md#obot-doc-verify-the-setup) |
| Model call fails | Model policy, provider credentials, exact model identifier, and [LLM troubleshooting](https://docs.obot.ai/v0.28.0/llm-gateway/troubleshooting.md) |
## Collect diagnostics
For Docker, inspect `docker ps` and `docker logs `. For Kubernetes, inspect pod state, events, and logs in both the Obot and MCP namespaces. Check ingress/TLS when the public endpoint fails but the application is healthy internally. Check the external database when Obot cannot start or persist changes.
Correlate application logs with MCP or model audit records by timestamp and resource. A successful `/api/healthz` response does not prove that a provider credential, model grant, MCP component, or tunnel is working.
## Verify the repair
Repeat the same read-only request under the affected user's account. Verify its result and the corresponding audit entry. For a storage problem, verify the expected files remain available after workload replacement in a test environment.
Remove credentials and sensitive payloads before sharing diagnostics. See [Monitoring](https://docs.obot.ai/v0.28.0/operations/monitoring.md) for routine observations and alerts.
---
Document: Backup and recovery
Version: v0.28.0
Markdown: https://docs.obot.ai/v0.28.0/operations/backup.md
HTML: https://docs.obot.ai/operations/backup
# Backup and recovery
Back up the stores that hold your installation's state, together with the configuration and key access needed to read them. Audit export alone is not a recoverable Obot backup.
## Backup scope
| Store | Preserve |
| ------------------------ | ----------------------------------------------------------------------------------------------------------------------------------- |
| PostgreSQL | Platform configuration, identities, metadata, LLM gateway configuration and credentials, and retained database-backed audit records |
| Deployment configuration | Image/chart versions, Helm values, runtime settings, and references to external secrets |
| Encryption | Custom key material or access to the original cloud KMS keys, protected separately |
Use [persistent storage configuration](https://docs.obot.ai/v0.28.0/installation/kubernetes-persistent-storage.md) to identify the Obot data volume and its StorageClass.
Use your database and storage providers' backup mechanisms. Define an acceptable recovery point and recovery time for your installation, and keep a version record with each backup. Coordinate database and file/object backups so restored metadata does not refer to missing artifacts.
## Recovery exercise
1. Restore into an isolated environment using the recorded Obot and chart versions.
2. Restore the database and relevant object/volume data using the providers' documented restore procedures.
3. Restore secret references and encryption-provider access before starting Obot.
4. Configure the restored environment's hostname, TLS, and authentication callbacks.
5. Confirm sign-in, resource visibility, decryption, a harmless MCP request, and access to any persistent files required by your MCP servers.
6. Keep integrations that perform external actions disabled until their behavior is reviewed.
Only treat a backup as usable after testing restoration. See [Data storage and lifecycle](https://docs.obot.ai/v0.28.0/architecture/data-lifecycle.md) and [Encryption Providers](https://docs.obot.ai/v0.28.0/security/credentials.md) for coverage boundaries. Infrastructure-specific restore commands depend on your chosen database and storage services.
---
Document: Upgrades and rollback
Version: v0.28.0
Markdown: https://docs.obot.ai/v0.28.0/operations/upgrades.md
HTML: https://docs.obot.ai/operations/upgrades
# Upgrades and rollback
Use explicit image and chart versions for production upgrades. Review the target release's changes before replacing the running application.
## Prepare
1. Record the current image digest/tag, chart version, values, and external dependencies.
2. Read release notes and relevant [compatibility guidance](https://docs.obot.ai/v0.28.0/reference/compatibility.md), including vMCP transitions.
3. Take and test an appropriate [backup](https://docs.obot.ai/v0.28.0/operations/backup.md).
4. Rehearse the upgrade against a restored staging installation. Confirm authentication, representative gateway requests, audit records, and any persistent files your deployment uses.
## Apply and verify
For Kubernetes, update the selected chart version and values through your normal Helm or GitOps deployment process. For Docker evaluation, recreate the container with the selected image and the same persistent data volume and configuration. Do not remove the data volume as part of an image update.
Check the rollout, application health, sign-in, and representative workloads. Review [tunnel peer-token behavior](https://docs.obot.ai/v0.28.0/functionality/mcp-tunnels.md#obot-doc-multiple-obot-replicas) before changing peer secrets during a multi-replica rollout.
## Rollback
Do not assume that changing the image tag or running a Helm rollback reverses database or resource migrations. Confirm downgrade compatibility for the exact release first. When it is not established, use the recorded prior application/configuration with a compatible pre-upgrade data restore in a rehearsed recovery procedure.
A data restore can lose writes made after the backup. Decide how to stop traffic and scheduled work and how to handle that recovery point before proceeding with production changes.
---
Document: Upgrade embedded PostgreSQL from 17 to 18
Version: v0.28.0
Markdown: https://docs.obot.ai/v0.28.0/operations/embedded-postgresql-upgrade.md
HTML: https://docs.obot.ai/operations/embedded-postgresql-upgrade
# Upgrade embedded PostgreSQL from 17 to 18
Obot's embedded database now uses PostgreSQL 18. Existing PostgreSQL 17 data directories require a dump and restore before starting the new image. Obot exits with a migration link when it finds an incompatible directory.
This affects Docker installations without `OBOT_SERVER_DSN` and Helm installations using `dev.useEmbeddedDb: true`. The embedded database is for development and evaluation. External PostgreSQL installations and Substrate's separate database do not require this migration.
## Before you begin
Plan downtime for the entire procedure. Keep Obot stopped while taking the final dump and restoring it: starting the application can create schemas and write data before restoration finishes.
- Record the old image digest, new image tag, deployment settings, volume/PVC, and database credentials. Use an explicit new image tag, not `latest`.
- Preserve all other files under `/data` and access to the original encryption keys. See [Backup and recovery](https://docs.obot.ai/v0.28.0/operations/backup.md).
- Allow enough space for the old cluster, new cluster, and SQL dump. Keep the dump outside the volume being migrated, with restricted permissions; it contains data and role password hashes.
- `pg_dumpall` includes every database on this server, including `_llm_gateway`. A gateway database configured on another server through `OBOT_SERVER_LLM_GATEWAY_POSTGRES_DSN` needs its own coordinated backup.
- These steps assume the default tablespaces. If you added tablespaces or customized PostgreSQL configuration, preserve their storage and reproduce those settings before restoring.
Run the commands in Bash and stop if any command fails. The examples use the database superuser `obot` and `/data/postgresql`; substitute your configured values. Keep the old image and old directory until all verification is complete.
## Docker
### Stop Obot and dump PostgreSQL 17
Set the container name, named volume, new image, and database settings:
```bash
umask 077
CONTAINER=obot
DATA_VOLUME=obot-data
NEW_IMAGE='ghcr.io/obot-platform/obot:'
DB_USER=obot
OLD_IMAGE=$(docker inspect --format '{{.Image}}' "$CONTAINER")
docker inspect "$CONTAINER" > obot-container-before-upgrade.json
docker exec "$CONTAINER" sh -c 'printf "POSTGRES_USER=%s\nPOSTGRES_PASSWORD=%s\nPGDATA=%s\n" "$POSTGRES_USER" "$POSTGRES_PASSWORD" "$PGDATA"' > postgres.env
docker stop --time 60 "$CONTAINER"
```
For a bind mount, replace each `--mount "type=volume,source=$DATA_VOLUME,target=/data"` below with your original bind mount. Confirm the volume from the saved container configuration. Do not remove it.
Start only PostgreSQL using the old image. No database port is exposed; commands connect over its Unix socket.
```bash
docker run -d --name obot-pg-maintenance --network none \
--mount "type=volume,source=$DATA_VOLUME,target=/data" \
--env-file postgres.env -e POSTGRES_DB=postgres \
--entrypoint /usr/bin/docker-entrypoint.sh \
"$OLD_IMAGE" postgres -c listen_addresses=
docker exec obot-pg-maintenance pg_isready -U "$DB_USER" -d postgres
```
Wait for readiness before continuing. The version query must report `17` as its major version.
```bash
docker exec obot-pg-maintenance psql -X -U "$DB_USER" -d postgres -c 'SHOW server_version;'
docker exec obot-pg-maintenance pg_dumpall -U "$DB_USER" --quote-all-identifiers > obot-backup.sql
test -s obot-backup.sql
docker stop --time 60 obot-pg-maintenance
docker rm obot-pg-maintenance
```
### Initialize PostgreSQL 18 and restore
Retain the old directory. The guard prevents overwriting an earlier backup.
```bash
docker run --rm --network none \
--mount "type=volume,source=$DATA_VOLUME,target=/data" \
--env-file postgres.env --entrypoint sh "$NEW_IMAGE" -ec \
'test "$(cat "$PGDATA/PG_VERSION")" = 17; test ! -e "$PGDATA-17-backup"; mv "$PGDATA" "$PGDATA-17-backup"'
docker run -d --name obot-pg-maintenance --network none \
--mount "type=volume,source=$DATA_VOLUME,target=/data" \
--env-file postgres.env -e POSTGRES_DB=postgres \
--entrypoint /usr/bin/docker-entrypoint.sh \
"$NEW_IMAGE" postgres -c listen_addresses=
docker exec obot-pg-maintenance sh -c \
'test "$(head -n 1 "$PGDATA/postmaster.pid")" = 1 && pg_isready -U "$POSTGRES_USER" -d postgres'
```
Wait until the last command succeeds. Checking PID 1 avoids mistaking the entrypoint's temporary initialization server for the final server. `POSTGRES_DB=postgres` is used only for maintenance, so the application database does not already exist when the dump creates it.
```bash
docker exec -i obot-pg-maintenance psql -X -U "$DB_USER" -d postgres \
-v ON_ERROR_STOP=off -v VERBOSITY=terse \
< obot-backup.sql > restore.out 2> restore.log
```
Complete [Check the restore](https://docs.obot.ai/v0.28.0/operations/embedded-postgresql-upgrade.md#obot-doc-check-the-restore) before starting Obot. Then refresh statistics and stop maintenance:
```bash
docker exec obot-pg-maintenance vacuumdb -U "$DB_USER" --all --analyze
docker exec obot-pg-maintenance psql -X -U "$DB_USER" -d postgres -c '\l'
docker stop --time 60 obot-pg-maintenance
docker rm obot-pg-maintenance
```
Recreate Obot using the new image and its original mounts, network, ports, authentication, encryption, and other settings from your deployment configuration. Restore the original `POSTGRES_DB`; do not use the maintenance override. The stopped old container must be removed or renamed before reusing its name. Keep the original data volume attached and perform [Verify Obot](https://docs.obot.ai/v0.28.0/operations/embedded-postgresql-upgrade.md#obot-doc-verify-obot).
## Helm with `dev.useEmbeddedDb: true`
### Record the installation and stop Obot
Use one Obot replica and persistent storage for this procedure. Suspend any GitOps controller or autoscaler that would undo the temporary scale-down. Do not uninstall the release or delete its PVC.
```bash
umask 077
NS=obot
RELEASE=obot
DEPLOYMENT=obot
POD=''
PVC=''
OLD_IMAGE=''
NEW_IMAGE='ghcr.io/obot-platform/obot:'
DB_USER=obot
helm get values "$RELEASE" -n "$NS" -o yaml > obot-values-before-upgrade.yaml
kubectl get deployment "$DEPLOYMENT" -n "$NS" -o yaml > obot-deployment-before-upgrade.yaml
kubectl exec -n "$NS" "$POD" -c obot -- sh -c 'printf "POSTGRES_USER=%s\nPOSTGRES_PASSWORD=%s\nPGDATA=%s\n" "$POSTGRES_USER" "$POSTGRES_PASSWORD" "$PGDATA"' > postgres.env
kubectl scale deployment "$DEPLOYMENT" -n "$NS" --replicas=0
kubectl wait -n "$NS" --for=delete "pod/$POD" --timeout=180s
kubectl create secret generic obot-pg-migration -n "$NS" --from-env-file=postgres.env
```
Obtain the PVC name from the deployment's `data` volume, including when `persistence.existingClaim` is configured. Confirm all Obot pods have stopped before mounting it elsewhere. The environment file records the actual `PGDATA`. Mount the volume at the same path used by the original deployment if it differs from `/data`.
### Dump, replace the data directory, and restore
Define this helper to create a temporary pod. It has no Obot service labels or HTTP probes. For a private image, add your existing `imagePullSecrets` under `spec`; carry over any node scheduling requirements needed to mount the PVC.
```bash
pg_pod() {
kubectl create -n "$NS" -f - < restore.out 2> restore.log
```
Complete [Check the restore](https://docs.obot.ai/v0.28.0/operations/embedded-postgresql-upgrade.md#obot-doc-check-the-restore), then:
```bash
kubectl exec -n "$NS" obot-pg-maintenance -- vacuumdb -U "$DB_USER" --all --analyze
kubectl exec -n "$NS" obot-pg-maintenance -- psql -X -U "$DB_USER" -d postgres -c '\l'
kubectl delete pod obot-pg-maintenance -n "$NS" --wait=true
kubectl delete secret obot-pg-migration -n "$NS"
```
Upgrade the existing Helm release through your normal deployment process, preserving its values, secrets, PVC, and original database environment. Set the target chart/image versions, `dev.useEmbeddedDb: true`, and `replicaCount: 1`. Resume reconciliation only after the desired configuration uses the new image. Wait for the deployment rollout and perform the checks below.
## Check the restore
The new cluster already contains the bootstrap superuser. PostgreSQL documents the resulting `CREATE ROLE` error as [harmless](https://www.postgresql.org/docs/18/app-pg-dumpall.html#APP-PG-DUMPALL-NOTES). This is the only SQL error these instructions permit. The later `ALTER ROLE` statements restore that user's attributes and password.
`psql` can exit successfully after SQL errors when `ON_ERROR_STOP` is off. Require both a successful restore command and this diagnostic check:
```bash
grep -E '(ERROR|FATAL|PANIC):' restore.log > restore-errors.txt
printf 'ERROR: role "%s" already exists\n' "$DB_USER" > expected-restore-error.txt
cmp restore-errors.txt expected-restore-error.txt
```
Read `restore.log` as well. If the comparison fails or the restore command fails, keep Obot stopped and investigate. Do not restore again into a partially populated cluster; retain that failed directory separately and initialize another empty cluster before retrying. Never continue merely because the last SQL statement succeeded.
## Verify Obot
- Confirm PostgreSQL reports version 18 and both the application and gateway databases exist with their expected owners and records.
- Sign in with an existing user. Check existing MCP servers, then make a harmless call through a virtual MCP server.
- Confirm saved credentials still decrypt, gateway configuration is present, a representative model request succeeds, and retained MCP/LLM audit records are visible.
- Restart Obot once and repeat the health and data checks.
Keep the dump, previous image, original deployment configuration, and `PGDATA-17-backup` until these checks pass. Retain backups according to your normal policy; protect or remove temporary credential files when finished.
## Recovery and rollback
If you upgraded before taking a dump, the startup check leaves the PG17 directory intact. Recreate the Docker container or roll back the Helm workload to the previous image with its original configuration and volume. Once it is running, begin the procedure above to record its settings, stop Obot, and take the PostgreSQL-only dump. If the old image is no longer local, retrieve the exact previous tag/digest from your recorded configuration.
To roll back after initializing PG18, stop Obot and all maintenance database processes. Using a temporary container/pod with the volume mounted and a shell entrypoint, rename the new `$PGDATA` to a separate failed-upgrade directory, then move `$PGDATA-17-backup` back to `$PGDATA`. Start the previous Obot image with its original configuration. Do not run PG17 against the PG18 directory. A Helm rollback alone does not restore the database.
Rollback returns to the backup's recovery point and loses subsequent writes. Preserve the new directory for investigation rather than deleting it.
---
Document: Platform overview
Version: v0.28.0
Markdown: https://docs.obot.ai/v0.28.0/concepts/architecture.md
HTML: https://docs.obot.ai/concepts/architecture
# Platform overview
Obot connects AI clients and user devices with hosted services and external providers. It provides MCP and LLM gateways, hosting, identity and access control, audit logs, and MCP and Skills registries.
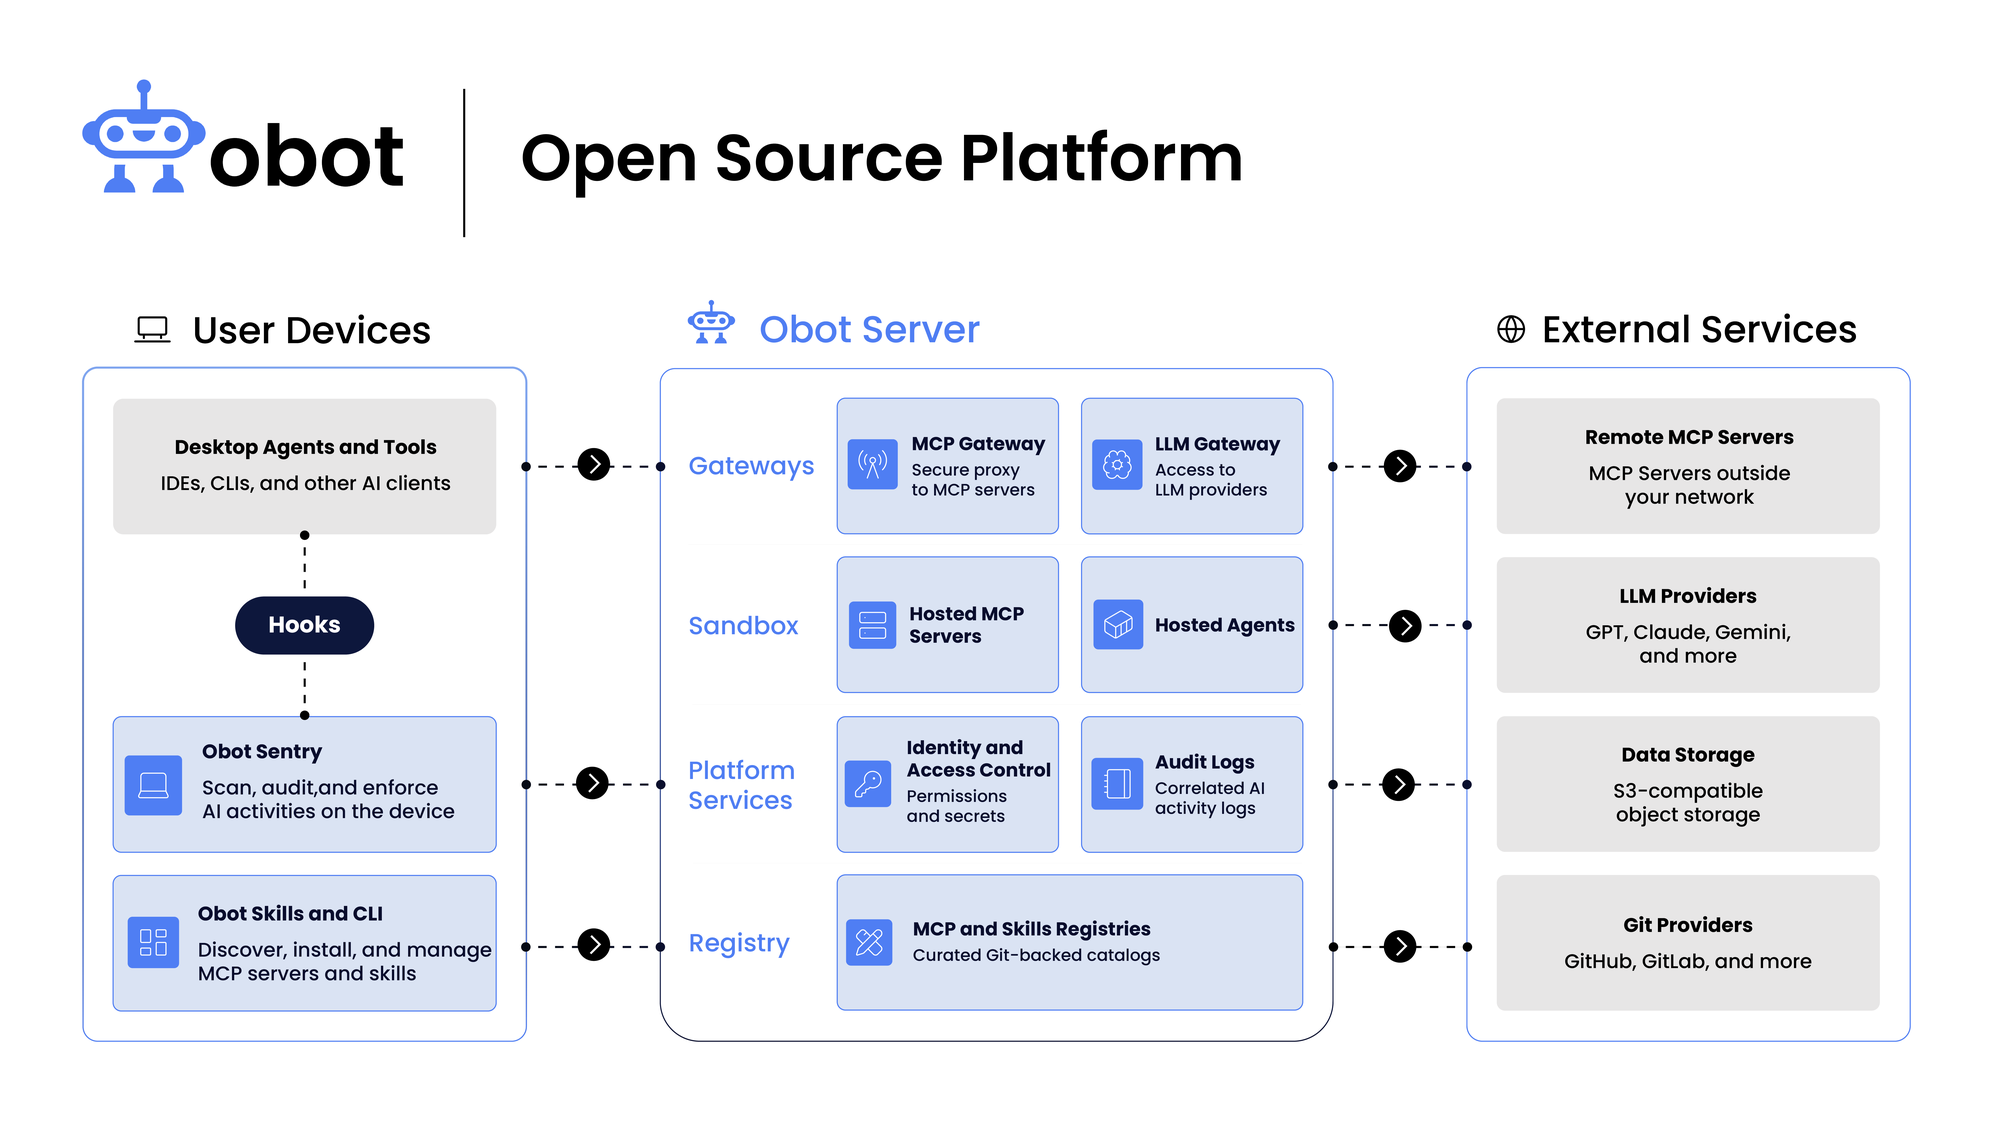
## Key Concepts
- **MCP Clients**: Agents and applications that consume MCP tools, prompts, and resources, including desktop clients and command-line tools.
- **MCP Registry**: An index of MCP servers with metadata about how to run them and where to find them.
- **MCP Gateway**: The proxy inside Obot that authenticates and authorizes requests, records audit data, invokes filters, enforces their responses, and forwards allowed traffic. See [MCP Gateway](https://docs.obot.ai/v0.28.0/concepts/mcp-gateway.md).
- **MCP Hosting**: Obot manages separate Docker containers or Kubernetes workloads for hosted servers. Remote servers remain on external infrastructure. See [MCP Hosting](https://docs.obot.ai/v0.28.0/concepts/mcp-hosting.md).
- **Filters**: Hosted or remote MCP servers that expose a filter tool, or external HTTP webhooks reached through a hosted adapter. Filter code runs separately from Obot; Obot calls it and applies the result. See [Filters](https://docs.obot.ai/v0.28.0/functionality/filters.md).
- **LLM Gateway**: A proxy between chat clients and LLM providers for monitoring and controlling model communications.
## Authentication Flow
Obot handles two separate authorizations: the user's permission for an MCP client to access Obot, and, when needed, permission for Obot to access an upstream MCP service on the user's behalf.
### Connecting an MCP Client
The user initiates a connection to an Obot MCP endpoint from their MCP client. The following flow shows a public client using OAuth with PKCE. The user signs in with the configured [auth provider](https://docs.obot.ai/v0.28.0/configuration/auth-providers.md), then approves the client's access. Obot checks the user's permission to access the requested MCP server; approving the client does not grant additional server access.
```mermaid
sequenceDiagram
actor U as User / browser
participant C as MCP client
participant O as Obot
participant A as Upstream OAuth service
U->>C: Initiate connection to Obot MCP endpoint
C->>O: Connect without an access token
O-->>C: Authentication required and OAuth discovery
C->>U: Open Obot authorization page
U->>O: Sign in through configured auth provider
O->>O: Check access to the requested MCP server
O-->>U: Request permission for this client
U->>O: Approve client access
opt Upstream service authorization needed
O-->>U: Redirect to upstream sign-in
U->>A: Sign in and authorize Obot
A-->>O: Authorization code via browser
O->>A: Exchange code for upstream tokens
A-->>O: Upstream tokens
O->>O: Store upstream credentials
end
O-->>C: Obot authorization code via browser
C->>O: Exchange code with PKCE verifier
O-->>C: Obot access and refresh tokens
```
The upstream authorization step is skipped when it is unnecessary or an existing authorization is usable. The client receives Obot tokens; upstream credentials remain with Obot.
### Authorizing MCP Requests
Once connected, the client sends its Obot access token with MCP requests. Obot validates the token, identifies the user, and checks both the user's current server access and the token's permitted servers. Access checks use ownership and applicable [MCP access policies](https://docs.obot.ai/v0.28.0/mcp-gateway/access.md), including user and group rules.
```mermaid
sequenceDiagram
participant C as MCP client
participant O as Obot gateway
participant S as MCP server
C->>O: MCP request with Obot access token
O->>O: Validate token and identify user
O->>O: Check server access and token restrictions
alt Authentication or authorization fails
O-->>C: Authentication required or access denied
else Access allowed
opt Upstream OAuth required
O->>O: Retrieve or refresh stored upstream token
end
O->>S: Forward request with upstream credentials as needed
S-->>O: MCP response
O-->>C: MCP response
end
```
Clients using an existing Obot token or MCP API key begin with authenticated requests. Obot credentials authorize access to the gateway; upstream credentials authorize Obot's connection to the MCP service.
## Data Persistence
- **Database**: Postgres stores configuration, metadata, and audit data. In production, host it independently of the Obot deployment.
## Encryption
Application-level encryption is disabled by default. When configured, an encryption provider protects selected database fields and credential values, including sensitive audit payloads; it does not encrypt entire records or automatically backfill all historical data. Local passwords are hashed independently of this setting. See [Encryption Providers](https://docs.obot.ai/v0.28.0/security/credentials.md) for field coverage and existing-data considerations.
## LLMs
Obot reaches models through its built-in [LLM Gateway](https://docs.obot.ai/v0.28.0/llm-gateway/how-it-works.md), which supports many providers in every edition, without registration or a license key. Administrators add providers and their credentials under **LLM Gateway** → **Providers**. See [Configure providers and models](https://docs.obot.ai/v0.28.0/configuration/model-providers.md).
---
Document: Request flows and trust boundaries
Version: v0.28.0
Markdown: https://docs.obot.ai/v0.28.0/architecture/request-flows.md
HTML: https://docs.obot.ai/architecture/request-flows
# Request flows and trust boundaries
An Obot deployment has several enforcement points. Identify which traffic passes through each before relying on a policy.
| Flow | Path | Boundary |
| ------------------- | --------------------------------------------------------- | --------------------------------------------------------------------------------------- |
| MCP request | Client → Obot gateway → hosted or remote MCP server | Obot authenticates the client and applies server/tool grants and matching filters |
| LLM request | Client → Obot LLM Gateway → model provider | Obot checks model access and supplies the upstream provider credential |
| Private MCP request | Gateway → outbound tunnel connection → private MCP server | The tunnel allowlist limits destinations; the tunnel machine makes the final connection |
| Local tool call | AI client hook → Sentry → Obot decision/audit services | Coverage depends on the client and installed hooks, independently of gateway routing |
The [MCP authentication diagrams](https://docs.obot.ai/v0.28.0/concepts/architecture.md#obot-doc-authentication-flow) distinguish permission to access Obot from permission to use an upstream service. Clients receive Obot tokens; upstream OAuth credentials remain with Obot.
Hosted MCP servers and filters execute outside the Obot process. Calling a remote server does not place that service inside Obot's workload isolation boundary. [Filters](https://docs.obot.ai/v0.28.0/functionality/filters.md) inspect matching traffic; they do not sandbox the remote service.
A client that talks directly to a provider or server bypasses the corresponding gateway. Device enforcement has its own [client support and limitations](https://docs.obot.ai/v0.28.0/device-management/enforcement.md). Use [Security model](https://docs.obot.ai/v0.28.0/security/model.md) to relate these boundaries to deployment responsibilities.
---
Document: Resource ownership
Version: v0.28.0
Markdown: https://docs.obot.ai/v0.28.0/architecture/identity-resources.md
HTML: https://docs.obot.ai/architecture/identity-resources
# Resource ownership
Obot uses identity and resource ownership together with explicit grants. A successful sign-in identifies the caller; it does not make every resource available.
| Resource | Purpose and scope |
| ----------------------------------------- | -------------------------------------------------------------------- |
| User and authentication-provider identity | The signed-in account and its external group membership |
| Catalog entry | A definition of a hosted or remote MCP server |
| vMCP component | A snapshot of a catalog entry plus configuration and tool selection |
| Shared vMCP | An administrator-published endpoint governed by profiles |
| Personal vMCP | An endpoint usable only by its author |
| Profile | An additive grant of shared-vMCP components/tools to users or groups |
| vMCP instance | A user's connection state and user-supplied credentials |
| Agent authorization scope | Programmatic capabilities limited by the owning user's permissions |
The [vMCP guide](https://docs.obot.ai/v0.28.0/mcp-gateway/server-types.md) explains snapshot updates, profile composition, and loss of catalog access. [Agent authorization scopes](https://docs.obot.ai/v0.28.0/functionality/agent-auth-scopes.md) explain key expiration and revocation.
Logical isolation and runtime isolation are different. A shared component can serve users with separate headers; user-provided non-header configuration can require separate deployments. Kubernetes pods, network policies, and runtime classes provide workload boundaries. See [Network and workload isolation](https://docs.obot.ai/v0.28.0/security/isolation.md).
Authentication-provider changes can create different Obot user identities. Read [Switching auth providers](https://docs.obot.ai/v0.28.0/configuration/auth-providers.md#obot-doc-switching-between-auth-providers) before changing providers; do not assume ownership and stored work automatically transfer.
---
Document: Where Obot and MCP servers run
Version: v0.28.0
Markdown: https://docs.obot.ai/v0.28.0/architecture/topologies.md
HTML: https://docs.obot.ai/architecture/topologies
# Where Obot and MCP servers run
Start with where you install Obot: Docker or Kubernetes. Within either installation, Obot can launch hosted MCP servers, connect directly to remote MCP servers, and reach private remote MCP servers through an admin-deployed tunnel client. One installation can use all three arrangements.
The examples below show the standard Docker and Helm installations. They distinguish the Obot application, the MCP workloads it manages, and services deployed independently of Obot.
## Obot on Docker
### Where Obot runs
Obot runs as a container on a Docker host. The evaluation installation includes PostgreSQL in the Obot container and mounts a persistent data volume. See [Docker evaluation](https://docs.obot.ai/v0.28.0/installation/docker-deployment.md) for installation and authentication setup.
### Where MCP servers run
| MCP arrangement | Placement and responsibility |
| -------------------------- | ------------------------------------------------------------------------------------------------------------------------------------------------------------------ |
| Hosted by Obot | Obot launches separate sibling containers through the host Docker daemon. MCP servers run alongside the Obot container. |
| Remote, directly reachable | A vendor or your organization operates the MCP service independently, on another host, in a cluster, or as a hosted service. Obot connects to its HTTP/S endpoint. |
| Private remote service | The service remains on its private network. An admin deploys a tunnel client where it can reach that service and establish an outbound connection to Obot. |
```mermaid
flowchart TB
C[AI client] --> O
subgraph D[Docker host]
O[Obot container]
H[Obot-managed MCP containers]
O -->|MCP traffic| H
end
O -->|Direct HTTP/S| R[Independently operated remote MCP server]
subgraph P[Example private network]
T[Admin-deployed tunnel client]
M[Private remote MCP server]
T -->|HTTP/S to allowed destination| M
end
T -.->|Outbound WebSocket to Obot| O
```
The tunnel client is deployed separately by an admin, as a CLI process or container. It may run on the private MCP server's machine or another machine with the required connectivity. Obot does not launch the tunnel client. The dashed arrow shows who establishes the connection; Obot forwards MCP requests back through that established tunnel.
The Docker installation mounts the host Docker socket to launch MCP workloads. Treat users who can deploy server code as trusted on that host. Use this installation for development, evaluation, or trusted single-tenant use.
## Obot on Kubernetes
### Where Obot runs
The Helm installation runs Obot as pods in the installation's namespace. Configure an external PostgreSQL database, persistent or object storage, and encryption separately. AWS EKS, Azure AKS, and Google GKE are examples of where you can run this Kubernetes installation. See [Kubernetes production deployment](https://docs.obot.ai/v0.28.0/installation/kubernetes-deployment.md) and the [cloud deployment guides](https://docs.obot.ai/v0.28.0/operations/cloud.md).
### Where MCP servers run
| MCP arrangement | Placement and responsibility |
| -------------------------- | --------------------------------------------------------------------------------------------------------------------------------------------------------------------------------- |
| Hosted by Obot | Obot creates separate MCP workloads in the configured MCP namespace, normally in the same cluster. With a Helm release named `obot`, the default MCP namespace is `obot-mcp`. |
| Remote, directly reachable | A vendor or your organization operates the service independently. Its location can be another cluster, a VM, or a hosted service; Obot connects to its reachable HTTP/S endpoint. |
| Private remote service | An admin deploys a tunnel client with access to the service's private network. The client may be a CLI process, container, or a separately managed pod, and must also reach Obot. |
```mermaid
flowchart TB
C[AI client] --> O
subgraph K[Kubernetes cluster]
subgraph N[Obot installation namespace]
O[Obot pods]
end
subgraph W[Configured MCP namespace]
H[Obot-managed MCP workloads]
end
O -->|MCP traffic| H
end
O -->|Direct HTTP/S| R[Independently operated remote MCP server]
subgraph P[Example private network]
T[Admin-deployed tunnel client]
M[Private remote MCP server]
T -->|HTTP/S to allowed destination| M
end
T -.->|Outbound WebSocket to Obot| O
```
The tunnel client is not one of the MCP workloads Obot deploys. An admin chooses its location and manages its lifecycle. The private network in the diagram can be a separate cluster or network segment; the requirement is connectivity from the tunnel client to both the private service and Obot.
Kubernetes provides independently configurable pod security, network policy, and sandbox runtimes for hosted MCP workloads. Those controls do not configure the independently operated remote services or tunnel clients. See [MCP workload configuration](https://docs.obot.ai/v0.28.0/configuration/mcp-deployments-in-kubernetes.md) and [Network and workload isolation](https://docs.obot.ai/v0.28.0/security/isolation.md).
For multiple Obot replicas, use an external database and plan shared storage for any files the replicas must access. See [Capacity and high availability](https://docs.obot.ai/v0.28.0/operations/capacity.md) and [Data storage and lifecycle](https://docs.obot.ai/v0.28.0/architecture/data-lifecycle.md).
## Tunnel ownership and connection direction
In either installation type, the tunnel has two ends:
| End | Runs where | Managed by |
| ----------------------------- | ---------------------------------------------------------------- | -------------------------------------------- |
| Receiving endpoint | Inside the Obot application, at `/tunnel/connect` | Provided by Obot |
| Tunnel client (`obot tunnel`) | A machine or pod that can reach the private MCP service and Obot | Deployed and operated externally by an admin |
An Admin or Owner creates the tunnel record and allowed-URL rules in Obot, then uses the generated secret to run the client externally. Creating the record does not deploy a client or an MCP server.
The tunnel client establishes an outbound WebSocket connection to Obot. When an AI client calls the configured remote MCP server through Obot, Obot sends the request over that connection. The tunnel client forwards it to the allowed HTTP/S destination and returns the response. The tunnel client needs no inbound listening port; the private MCP service must still accept connections from it.
Use a tunnel when Obot cannot directly reach the remote service. A directly reachable remote server does not need one, and tunnel placement does not depend on whether Obot itself runs on Docker or Kubernetes. Follow [Create and run an MCP tunnel](https://docs.obot.ai/v0.28.0/mcp-gateway/filters-tunnels.md#obot-doc-mcp-tunnels-create-an-mcp-tunnel) for setup and the [tunnel operations reference](https://docs.obot.ai/v0.28.0/functionality/mcp-tunnels.md) for connection handling and secret rotation.
---
Document: Data storage and lifecycle
Version: v0.28.0
Markdown: https://docs.obot.ai/v0.28.0/architecture/data-lifecycle.md
HTML: https://docs.obot.ai/architecture/data-lifecycle
# Data storage and lifecycle
Obot stores platform records, activity history, and workload files separately. Each needs its own plan for surviving restarts, removing old data, and recovering from a failure.
## Where data is stored
**Use an external PostgreSQL database for production**, configured through `OBOT_SERVER_DSN`. See [Kubernetes production deployment](https://docs.obot.ai/v0.28.0/installation/kubernetes-deployment.md).
The bundled PostgreSQL database is for testing and evaluation. In that setup, the [Docker deployment](https://docs.obot.ai/v0.28.0/installation/docker-deployment.md) uses a `/data` volume to retain its database and local files.
| Data | Storage |
| ------------------------------------------------ | ---------------------------------------------------------------------------------------------- |
| Platform configuration, identities, and metadata | External PostgreSQL in production; bundled PostgreSQL for testing and evaluation |
| MCP and LLM audit records | The Obot database |
| Device scan history | The Obot database; scans can include captured configuration files containing sensitive content |
## Keep files across restarts
The database, Obot server's data volume, and any persistent files used by MCP servers serve different purposes. Back up each store your deployment uses.
For testing and evaluation, retain the Docker `/data` volume to keep the bundled database and local files when replacing the container.
The [Kubernetes persistent storage guide](https://docs.obot.ai/v0.28.0/installation/kubernetes-persistent-storage.md) covers the Obot server data volume.
## Decide how long to keep activity records
Retention controls when Obot automatically deletes old records. MCP audit logs, LLM audit logs, and device scans each have a separate retention setting; changing one does not change the others. Choose the retention period for each in [Server configuration](https://docs.obot.ai/v0.28.0/configuration/server-configuration.md).
If you need MCP or LLM audit records after their retention period ends, [export them](https://docs.obot.ai/v0.28.0/security/audit-data.md#obot-doc-audit-log-export-creating-exports) before cleanup removes them. Configure how long exported files are kept in the destination storage separately.
## Understand what encryption protects
Application encryption is disabled by default. When configured, it protects selected stored fields, such as credential secrets and gateway request and response bodies. Other metadata can remain readable. The [encryption coverage table](https://docs.obot.ai/v0.28.0/security/credentials.md#obot-doc-overview-encrypted-resources-and-fields) lists the protected fields.
Configure encryption for exported logs, storage volumes, and backups through the systems that store them. Obot's application encryption does not encrypt those stores as a whole.
Turning encryption on also does not encrypt all previously stored data automatically. An existing installation may need a separate data migration; account for that when planning the change.
## Understand what deletion and access changes remove
Some resources contain copies of other resources. Removing the source or changing access does not necessarily remove those copies.
| Action | Effect |
| ------------------------------------------------------------ | -------------------------------------------------------------------------------------------------------------------------------------------------------------------------------------------------------------------------------------------------------------- |
| Delete an MCP catalog entry | Existing vMCPs can keep using their saved snapshot of the entry. Review, update, or delete the affected vMCPs separately. See [vMCP snapshots and updates](https://docs.obot.ai/v0.28.0/mcp-gateway/publish.md#obot-doc-virtual-mcps-snapshots-and-updates). |
| Remove a Git-managed vMCP definition from its catalog source | A successful sync deletes that vMCP. This differs from deleting a catalog entry used by an independently managed vMCP. See [Git-managed vMCPs](https://docs.obot.ai/v0.28.0/mcp-gateway/publish.md#obot-doc-virtual-mcps-snapshots-and-updates). |
| Remove a skill source or a regular user's last access grant | The affected skills are no longer available to that user for discovery or installation through Obot. Copies already installed on clients remain. See [skill access](https://docs.obot.ai/v0.28.0/registries/publish-skills.md#obot-doc-skills-access-control). |
## Back up the stores you need to recover
Persistent storage keeps files across workload replacement; backups let you recover from deletion, corruption, or loss of that storage. Back up the database and the file or object stores your installation uses, and retain access to any encryption keys needed to restore them. Follow [Backup and recovery](https://docs.obot.ai/v0.28.0/operations/backup.md) to plan and test a restore.
---
Document: Server configuration
Version: v0.28.0
Markdown: https://docs.obot.ai/v0.28.0/configuration/server-configuration.md
HTML: https://docs.obot.ai/configuration/server-configuration
# Server configuration
The Obot server is configured via environment variables. The following configuration is available:
| Environment Variable | Description | Default |
| ------------------------------------------------------------------- | ---------------------------------------------------------------------------------------------------------------------------------------------------------------------------------------------------------------------------------------------------------------------------------------------------------------------------------------------------------------------------------------------------------------------------------------------------------------------------------------------------------- | ----------------------------------------------------------------------------------------- |
| `OPENAI_API_KEY` | Configures the [LLM gateway](https://docs.obot.ai/v0.28.0/configuration/model-providers.md#obot-doc-openai-and-anthropic-keys-at-startup)'s `openai` provider with this key at startup. If the value changes, Obot updates the provider's key on the next start. You can also add providers and keys under **LLM Gateway** → **Providers**. | - |
| `ANTHROPIC_API_KEY` | Configures the [LLM gateway](https://docs.obot.ai/v0.28.0/configuration/model-providers.md#obot-doc-openai-and-anthropic-keys-at-startup)'s `anthropic` provider with this key at startup. If the value changes, Obot updates the provider's key on the next start. | - |
| `GITHUB_AUTH_TOKEN` | Obot makes heavy use of repositories hosted on GitHub. Care is taken to cache these and only re-check when necessary. However, rate-limiting can happen. Setting a read-only token here can alleviate many of these issues. No grants are required for either a 'classic' or 'fine-grained' token to access public repos (read-only). If you want to give the token access to private repos, you will need to give it `repo` (for a 'classic' token) or `contents (read-only)` and `metadata (read-only)`. | |
| `OBOT_SERVER_GIT_MAX_REPO_SIZE_MB` | Maximum repository size for git clones, in MB (1 MB = 1,048,576 bytes). Applies to GitHub/GitLab size pre-checks and cumulative bytes written during cloning. Must be a positive integer; invalid values prevent server startup. Also available as `--git-max-repo-size-mb`. | `100` |
| `OBOT_SERVER_DSN` | Obot uses a database backend. By default, it will use a sqlite3 local database when running the plan Obot binary. The Obot container will use an internal PostgreSQL database (not recommended for production). This environment variable allows you to specify another database option. For example, you can use a postgres database with something like `OBOT_SERVER_DSN=postgres://user:password@host/database`. | - |
| `OBOT_SERVER_HOSTNAME` | Tell Obot what its server URL is so that things like OAuth, LLM proxying, and invoke URLs are handled correctly. | - |
| `OBOT_SERVER_DAILY_USER_INPUT_TOKEN_LIMIT` | Daily input token limit per user in the LLM gateway's *Daily token limit* budget, which the gateway puts on every profile when it first starts. Administrators are exempt. It is used only then; after that, edit each profile's budget on the **Profiles** tab of the **LLM Gateway** page. Set to a negative value to leave out this limit. | `10000000` |
| `OBOT_SERVER_DAILY_USER_OUTPUT_TOKEN_LIMIT` | Daily output token limit per user in the LLM gateway's *Daily token limit* budget, which the gateway puts on every profile when it first starts. Administrators are exempt. It is used only then. Set to a negative value to leave out this limit. | `100000` |
| `OBOT_SERVER_SINGLE_USER_IDLE_SERVER_SHUTDOWN_HOURS` | The interval in hours to check for idle single-user MCP servers and shut them down. Set to `-1` to disable idle shutdown. | `24` (1 day) |
| `OBOT_SERVER_MULTI_USER_IDLE_SERVER_SHUTDOWN_HOURS` | The interval in hours to check for idle multi-user MCP servers and shut them down. Set to `-1` to disable idle shutdown. | `168` (7 days) |
| `NAH_THREADINESS` | Sets the number of concurrent threads that can run in the Obot controller. | `10` |
| `KINM_DB_CONNECTIONS` | Sets both the maximum open and idle connection counts in the Kinm database pool. `KINM_DB_MAX_CONNECTIONS` and `KINM_DB_MAX_IDLE_CONNECTIONS` override the corresponding values. | `5` |
| `KINM_DB_MAX_IDLE_CONNECTIONS` | The maximum number of idle connections in the Kinm database pool. Overrides the idle connection count set by `KINM_DB_CONNECTIONS`. | `2` |
| `KINM_DB_MAX_CONNECTIONS` | The maximum number of open connections in the Kinm database pool. Overrides the open connection count set by `KINM_DB_CONNECTIONS`. | `5` |
| `KINM_DB_MAX_CONNECTION_LIFETIME_SECONDS` | The maximum lifetime of a connection in the Kinm database pool, in seconds. | `180` |
| `KINM_DB_WATCH_POLL_SECONDS` | How long a Kinm watch waits before listing again when nothing has woken it, in seconds. Only applies while the change listener is connected. Without a connected listener a watch polls every 2 seconds, which this does not change. | `120` |
| `KINM_DB_NOTIFY_DEBOUNCE_MILLISECONDS` | How often change notifications may wake the watches on one table, in milliseconds. The first change after a quiet moment is never delayed. | `1000` |
| `KINM_DB_DISABLE_NOTIFY` | Disables Kinm's use of PostgreSQL LISTEN/NOTIFY, so replicas learn about each other's writes by polling every 2 seconds instead. | `false` |
| `OBOT_AUTH_PROVIDER_POSTGRES_MAX_IDLE_CONNECTIONS` | The maximum number of idle connections in the PostgreSQL database pool used by authentication providers. | `2` |
| `OBOT_AUTH_PROVIDER_POSTGRES_MAX_CONNECTIONS` | The maximum number of open connections in the PostgreSQL database pool used by authentication providers. | `5` |
| `OBOT_AUTH_PROVIDER_POSTGRES_CONNECTION_LIFETIME_SECONDS` | The maximum lifetime of a connection in the PostgreSQL database pool used by authentication providers, in seconds. | `180` |
| `OBOT_SERVER_ENABLE_AUTHENTICATION` | Enables authentication for Obot | `false` |
| `OBOT_SERVER_UNAUTHENTICATED_RATE_LIMIT` | Rate limit for unauthenticated requests (requests per second). Unauthenticated requests are tracked by source IP address. | `100` |
| `OBOT_SERVER_AUTHENTICATED_RATE_LIMIT` | Rate limit for authenticated non-admin requests (requests per second). Authenticated requests are tracked by user ID. Admin users are exempt from rate limiting. | `200` |
| `OBOT_SERVER_ENCRYPTION_PROVIDER` | Configures an encryption provider for credentials in Obot. One of aws, gcp, azure, custom, or none | `none` |
| `OBOT_SERVER_ENCRYPTION_CONFIG_FILE` | The path to a file containing the encryption configuration. Only used when `OBOT_SERVER_ENCRYPTION_PROVIDER` is `custom` | - |
| `OBOT_SERVER_ENCRYPTION_KEY` | Sets the key to be used for encryption. Should only be set if `OBOT_SERVER_ENCRYPTION_PROVIDER` is `custom` | - |
| `OBOT_BOOTSTRAP_TOKEN` | Sets a bootstrap token. If authentication is enabled, one will be autogenerated for you if this is not set. | - |
| `OBOT_SERVER_LOCAL_AUTH_INITIAL_OWNER_EMAIL` | Provisions this email as the initial owner with the built-in Local provider. Must be set with `OBOT_SERVER_LOCAL_AUTH_INITIAL_OWNER_SETUP_TOKEN`. This disables bootstrap-token login. | - |
| `OBOT_SERVER_LOCAL_AUTH_INITIAL_OWNER_SETUP_TOKEN` | Randomly generated, high-entropy secret (at least 32 characters; for example, `openssl rand -hex 32`) bound to the initial owner setup link. Obot stores only its hash and revokes it when password setup completes. | - |
| `OBOT_SERVER_LOCAL_AUTH_INITIAL_OWNER_SETUP_TOKEN_EXPIRATION_HOURS` | Number of hours the initial owner setup link remains valid. | `168` |
| `OBOT_SERVER_MCPAUDIT_LOG_RETENTION_DAYS` | The number of days to retain MCP audit logs before they are automatically deleted. Set to `0` to disable automatic cleanup. Use the [audit log export](https://docs.obot.ai/v0.28.0/configuration/audit-log-export.md) functionality to preserve logs beyond this period. | `90` |
| `OBOT_SERVER_MCPAUDIT_LOG_PERSIST_INTERVAL_SECONDS` | The interval in seconds at which buffered MCP audit logs are flushed to the database. | `5` |
| `OBOT_SERVER_MCPAUDIT_LOGS_PERSIST_BATCH_SIZE` | The number of MCP audit log entries written to the database in a single batch. | `1000` |
| `OBOT_SERVER_LLMAUDIT_LOG_RETENTION_DAYS` | The number of days to retain LLM audit logs before they are automatically deleted. Set to `0` to disable automatic cleanup. | `90` |
| `OBOT_SERVER_MODEL_PROXY_URL` | MCP Tester model proxy service base URL, used for generation only when the LLM gateway has no providers configured. An explicitly empty string disables generation. Custom URLs must use HTTPS; HTTP is allowed only with `OBOT_DEV_MODE=true`. | `https://model-service.obot.ai` |
| `OBOT_SERVER_DISABLE_LLMAUDIT_LOG` | Disables collection and persistence of new LLM gateway audit logs. Existing logs remain available. | `false` |
| `OBOT_SERVER_DEVICE_SCAN_RETENTION_DAYS` | The number of days to retain submitted device scans before they are automatically deleted. Set to `0` to disable automatic cleanup. | `90` |
| `OBOT_SERVER_DEFAULT_MCPCATALOG_PATH` | The path to the default MCP catalog (accessible to all users). | - |
| `OBOT_SERVER_DEFAULT_SYSTEM_MCPCATALOG_PATH` | The path to the default System MCP catalog. | - |
| `OBOT_SERVER_MDM_ASSET_SOURCE` | The source for MDM assets. Can be a local directory, a tar archive path, or an HTTP(S) tarball URL. | `https://github.com/obot-platform/obot-sentry/releases/download/v0.1.9/mdm-assets.tar.gz` |
| `OBOT_SERVER_AUDIT_LOGS_MODE` | Configures the storage backend for audit logs in Obot. Can be 'off', 'disk', or 's3' | `off` |
| `OBOT_SERVER_AUDIT_LOGS_STORE_S3BUCKET` | The name of the S3 bucket to store audit logs in. | - |
| `OBOT_SERVER_AUDIT_LOGS_STORE_S3ENDPOINT` | If config.OBOT\_SERVER\_AUDIT\_LOGS\_MODE is 's3' and you are not using AWS S3, this needs to be set to the S3 api endpoint of your provider. | - |
| `OBOT_SERVER_AUDIT_LOGS_COMPRESS_FILE` | Controls whether or not to compress audit log files | `true` |
| `OBOT_SERVER_AUDIT_LOGS_STORE_USE_PATH_STYLE` | Whether to use path style for S3 object names | - |
| `OBOT_SERVER_MCPBASE_IMAGE` | Base image for MCP servers in Kubernetes or Docker. Also used for Docker setup containers for wrapper configuration and file configuration across runtimes. Custom images must provide `sh`, `cp`, and `rm`, and support running setup as root. | `ghcr.io/obot-platform/mcp-images/stdio-wrapper:v0.26.2` |
| `OBOT_SERVER_MCPOPEN_APIIMAGE` | Container image used to host OpenAPI MCP servers with the Docker or Kubernetes runtime backend. | `ghcr.io/obot-platform/mcp-images/openapi-mcp:v0.27.2` |
| `OBOT_SERVER_MCPIMAGE_PULL_SECRETS` | Comma-separated Kubernetes secret names to use as static image pull secrets for every MCP server Deployment. When set, managed image pull secrets are disabled. See [Image Pull Secrets](https://docs.obot.ai/v0.28.0/configuration/image-pull-secrets.md). | - |
| `OBOT_SERVER_MCPSECRET_BINDING_ALLOWED_LABEL` | Kubernetes Secret label key required before a Secret can be selected or resolved by MCP secret bindings. Only label presence is checked; the label value is ignored. Secrets without this label are not shown as bindable targets in the admin UI and are treated as unavailable when Obot resolves a secret binding at runtime. | `obot.obot.ai/allow-secret-binding` |
| `OBOT_SERVER_MCPHTTPWEBHOOK_BASE_IMAGE` | Deploy MCP HTTP webhook servers in the cluster using this base image. | `ghcr.io/obot-platform/mcp-images/http-webhook-mcp-converter:v0.26.2` |
| `OBOT_SERVER_MCPRUNTIME_BACKEND` | The runtime backend to use for running MCP servers: docker or kubernetes. | `kubernetes` in the helm chart, `docker` otherwise |
| `OBOT_SERVER_MCPCLUSTER_DOMAIN` | The cluster domain to use for MCP services. Only matters if `OBOT_SERVER_MCPBASE_IMAGE` is set. | `cluster.local` |
| `OBOT_SERVER_SERVICE_NAME` | The Kubernetes service name for the obot server. Automatically set by the helm chart when using kubernetes backend. Used to construct the internal service FQDN for MCP runtime callbacks. | - |
| `OBOT_SERVER_SERVICE_NAMESPACE` | The Kubernetes namespace where the obot server runs. Automatically set by the helm chart when using kubernetes backend. Used to construct the internal service FQDN for MCP runtime callbacks. | - |
| `OBOT_SERVER_DISALLOW_LOCALHOST_MCP` | Disallow MCP servers that try to connect to localhost. Set to `false` only when you intentionally need MCP servers to reach localhost from the Obot runtime environment. | `true` |
| `OBOT_SERVER_DISALLOW_PRIVATE_IPMCP` | Disallow MCP servers that resolve to private IP addresses. Set to `false` only when you intentionally need MCP servers to reach private network services from the Obot runtime environment. | `true` |
| `OBOT_SERVER_DISALLOW_LINK_LOCAL_MCP` | Disallow MCP servers that resolve to link-local addresses. Set to `false` only when you intentionally need MCP servers to reach link-local services from the Obot runtime environment. | `true` |
| `OBOT_SERVER_MCPNETWORK_POLICY_PROVIDER_CHART_REPO` | Helm repository URL for the MCP server egress control provider chart. Used with `OBOT_SERVER_MCPNETWORK_POLICY_PROVIDER_CHART_NAME`. | - |
| `OBOT_SERVER_MCPNETWORK_POLICY_PROVIDER_CHART_NAME` | Helm chart name for the MCP server egress control provider. Setting this enables MCP server egress control. | - |
| `OBOT_SERVER_MCPNETWORK_POLICY_PROVIDER_CHART_VERSION` | Helm chart version for the MCP server egress control provider. | - |
| `OBOT_SERVER_MCPNETWORK_POLICY_PROVIDER_CHART_PATH` | Local filesystem path to an MCP server egress control provider chart. Setting this enables MCP server egress control and cannot be combined with chart repo, name, or version. | - |
| `OBOT_SERVER_MCPNETWORK_POLICY_PROVIDER_VALUES` | YAML or JSON values blob merged into the MCP server egress control provider chart values. | - |
| `OBOT_SERVER_MCPDEFAULT_DENY_ALL_EGRESS` | Default new MCP servers to deny all egress when MCP server egress control is enabled and no egress domains are configured. | `false` |
| `OBOT_SERVER_MCPPOD_SECURITY_ENABLED` | Enable Pod Security Admission labels on the MCP namespace. Only applies when using kubernetes backend. | `true` |
| `OBOT_SERVER_MCPPOD_SECURITY_ENFORCE` | Pod Security Standards level to enforce for MCP namespace (privileged, baseline, or restricted). Only applies when using kubernetes backend. | `restricted` |
| `OBOT_SERVER_MCPPOD_SECURITY_ENFORCE_VERSION` | Kubernetes version for the PSA enforce policy. Only applies when using kubernetes backend. | `latest` |
| `OBOT_SERVER_MCPPOD_SECURITY_AUDIT` | Pod Security Standards level to audit for MCP namespace (privileged, baseline, or restricted). Only applies when using kubernetes backend. | `restricted` |
| `OBOT_SERVER_MCPPOD_SECURITY_AUDIT_VERSION` | Kubernetes version for the PSA audit policy. Only applies when using kubernetes backend. | `latest` |
| `OBOT_SERVER_MCPPOD_SECURITY_WARN` | Pod Security Standards level to warn about for MCP namespace (privileged, baseline, or restricted). Only applies when using kubernetes backend. | `restricted` |
| `OBOT_SERVER_MCPPOD_SECURITY_WARN_VERSION` | Kubernetes version for the PSA warn policy. Only applies when using kubernetes backend. | `latest` |
| `OBOT_SERVER_DISABLE_UPDATE_CHECK` | Disable the Obot server update check. | `false` |
| `OBOT_SERVER_PRODUCT_ANALYTICS_MODE` | [Product analytics](https://docs.obot.ai/v0.28.0/configuration/product-analytics.md) mode: `consent` lets admins choose, `on` forces analytics on, and `off` disables analytics. | `consent` |
| `OBOT_SERVER_HIDE_K8S_DETAILS` | Hide Kubernetes configuration details such as the Server Scheduling page from the UI. | `false` |
| `OBOT_SERVER_MCPOAUTH_CLIENT_EXPIRATION` | The expiration time for dynamically registered MCP OAuth clients. Must be a valid duration string and may include days, hours, or minutes. | `30d` |
| `OBOT_SERVER_MCPOAUTH_CLIENT_NATIVE_EXCEPTIONS` | A comma-separated list of additional Client ID Metadata Document URLs that default to the native application type when `application_type` is omitted. | - |
| `OBOT_SERVER_FORCE_DYNAMIC_CLIENT` | Force Dynamic Client Registration when Obot authenticates to remote MCP servers, even when the authorization server supports Client ID Metadata Documents. | `false` |
| `OBOT_SERVER_LLM_GATEWAY_DATA_DIR` | Where the LLM gateway keeps model price and capability files. | `$XDG_DATA_HOME/obot/llm-gateway` |
| `OBOT_SERVER_LLM_GATEWAY_LOG_LEVEL` | Log level for the embedded LLM gateway (`debug`, `info`, `warn`, `error`). | `warn` |
| `OBOT_SERVER_LLM_GATEWAY_MODEL_DATA_URL` | Where the LLM gateway refreshes model prices and capabilities from, every 6 hours. Obot's published images and release binaries include a copy of this data; set `off` to use only that copy. | `https://upgrade-server.obot.ai/v1/model-data` |
| `OBOT_SERVER_LICENSE_KEY` | An Obot license key. It takes precedence over a key stored in the database, and the key can't be changed or removed in the UI while it's set. Obot validates it with `https://api.keygen.sh`; see [Editions and licensing](https://docs.obot.ai/v0.28.0/enterprise/overview.md#obot-doc-how-obot-validates-a-license). | - |
| `OBOT_DEFAULT_SKILL_REPO_URL` | The default skill repository URL. Must be a full HTTPS GitHub URL (e.g. `https://github.com/org/repo`). Only used on first-time setup (before the first owner user is created). A SkillRepository resource will be created from this URL and synced automatically. | `https://github.com/obot-platform/skills` |
| `OBOT_DEFAULT_SKILL_REPO_REF` | The ref (branch, tag, or commit SHA) for the default skill repository. If empty, the repository's default branch is used. Only used on first-time setup. | - |
### Claude egress audit retention (experimental)
`OBOT_SERVER_EGRESS_AUDIT_LOG_RETENTION_DAYS` controls how many days egress audit
records are retained after their last update. The default is `90`; `0` disables
cleanup. In Helm, set this under `config.OBOT_SERVER_EGRESS_AUDIT_LOG_RETENTION_DAYS`.
The admin Audit Logs page includes a **Claude Environments** tab. Only members of the auditor
group can read request/response bodies and headers, including administrators.
See [experimental Claude Environments](https://docs.obot.ai/v0.28.0/claude-environments/overview.md) for setup, access control, and audit limitations.
---
Document: Helm values
Version: v0.28.0
Markdown: https://docs.obot.ai/v0.28.0/reference/helm.md
HTML: https://docs.obot.ai/reference/helm
# Helm values
The Helm chart reference is published at [charts.obot.ai](https://charts.obot.ai/). Use the values for the exact chart version you deploy.
| Configuration area | Detailed guide |
| -------------------------------------------------------- | -------------------------------------------------------------------------------------------------------- |
| Obot replicas, ingress, secrets, and environment | [Kubernetes Deployment](https://docs.obot.ai/v0.28.0/installation/kubernetes-deployment.md) |
| MCP namespace, pod security, resources, and RuntimeClass | [MCP Servers in Kubernetes](https://docs.obot.ai/v0.28.0/configuration/mcp-deployments-in-kubernetes.md) |
| Obot data volume and StorageClass | [Persistent Storage](https://docs.obot.ai/v0.28.0/installation/kubernetes-persistent-storage.md) |
| Private image registries | [Image Pull Secrets](https://docs.obot.ai/v0.28.0/configuration/image-pull-secrets.md) |
| Domain egress provider | [MCP Server Egress Control](https://docs.obot.ai/v0.28.0/configuration/mcp-server-egress-control.md) |
| Experimental Claude Environments | [Install Claude Environments](https://docs.obot.ai/v0.28.0/claude-environments/installation.md) |
| Encryption providers | [Encryption](https://docs.obot.ai/v0.28.0/security/credentials.md) |
Put sensitive values under the chart's `secret` settings rather than `config`. For reviewed production configuration, retain chart version and values alongside the deployment's change history. See [Server Configuration](https://docs.obot.ai/v0.28.0/configuration/server-configuration.md) for environment-variable descriptions; not every development-only variable has a dedicated Helm value.
---
Document: CLI and APIs
Version: v0.28.0
Markdown: https://docs.obot.ai/v0.28.0/reference/cli-api.md
HTML: https://docs.obot.ai/reference/cli-api
# CLI and APIs
Set up CLI authentication and local bootstrap skills with the procedure below. Use the linked references for catalog validation, tunnel operations, and gateway APIs. Internal Obot APIs are not all stable public integration surfaces.
| Task | Reference |
| ----------------------------------------------------------------- | ----------------------------------------------------------------------------------------------------------------------------------------------------------------- |
| Configure CLI authentication and local bootstrap skills | [CLI setup](https://docs.obot.ai/v0.28.0/reference/cli-api.md#obot-doc-cli-setup-basic-usage) |
| Sign in to an MCP server that requires a localhost OAuth callback | [MCP localhost OAuth sign-in](https://docs.obot.ai/v0.28.0/reference/cli-api.md#obot-doc-mcp-localhost-oauth-sign-in) |
| Obtain and scope API keys with `obot login` | [Agent authorization scopes](https://docs.obot.ai/v0.28.0/functionality/agent-auth-scopes.md#obot-doc-creating-an-agent-authorization-scope-with-the-cli) |
| Generate vMCP definitions for migrated Git composites | [Catalog migration](https://docs.obot.ai/v0.28.0/configuration/mcp-server-gitops.md#obot-doc-migrating-git-synced-composites-to-vmcps) |
| Validate catalog YAML | [Catalog validation](https://docs.obot.ai/v0.28.0/configuration/mcp-server-gitops.md#obot-doc-validating-catalog-entries) |
| Run an outbound MCP tunnel | [Tunnel CLI and API](https://docs.obot.ai/v0.28.0/functionality/mcp-tunnels.md) |
| Discover MCP catalog entries | [MCP Registry API](https://docs.obot.ai/v0.28.0/functionality/mcp-registry-api.md) |
| Call models through Obot | [LLM client examples](https://docs.obot.ai/v0.28.0/llm-gateway/connect-clients.md) and [compatibility](https://docs.obot.ai/v0.28.0/llm-gateway/compatibility.md) |
Check `obot --help` and each subcommand's `--help` for the installed CLI version. Use the server's displayed connection URLs and model identifiers rather than assuming catalog IDs and provider display names are connection identifiers.
The CLI's default login capabilities do not include general API access. Request `--scope api` explicitly when necessary and keep keys limited to the integration's needs. All credentials remain subject to the owning user's permissions.
The `obot setup` command prepares your local workstation to use an Obot server from the command line and from supported local AI clients.
Use it after an Obot server is running and reachable from your machine.
## What it does
`obot setup` performs these steps:
1. Resolves the Obot app URL to use, either from `--url`, from an existing local default, or by prompting you.
2. Authenticates to that Obot server. If `OBOT_TOKEN` is set, the CLI uses that token. Otherwise, it uses the same browser-based API key flow as `obot login`.
3. Stores the normalized default Obot URL in the local Obot CLI config.
4. Stores a newly acquired Obot API key in the host OS keyring, scoped to that Obot URL.
5. Optionally installs Obot bootstrap skills into supported local AI clients.
The bootstrap skills let local agents use the `obot` CLI to search for Obot-managed skills, install skills, and run local client scans without manually editing client configuration.
> **NOTE**
>
> `obot setup` configures the local CLI and local client bootstrap files. It does not deploy the Obot server or configure server-side authentication providers.
## Prerequisites
- The `obot` CLI is installed and available on your `PATH`.
- The Obot server URL is reachable from your workstation.
- If authentication is enabled, Obot has at least one configured authentication provider that your user can use.
- Your local OS keyring is available so the CLI can store a newly acquired API key.
If Obot authentication is enabled but no provider is configured yet, finish server-side authentication setup first. See [Enabling Authentication](https://docs.obot.ai/v0.28.0/security/authentication.md) and [Auth Providers](https://docs.obot.ai/v0.28.0/configuration/auth-providers.md).
## Basic usage
Run setup with your Obot app URL:
```bash
obot setup --url https://obot.example.com
```
For a local Docker deployment using the default port:
```bash
obot setup --url http://localhost:8080
```
If authentication is required, the CLI opens a browser to complete login. After login succeeds, setup saves the default URL and asks where to install local bootstrap skills.
## Choosing local client targets
Use `--clients` to choose where bootstrap skills are installed:
| Value | Description | Install location |
| ------------- | ---------------------------------------------------------------------------------------- | ------------------ |
| `agents` | Install into the shared Agent Skills directory used by clients that support `~/.agents`. | `~/.agents/skills` |
| `claude-code` | Install into Claude Code's skills directory. | `~/.claude/skills` |
| `none` | Skip local client bootstrap installation. | Not applicable |
You can install into more than one target:
```bash
obot setup --url https://obot.example.com --clients agents,claude-code
```
To configure only CLI authentication and the default URL:
```bash
obot setup --url https://obot.example.com --clients none
```
When `--clients` is omitted in an interactive terminal, setup prompts you. The prompt always offers `agents`. It offers `claude-code` when Claude Code is detected locally. You can still install Claude Code support explicitly with `--clients claude-code`.
## Non-interactive setup
For scripts or GUI wrappers, pass both `--url` and `--clients` with `--non-interactive`:
```bash
obot setup \
--url https://obot.example.com \
--clients agents \
--non-interactive
```
Non-interactive mode never reads from stdin. It still uses the normal API key flow, so it may open a browser and wait for authentication unless a valid key is already stored.
Use `--yes` to accept defaults and confirmations. If `--clients` is omitted with `--yes`, setup installs the shared `agents` target by default:
```bash
obot setup --url https://obot.example.com --yes
```
If a different default Obot URL is already configured, setup refuses to replace it unless you pass `--yes`:
```bash
obot setup --url https://new-obot.example.com --yes
```
## Check setup status
Use `obot setup status` to verify the local configuration:
```bash
obot setup status
```
The command prints:
- CLI version
- Default Obot URL
- Whether the stored API key is valid
- Whether setup is complete
For JSON output:
```bash
obot setup status --json
```
## What setup writes locally
`obot setup` writes:
- The default Obot URL to the Obot CLI config file under the user's XDG config directory.
- An API key to the host OS keyring under the `obot` service, scoped by Obot app URL, when setup acquires a new key through the login flow.
- Bootstrap skill files under the selected client skill directories, such as `~/.agents/skills` or `~/.claude/skills`.
## Troubleshooting
### `auth_unavailable`
The Obot server did not report exactly one usable configured authentication provider. Configure an auth provider first.
### `server_unreachable`
Check that the URL points to the Obot app, that the server is running, and that the CLI can reach it from your workstation.
### Missing `--url` in non-interactive mode
Pass `--url`, or run setup interactively and enter the URL when prompted.
### `--clients is required in non-interactive mode`
Pass `--clients agents`, `--clients claude-code`, `--clients agents,claude-code`, or `--clients none`.
### Existing URL mismatch
If setup reports that another Obot URL is already configured, pass `--yes` to replace the stored default URL.
## MCP localhost OAuth sign-in
Some MCP servers require their OAuth clients to use a localhost callback. When you connect to one through Obot, select **Authenticate** to display a command:
```bash
obot mcp login "https://obot.example.com/oauth/mcp/login/"
```
1. Install an Obot CLI version that supports `mcp login` and make sure `obot` is on your `PATH`.
2. Copy the command from Obot and run it on a computer with a web browser.
3. Complete sign-in in the browser opened by the CLI, then return to Obot. The connection continues automatically once all required servers are authenticated.
Keep using the HTTP connection URL from Obot in your MCP client. The command runs only during sign-in; Obot stores the provider credentials.
Commands expire after ten minutes. If a command expires or the CLI cannot use the localhost port, select **Generate new command**, then copy and run the replacement. You can generate a replacement before expiry. Expired commands are not replaced automatically.
Administrators must first enable [Localhost OAuth callback](https://docs.obot.ai/v0.28.0/mcp-gateway/register-remote.md#obot-doc-localhost-oauth-callbacks) for the server.
---
Document: Catalog schemas
Version: v0.28.0
Markdown: https://docs.obot.ai/v0.28.0/reference/catalog-schemas.md
HTML: https://docs.obot.ai/reference/catalog-schemas
# Catalog schemas
Use these references when authoring MCP server and vMCP definitions in Git. A catalog entry defines how a server runs or where it is reached. A separate `type: vmcp` item defines components, configuration policies, tool selections, and profiles.
| Format | Reference |
| -------------------------------------------------------------------------- | --------------------------------------------------------------------------------------------------------------------------------------------------------------------------------------------------------------------------------------------- |
| Catalog metadata, runtime, configuration values, and resource requirements | [Catalog YAML structure](https://docs.obot.ai/v0.28.0/configuration/mcp-server-gitops.md#obot-doc-yaml-configuration-structure) |
| Supported Obot versions for an entry | [Obot version range](https://docs.obot.ai/v0.28.0/configuration/mcp-server-gitops.md#obot-doc-obot-version-range) |
| Catalog file selection and validation | [Selecting files](https://docs.obot.ai/v0.28.0/configuration/mcp-server-gitops.md#obot-doc-selecting-catalog-files) and [CLI validation](https://docs.obot.ai/v0.28.0/configuration/mcp-server-gitops.md#obot-doc-validating-catalog-entries) |
| vMCP components, profiles, and fixed configuration | [vMCP definitions](https://docs.obot.ai/v0.28.0/configuration/mcp-server-gitops.md#obot-doc-vmcp-definitions) |
| Registry contribution example | [MCP Registry API](https://docs.obot.ai/v0.28.0/functionality/mcp-registry-api.md#obot-doc-server-entry-format) |
| Per-server domain egress settings | [Egress YAML examples](https://docs.obot.ai/v0.28.0/configuration/mcp-server-egress-control.md#obot-doc-yaml-configuration-examples) |
| OpenAPI schema sources and credential configuration | [OpenAPI GitOps examples](https://docs.obot.ai/v0.28.0/configuration/mcp-server-gitops.md#obot-doc-openapi-schemas) and [import requirements](https://docs.obot.ai/v0.28.0/concepts/mcp-hosting.md#obot-doc-openapi-import-an-http-api) |
Validate changes with `obot mcp validate-catalog` before synchronizing a source. The validator for the installed Obot version is authoritative for supported fields. `runtime: composite` is not accepted; build endpoints from catalog entries using [Create vMCP](https://docs.obot.ai/v0.28.0/mcp-gateway/server-types.md).
For existing Git-synced composites, use the [migration command](https://docs.obot.ai/v0.28.0/configuration/mcp-server-gitops.md#obot-doc-migrating-git-synced-composites-to-vmcps) to generate matching vMCP definitions while retaining component IDs and connections. See [Git Catalogs](https://docs.obot.ai/v0.28.0/configuration/mcp-server-gitops.md) for source setup and validation commands.
---
Document: Filter schemas
Version: v0.28.0
Markdown: https://docs.obot.ai/v0.28.0/reference/filter-schemas.md
HTML: https://docs.obot.ai/reference/filter-schemas
# Filter schemas
Filters receive MCP messages and return an enforcement decision. Choose the contract that matches the implementation you are deploying.
| Format | Reference |
| ---------------------------------- | ----------------------------------------------------------------------------------------------------------- |
| MCP filter tool request/response | [Filter tool contract](https://docs.obot.ai/v0.28.0/functionality/filters.md#obot-doc-filter-tool-contract) |
| HTTP webhook payload and signature | [HTTP filters](https://docs.obot.ai/v0.28.0/functionality/filters.md#obot-doc-http-based-filters) |
An MCP filter tool returns the decision fields described in its contract. An HTTP webhook uses HTTP status codes and can verify the configured request signature. Do not interchange these response formats.
For deployment and traffic selectors, see [Filter MCP traffic](https://docs.obot.ai/v0.28.0/functionality/filters.md).
---
Document: Release notes and compatibility
Version: v0.28.0
Markdown: https://docs.obot.ai/v0.28.0/reference/compatibility.md
HTML: https://docs.obot.ai/reference/compatibility
# Release notes and compatibility
Use the documentation version matching the running Obot release. **Next** describes unreleased work and can include capabilities absent from released images.
Release notes are maintained in [Obot's GitHub releases](https://github.com/obot-platform/obot/releases). Review the notes for each release involved in an upgrade, alongside [Upgrades and rollback](https://docs.obot.ai/v0.28.0/operations/upgrades.md).
| Compatibility area | Reference |
| ---------------------------------------------------- | ------------------------------------------------------------------------------------------------------------------------------------------------------------------------------------------------- |
| Provider routes, request formats, and client caveats | [LLM API compatibility](https://docs.obot.ai/v0.28.0/llm-gateway/compatibility.md) |
| Local client inventory and enforcement coverage | [Device inventory](https://docs.obot.ai/v0.28.0/device-management/inventory.md#obot-doc-supported-local-clients) and [enforcement](https://docs.obot.ai/v0.28.0/device-management/enforcement.md) |
| Legacy MCP endpoints and vMCP transition | [vMCP migration](https://docs.obot.ai/v0.28.0/mcp-gateway/publish.md#obot-doc-virtual-mcps-gitops-and-migration) |
| Git catalog formats and vMCP synchronization limits | [Git-backed configuration](https://docs.obot.ai/v0.28.0/configuration/mcp-server-gitops.md) |
| Editions and licensing | [Editions and licensing](https://docs.obot.ai/v0.28.0/enterprise/overview.md) |
A documentation reorganization does not change release compatibility. Keep existing endpoints during the documented transition and test representative clients before deploying a new server version.
---
Document: Audit Log Exports
Version: v0.28.0
Markdown: https://docs.obot.ai/v0.28.0/configuration/audit-log-export.md
HTML: https://docs.obot.ai/configuration/audit-log-export
# Audit Log Exports
For the current task-based instructions, see [Audit data, privacy, and retention](https://docs.obot.ai/v0.28.0/security/audit-data.md). This page preserves existing bookmarks and specialized reference material.
Obot can export MCP and LLM gateway audit logs to various cloud storage providers for long-term retention. This feature supports both one-time exports and scheduled recurring exports.
## Overview
The audit log export feature enables you to:
- Export audit logs to Amazon S3, Google Cloud Storage, Azure Blob Storage, or custom S3-compatible storage
- Create one-time exports for specific date ranges and filters
- Schedule recurring exports (hourly, daily, weekly, monthly)
- Apply filters to export only relevant logs
MCP audit log exports and LLM audit log exports use the same storage credentials.
## Supported Storage Providers
### Amazon S3
**Requirements:**
- AWS account with S3 access
- S3 bucket created in your desired region
- IAM credentials with appropriate permissions
**Required IAM Permissions:**
```json
{
"Version": "2012-10-17",
"Statement": [
{
"Effect": "Allow",
"Action": ["s3:PutObject"],
"Resource": [
"arn:aws:s3:::your-audit-logs-bucket",
"arn:aws:s3:::your-audit-logs-bucket/*"
]
}
]
}
```
**Configuration:**
- **Region**: AWS region where your S3 bucket is located (e.g., `us-east-1`)
- **Access Key ID**: AWS access key ID with S3 permissions. Optional if you are using workload identity.
- **Secret Access Key**: AWS secret access key. Optional if you are using workload identity.
**Encryption:**
- You can enable server-side encryption (SSE) for your bucket to encrypt your audit logs at rest, using either SSE-S3 or SSE-KMS. For more information, see [Server-Side Encryption](https://docs.aws.amazon.com/AmazonS3/latest/userguide/serv-side-encryption.html). If you are using SSE-KMS, you need to create a KMS key and grant the necessary permissions to the KMS key to the identity associated with your Obot deployment.
### Google Cloud Storage (GCS)
Google Cloud Storage provides reliable and scalable storage for audit logs.
**Requirements:**
- Google Cloud project with Cloud Storage API enabled
- Storage bucket created in your desired region
- Service account with appropriate permissions
**Required Role:**
- `roles/storage.objectCreator` Allows users to create objects. Does not give permission to view, delete, or overwrite objects.
**Configuration:**
- **Service Account JSON**: You will need to create a service account and grant the role above to the service account. Download the JSON key file for the service account and provide it in the configuration. For more information, see [Service Accounts](https://cloud.google.com/iam/docs/service-accounts). Optional if you are using workload identity.
**Encryption:**
- Enabled by default using Google-managed keys. You can also use customer-managed encryption keys (CMEK) to encrypt your audit logs. For more information, see [Customer-Managed Encryption Keys](https://cloud.google.com/storage/docs/encryption/customer-managed-keys).
### Azure Blob Storage
Azure Blob Storage integration uses service principal authentication for secure access.
**Requirements:**
- Azure subscription with Storage Account
- Blob container created in your storage account
- Azure Active Directory application (service principal)
**Required Permissions:**
- `Storage Blob Data Contributor` role on the storage account or container
**Configuration:**
- **Storage Account**: Name of your Azure storage account
- **Client ID**: Application (client) ID of your Azure AD application. Optional if you are using workload identity.
- **Tenant ID**: Directory (tenant) ID of your Azure AD tenant. Optional if you are using workload identity.
- **Client Secret**: Client secret for your Azure AD application. Optional if you are using workload identity.
### Custom S3 Compatible Storage
Support for S3-compatible storage providers like MinIO, DigitalOcean Spaces, Wasabi, R2, etc.
**Requirements:**
- S3-compatible storage service
- Bucket/container created
- Access credentials
**Configuration:**
- **Endpoint**: Full URL to your S3-compatible service
- **Region**: Region identifier (provider-specific)
- **Access Key ID**: Access key for authentication
- **Secret Access Key**: Secret key for authentication
## Storage Configuration
### Initial Setup
1. **Navigate to Audit Log Exports**:
- For MCP audit logs, go to Operations → Audit Logs → MCP → Manage Exports
- For LLM audit logs, go to Operations → Audit Logs → Model → Manage Exports
- Click "Configure Storage"
2. **Select Provider**:
- Choose your preferred storage provider from the dropdown
- Configure authentication method (if applicable)
3. **Enter Credentials**:
- Provide the required credentials based on your chosen provider
- For cloud providers, you can choose between manual credentials or workload identity
4. **Test Connection**:
- Use the "Test Connection" button to verify your configuration
- This ensures Obot can successfully connect to your storage
5. **Save Configuration**:
- Click "Save Credentials" to store your configuration securely
### Authentication Methods
#### Manual Credentials
Provide explicit access keys, service account files, or client secrets. This method gives you full control over the credentials used.
#### Workload Identity (Cloud Providers Only)
Use the identity associated with your Obot deployment. This method is more secure as it doesn't require storing explicit credentials.
**Supported for:**
- Amazon S3 (when running on AWS EKS). See [Workload Identity for AWS](https://docs.aws.amazon.com/eks/latest/userguide/pod-identities.html) for more information.
- Google Cloud Storage (when running on Google GKE). See [Workload Identity for Google Cloud](https://cloud.google.com/kubernetes-engine/docs/how-to/workload-identity) for more information.
- Azure Blob Storage (when running on Azure AKS). See [Workload Identity for Azure](https://learn.microsoft.com/en-us/azure/aks/workload-identity-deploy-cluster) for more information.
## Creating Exports
Continue to [Creating Exports](https://docs.obot.ai/v0.28.0/security/audit-data.md#obot-doc-audit-log-export-creating-exports).
### One-Time Exports
Continue to [One-Time Exports](https://docs.obot.ai/v0.28.0/security/audit-data.md#obot-doc-audit-log-export-one-time-exports).
### Scheduled Exports
Continue to [Scheduled Exports](https://docs.obot.ai/v0.28.0/security/audit-data.md#obot-doc-audit-log-export-scheduled-exports).
## Export Format
### JSON Lines (JSONL)
All audit logs are exported in JSON Lines format, where each line contains a complete JSON object representing one audit log entry.
MCP exports include MCP gateway activity such as server, operation, and response status metadata. LLM exports include LLM gateway activity such as provider, model, request path, token usage, client, and outcome metadata.
**MCP example:**
```jsonl
{"timestamp":"2024-01-15T10:30:00Z","user_id":"user123","mcp_server":"github","call_type":"tools/call","response_status":"success"}
{"timestamp":"2024-01-15T10:31:00Z","user_id":"user456","mcp_server":"slack","call_type":"resources/read","response_status":"success"}
```
**LLM example:**
```jsonl
{"id":"log-1","createdAt":"2024-01-15T10:30:00Z","userID":"user123","modelProvider":"openai","targetModel":"gpt-5.5","requestPath":"/v1/responses","responseStatus":200,"outcome":"success","inputTokens":128,"outputTokens":512,"client":"codex"}
{"id":"log-2","createdAt":"2024-01-15T10:31:00Z","userID":"user456","modelProvider":"anthropic","targetModel":"claude-opus-4.8","requestPath":"/v1/messages","responseStatus":200,"outcome":"success","inputTokens":256,"outputTokens":1024,"client":"claude-code"}
```
> **INFO**
>
> Sensitive fields
>
> Users with the Auditor role can export sensitive request and response fields. Admins and Owners without the Auditor role export metadata only.
## Filters
Filters applied in the audit log UI can be carried into a one-time or scheduled export.
MCP audit log exports support filters such as user, MCP server, call type, call identifier, session, client, response status, client IP, and search query.
LLM audit log exports support filters such as user, model provider, target model, request path, response status, outcome, client, client session, and search query.
### File Structure
Exported files are organized with the following structure by default:
```
mcp-audit-logs/
├── ///
│ │ └── -.jsonl
llm-audit-logs/
├── ///
│ │ └── -.jsonl
```
You can customize the key prefix to store the exports in a different location.
---
Document: AWS KMS
Version: v0.28.0
Markdown: https://docs.obot.ai/v0.28.0/configuration/encryption-providers/aws-kms.md
HTML: https://docs.obot.ai/configuration/encryption-providers/aws-kms
# AWS KMS
This guide explains how to set up AWS KMS encryption for Obot.
### Prerequisites
- AWS CLI installed and logged in with valid credentials.
### 1. Create KMS Key
```bash
aws kms create-key \
--description "Obot Encryption Key" \
--key-usage ENCRYPT_DECRYPT \
--key-spec SYMMETRIC_DEFAULT
# Optional, but recommended - Create an Alias
aws kms create-alias \
--alias-name alias/obot-encryption-key \
--target-key-id
```
### 2. Update the Key Policy (Optional)
```bash
aws kms put-key-policy \
--key-id \
--policy-name default \
--policy file://kms-policy.json
```
Example `kms-policy.json`:
```json
{
"Version": "2012-10-17",
"Id": "obot-encryption-policy",
"Statement": [
{
"Sid": "Allow access for Obot",
"Effect": "Allow",
"Principal": {
"AWS": "arn:aws:iam:::"
},
"Action": [
"kms:Encrypt",
"kms:Decrypt",
"kms:DescribeKey",
"kms:GenerateDataKey"
],
"Resource": "*"
}
]
}
```
### Obot environment variables
Make sure the following environment variables are set on Obot when you run it:
- `OBOT_SERVER_ENCRYPTION_PROVIDER=aws`
- `OBOT_AWS_KMS_KEY_ARN=`
### AWS credentials
The credentials can be provided to Obot either via the standard AWS environment variables (`AWS_ACCESS_KEY_ID`, `AWS_SECRET_ACCESS_KEY`, `AWS_SESSION_TOKEN`, `AWS_REGION`) or through a metadata server setup with EC2 or IRSA in Kubernetes.
---
Document: Azure Key Vault
Version: v0.28.0
Markdown: https://docs.obot.ai/v0.28.0/configuration/encryption-providers/azure-key-vault.md
HTML: https://docs.obot.ai/configuration/encryption-providers/azure-key-vault
# Azure Key Vault
This guide explains how to set up an Azure VM with a managed identity that can access an Azure Key Vault for encryption operations.
### Prerequisites
- Azure CLI installed and logged in (`az login`)
- A subscription with permissions to create resources
### 1. Create Resource Group
```bash
# Create a resource group
az group create \
--name your-resource-group \
--location eastus
```
### 2. Create Key Vault and Key
```bash
# Create a Key Vault with RBAC authorization
az keyvault create \
--name your-keyvault-name \
--resource-group your-resource-group \
--location eastus \
--enable-rbac-authorization true
# Create an RSA key in the Key Vault
az keyvault key create \
--name your-key-name \
--vault-name your-keyvault-name \
--size 4096 \
--kty RSA
```
### 3. Create VM with System-Assigned Managed Identity
```bash
# Create VM with system-assigned managed identity
az vm create \
--resource-group your-resource-group \
--name your-vm-name \
--image Ubuntu2204 \
--admin-username azureuser \
--generate-ssh-keys \
--size Standard_B4ms \
--assign-identity \
--public-ip-sku Standard
```
### 4. Grant Key Vault Permissions
```bash
# Get the VM's managed identity object ID
IDENTITY_OBJECT_ID=$(az vm identity show \
--resource-group your-resource-group \
--name your-vm-name \
--query principalId \
--output tsv)
# Get the Key Vault resource ID
KEYVAULT_ID=$(az keyvault show \
--name your-keyvault-name \
--query id \
--output tsv)
# Assign Key Vault Crypto User role
az role assignment create \
--role "Key Vault Crypto User" \
--assignee-object-id $IDENTITY_OBJECT_ID \
--scope $KEYVAULT_ID
```
### 5. Get the Key Version
1. Get the key version:
```bash
az keyvault key show \
--name your-key-name \
--vault-name your-keyvault-name \
--query key.kid \
--output tsv
```
The key version is the last segment of the key ID (after the last slash).
### 6. Run Obot using Docker
When running Obot with Docker, make sure you include the following environment variables:
- `OBOT_SERVER_ENCRYPTION_PROVIDER=azure`
- `OBOT_AZURE_KEY_VAULT_NAME=your-keyvault-name`
- `OBOT_AZURE_KEY_NAME=your-key-name`
- `OBOT_AZURE_KEY_VERSION=your-key-version`
When running `docker run`, be sure to include `--add-host=metadata.azure.com:169.254.169.254` to ensure the VM's metadata service is accessible.
---
Document: Custom Encryption Provider
Version: v0.28.0
Markdown: https://docs.obot.ai/v0.28.0/configuration/encryption-providers/custom-provider.md
HTML: https://docs.obot.ai/configuration/encryption-providers/custom-provider
# Custom Encryption Provider
This guide explains how to set up custom encryption for Obot using a local encryption key.
## Overview
The custom encryption provider uses AES-GCM encryption with a secret key that you provide. This is useful when:
- You want encryption at rest but don't have access to cloud KMS services
- You're running Obot in air-gapped or on-premises environments
- You want a simpler encryption setup without external dependencies
> **Note**: Unlike AWS KMS, Google Cloud KMS, or Azure Key Vault, the custom provider stores the encryption key locally. You are responsible for securing and backing up this key.
## Prerequisites
- OpenSSL or similar tool to generate a secure random key
## Configuration Steps
### 1. Generate an Encryption Key
Generate a secure 32-byte random key and encode it in base64:
```bash
openssl rand -base64 32
```
This will output a string like:
```
Kj8fH2lP9mQ4nR6tV8xZ0bC3dE5gF7hI9jK1lM3nO5p=
```
> **Security Warning**: Keep this key secret and secure. Anyone with access to this key can decrypt your data. Store it in a secure location such as a password manager or secrets management system.
### 2. Configure Your Deployment
#### Helm
Set the provider under `config` and the key you generated in step 1 under `secret` in your values file:
```yaml
config:
OBOT_SERVER_ENCRYPTION_PROVIDER: custom
secret:
OBOT_SERVER_ENCRYPTION_KEY: ""
```
The Helm chart uses this key to enable encryption for the [supported resources](https://docs.obot.ai/v0.28.0/security/credentials.md#obot-doc-overview-encrypted-resources-and-fields).
#### Standalone Server or Docker
Create an `EncryptionConfiguration` file with your generated key:
```yaml
apiVersion: apiserver.config.k8s.io/v1
kind: EncryptionConfiguration
resources:
- resources:
- credentials.obot.obot.ai
- users.obot.obot.ai
- identities.obot.obot.ai
- mcpoauthtokens.obot.obot.ai
- mcpoauthpendingstates.obot.obot.ai
- mcpauditlogs.obot.obot.ai
- llmauditlogs.obot.obot.ai
- policyviolations.obot.obot.ai
- properties.obot.obot.ai
providers:
- aesgcm:
keys:
- name: key0
secret: ""
- identity: {}
```
Make the file available to the Obot process, for example by mounting it read-only at `/config/encryption.yaml` in Docker. Restrict access because the file contains your encryption key. Set:
```text
OBOT_SERVER_ENCRYPTION_PROVIDER=custom
OBOT_SERVER_ENCRYPTION_CONFIG_FILE=/config/encryption.yaml
```
`OBOT_SERVER_ENCRYPTION_KEY` alone is insufficient for a standalone server; the chart performs the file-generation step.
For existing data, see [enabling encryption on an existing installation](https://docs.obot.ai/v0.28.0/security/credentials.md#obot-doc-overview-enabling-encryption-on-an-existing-installation).
---
Document: Google Cloud KMS
Version: v0.28.0
Markdown: https://docs.obot.ai/v0.28.0/configuration/encryption-providers/google-cloud-kms.md
HTML: https://docs.obot.ai/configuration/encryption-providers/google-cloud-kms
# Google Cloud KMS
This guide explains how to set up Google Cloud KMS encryption for Obot.
### Prerequisites
- `gcloud` cli installed and logged in.
- The proper permissions and credentials to access it
### 1. Create a KMS Keyring
```bash
gcloud kms keyrings create obot-keyring \
--location global
```
### Create the KMS Key
```bash
gcloud kms keys create obot-key \
--location global \
--keyring obot-keyring \
--purpose encryption
```
### Grant permissions to the serviceaccount that will be using the key
```bash
gcloud kms keys add-iam-policy-binding obot-key \
--location global \
--keyring obot-keyring \
--member "" \
--role roles/cloudkms.cryptoKeyEncrypterDecrypter
```
### Obot environment variables
Make sure the following environment variables are set on Obot when you run it:
- `OBOT_SERVER_ENCRYPTION_PROVIDER=gcp`
- `OBOT_GCP_KMS_KEY_URI=projects//locations//keyRings//cryptoKeys/`
### Google Cloud credentials
Some form of credentials is required for Obot to authenticate with Google Cloud for encryption and decryption.
It will look for credentials in the following formats, in this order, until it finds one:
1. A JSON file pointed to by the `GOOGLE_APPLICATION_CREDENTIALS` environment variable
2. A JSON file located at `$HOME/.config/gcloud/application_default_credentials.json`
3. If running on GCE or GKE, it will automatically attempt to fetch credentials from the metadata server
If using a JSON file (one of the first two options), the file must be in one of the following two formats:
1. The `credentials.json` format (see [here](https://developers.google.com/workspace/guides/create-credentials#create_credentials_for_a_service_account))
2. A file containing some of the following fields:
```
// Service Account fields
"client_email"`
"private_key_id"`
"private_key"`
"auth_uri"`
"token_uri"`
"project_id"`
"universe_domain"`
// User Credential fields
// (These typically come from gcloud auth.)
"client_secret"`
"client_id"`
"refresh_token"`
```
---
Document: Overview
Version: v0.28.0
Markdown: https://docs.obot.ai/v0.28.0/configuration/encryption-providers/overview.md
HTML: https://docs.obot.ai/configuration/encryption-providers/overview
# Overview
For the current task-based instructions, see [Credentials and encryption](https://docs.obot.ai/v0.28.0/security/credentials.md). This page preserves existing bookmarks.
## Supported Encryption Providers
Continue to [Supported Encryption Providers](https://docs.obot.ai/v0.28.0/security/credentials.md#obot-doc-overview-supported-encryption-providers).
## How Encryption Works
Continue to [How Encryption Works](https://docs.obot.ai/v0.28.0/security/credentials.md#obot-doc-overview-how-encryption-works).
## Encrypted Resources and Fields
Continue to [Encrypted Resources and Fields](https://docs.obot.ai/v0.28.0/security/credentials.md#obot-doc-overview-encrypted-resources-and-fields).
### MCP and Local-Agent Audit Details
Continue to [MCP and Local-Agent Audit Details](https://docs.obot.ai/v0.28.0/security/credentials.md#obot-doc-overview-mcp-and-local-agent-audit-details).
### Local Passwords
Continue to [Local Passwords](https://docs.obot.ai/v0.28.0/security/credentials.md#obot-doc-overview-local-passwords).
## Enabling Encryption on an Existing Installation
Continue to [Enabling Encryption on an Existing Installation](https://docs.obot.ai/v0.28.0/security/credentials.md#obot-doc-overview-enabling-encryption-on-an-existing-installation).
---
Document: Image Pull Secrets
Version: v0.28.0
Markdown: https://docs.obot.ai/v0.28.0/configuration/image-pull-secrets.md
HTML: https://docs.obot.ai/configuration/image-pull-secrets
# Image Pull Secrets
Obot can attach Kubernetes image pull secrets to MCP server Deployments when MCP servers run in Kubernetes. Use this when MCP server images are stored in a private registry such as GHCR, Docker Hub, a self-hosted registry, or Amazon ECR.
There are two ways to configure MCP image pull secrets:
- **Static Helm pull secrets** are configured with the `mcpImagePullSecrets` Helm value. Helm creates the Kubernetes secrets and Obot uses those names for every MCP server Deployment.
- **Managed image pull secrets** are configured in the Obot admin UI. Obot stores the registry configuration, creates an automatically named Kubernetes `kubernetes.io/dockerconfigjson` secret in the MCP namespace, and adds every enabled managed secret to every MCP server Deployment.
Static and managed pull secrets are mutually exclusive. If static `mcpImagePullSecrets` are configured, they remain the source of truth and the managed image pull secrets UI and API are read-only.
## Availability
Managed image pull secrets are available only when both of these are true:
- `OBOT_SERVER_MCPRUNTIME_BACKEND` is `kubernetes` or `k8s` (the Helm chart sets this automatically).
- `OBOT_SERVER_MCPIMAGE_PULL_SECRETS` is unset or empty.
When the feature is unavailable, Obot still shows existing managed image pull secret records, but mutations are blocked and no generated Kubernetes resources are created or updated.
## Deployment Behavior
Obot adds all effective pull secret names to every MCP server Deployment:
- If static pull secrets are configured, only the static names are used.
- If static pull secrets are not configured, every enabled managed image pull secret name is used.
- Managed secret names are sorted and deduplicated before they are written to Deployments.
Changing the effective pull secret list marks existing Kubernetes MCP servers as needing a Kubernetes update. New MCP server Deployments use the current effective list immediately. Existing Deployments are not automatically redeployed.
## Static Helm Pull Secrets
Use static pull secrets when you want credentials to be managed outside Obot, for example by GitOps or an external secret controller.
```yaml
mcpImagePullSecrets:
- name: my-registry-secret
registry: ghcr.io
username: myuser
password: mytoken
email: myuser@example.com
```
The Helm chart creates a Docker config JSON secret named `my-registry-secret` in the MCP namespace and sets `OBOT_SERVER_MCPIMAGE_PULL_SECRETS` for the Obot server.
> **NOTE**
>
> When `mcpImagePullSecrets` is set, managed image pull secrets are disabled. Remove the Helm value and restart Obot to use managed image pull secrets.
## Managed Basic Registry Credentials
Use a basic credential for registries that accept a username and password or token.
1. Go to **Admin -> Image Pull Secrets**.
2. Click **Create New Secret**.
3. Select **Type = Basic**.
4. Optionally enter a display name.
5. Enter the registry server, username, and password.
6. Save the credential.
7. Test the credential with an image reference from that registry.
The registry server should be only the registry host, for example:
- `ghcr.io`
- `index.docker.io`
- `registry.example.com`
- `registry.example.com:5000`
Do not include a repository path in the registry server.
### Basic Credential Testing
Basic credential tests require an image reference. Obot uses the credentials to request the image manifest through the Docker Registry HTTP API. It does not pull image layers.
Examples:
```text
ghcr.io/example/private-mcp-server:1.0.0
registry.example.com/team/server@sha256:...
```
Use an image that the credential is expected to pull. Testing only proves manifest access for the image you provide.
## Managed Amazon ECR Credentials
Amazon ECR credentials use Kubernetes service account OIDC federation. Obot does not store AWS access keys for ECR. Instead, the Obot controller requests a projected Kubernetes service account token, calls AWS STS, assumes your IAM role, calls ECR `GetAuthorizationToken`, and writes the generated Docker config JSON secret into the MCP namespace.
Create one ECR image pull secret per AWS region. ECR authorization tokens are regional. If your MCP images are in multiple ECR regions, create one managed ECR credential for each region.
### ECR Inputs
In **Admin -> Image Pull Secrets**, click **Add ECR** and configure:
The ECR form shows Obot's issuer URL, service account subject, audience, trust policy, and ECR IAM policy before the credential is saved. Use those values to create the AWS IAM OIDC provider, role trust policy, and permissions policy, then return to Obot with the resulting role ARN. If the Role ARN field is empty or incomplete, Obot shows a placeholder AWS account ID in the trust policy. If Obot cannot show an issuer URL, set **Issuer URL Override** to an externally reachable issuer URL before saving.
Obot uses its own Kubernetes service account subject for ECR refreshes:
```text
system:serviceaccount::
```
| Field | Description |
| ------------------- | --------------------------------------------------------------------------------------------------------------------------------------------------------- |
| Role ARN | IAM role that the Obot controller assumes with `sts:AssumeRoleWithWebIdentity`. |
| Region | AWS region for the ECR registry, for example `us-east-1`. |
| Issuer URL Override | Optional Kubernetes service account issuer URL. Use this only if Obot cannot discover the issuer or you need a different externally reachable issuer URL. |
| Audience | Optional token audience. Defaults to `sts.amazonaws.com`. |
| Refresh Schedule | Optional cron schedule. Defaults to `0 */6 * * *` (every six hours). |
| Display Name | Optional user-facing name shown in the Obot UI. |
After the credential is saved, Obot continues to show the computed trust policy and ECR IAM policy. Use those values to confirm or update the AWS IAM role.
### AWS IAM Setup for ECR Pull Secrets
These steps use the AWS console. Replace the example values with the values shown by Obot.
Use these example values while following the console steps:
```text
AWS account ID: 123456789012
AWS region: us-east-1
Role name: obot-ecr-pull
Issuer URL: https://issuer.example.com
Subject: system:serviceaccount:obot:obot
Audience: sts.amazonaws.com
```
The issuer URL must be reachable by AWS STS and must publish standard OIDC discovery and JWKS documents. On EKS, this is normally the cluster OIDC issuer URL. For other Kubernetes distributions, verify that the service account issuer is externally reachable and uses an AWS-trusted TLS certificate, or configure an issuer URL override that meets those requirements.
Create the IAM OIDC provider if it does not already exist:
1. In the AWS console, go to **IAM -> Identity providers**.
2. Choose **Add provider**.
3. Select **OpenID Connect**.
4. Enter the **Issuer URL** shown by Obot.
5. Enter `sts.amazonaws.com` as the audience, or the custom audience configured in Obot.
6. Add the provider.
Create the IAM role:
1. Go to **IAM -> Roles**.
2. Choose **Create role**.
3. Choose **Custom trust policy**.
4. Paste the trust policy shown by Obot, or use this template.
AWS IAM condition keys use the issuer URL without the `https://` prefix:
```json
{
"Version": "2012-10-17",
"Statement": [
{
"Effect": "Allow",
"Principal": {
"Federated": "arn:aws:iam::123456789012:oidc-provider/issuer.example.com"
},
"Action": "sts:AssumeRoleWithWebIdentity",
"Condition": {
"StringEquals": {
"issuer.example.com:sub": "system:serviceaccount:obot:obot",
"issuer.example.com:aud": "sts.amazonaws.com"
}
}
}
]
}
```
Create the ECR pull policy:
1. Go to **IAM -> Policies**.
2. Choose **Create policy**.
3. Choose **JSON**.
4. Paste the ECR policy shown by Obot, or use this template.
```json
{
"Version": "2012-10-17",
"Statement": [
{
"Effect": "Allow",
"Action": "ecr:GetAuthorizationToken",
"Resource": "*"
},
{
"Effect": "Allow",
"Action": [
"ecr:BatchCheckLayerAvailability",
"ecr:BatchGetImage",
"ecr:GetDownloadUrlForLayer"
],
"Resource": [
"arn:aws:ecr:us-east-1:123456789012:repository/*"
]
}
]
}
```
Attach the policy:
1. Return to the IAM role.
2. Open the **Permissions** tab.
3. Choose **Add permissions -> Attach policies**.
4. Select the ECR pull policy.
5. Attach it to the role.
Use the role ARN in Obot:
```text
arn:aws:iam::123456789012:role/obot-ecr-pull
```
AWS references:
- [CreateOpenIDConnectProvider](https://docs.aws.amazon.com/IAM/latest/APIReference/API_CreateOpenIDConnectProvider.html)
- [Configuring a role for web identity federation](https://docs.aws.amazon.com/IAM/latest/UserGuide/id_roles_create_for-idp_oidc.html)
- [Using Amazon ECR images with Amazon EKS](https://docs.aws.amazon.com/AmazonECR/latest/userguide/ECR_on_EKS.html)
- [Amazon ECR private repository policies](https://docs.aws.amazon.com/AmazonECR/latest/userguide/repository-policies.html)
### Cross-account ECR Registries
To pull from ECR repositories in another AWS account:
1. Grant the assumed IAM role permission to pull from the repository ARN in that account.
2. If the repository policy restricts principals, allow the IAM role ARN from the Obot account.
Example repository resource for another account:
```json
"arn:aws:ecr:us-east-1:210987654321:repository/private-mcp-server"
```
The ECR credential still covers only one region. Create another ECR credential for a different region.
### ECR Refresh and Test
After the ECR credential is saved, Obot creates these resources:
- A Docker config JSON secret.
The credential becomes `Ready` after the controller successfully writes the Docker config JSON secret. Use **Refresh Now** to request an immediate controller refresh. Use **Test** with a full image reference to verify that the generated secret can access the image manifest.
## Troubleshooting
### Managed Image Pull Secrets Are Unavailable
Check the capability banner in **Admin -> Image Pull Secrets**.
- If the backend is not Kubernetes, set `OBOT_SERVER_MCPRUNTIME_BACKEND=kubernetes` or use the Helm chart default.
- If static pull secrets are configured, remove `mcpImagePullSecrets` from Helm values and restart Obot before using managed image pull secrets.
### Image Pull Secret Is Not on an MCP Deployment
Managed image pull secrets are added to new MCP Deployments immediately. Existing MCP Deployments are marked as needing a Kubernetes update when the effective pull secret list changes. Apply the Kubernetes update from the admin UI for existing deployments.
### Basic Registry Test Fails
Verify:
- The registry server matches the image reference registry exactly.
- The username and password or token can pull the image.
- The image reference includes a tag or digest that exists.
- The registry accepts Docker Registry HTTP API v2 manifest requests.
### ECR Credential Stays Pending
Check the managed secret in the MCP namespace:
```bash
kubectl -n get secret \
-l obot.ai/managed-by=image-pull-secrets
```
Common causes:
- The IAM OIDC provider was not created for the issuer URL shown by Obot.
- The IAM role trust policy subject does not match the service account subject shown by Obot.
- The trust policy audience is not `sts.amazonaws.com` or does not match the configured audience.
- The issuer URL is not reachable by AWS STS.
- The IAM role policy allows `ecr:GetAuthorizationToken` but not repository pull actions.
- The ECR repository policy blocks the assumed role, especially in cross-account setups.
- The credential is configured for the wrong AWS region.
### Pods Still Show `ImagePullBackOff`
Describe the pod and confirm which secret Kubernetes used:
```bash
kubectl -n describe pod
kubectl -n get deployment -o yaml
```
Verify that:
- The Deployment has the expected `imagePullSecrets`.
- The generated secret exists in the MCP namespace.
- The secret is type `kubernetes.io/dockerconfigjson`.
- The image registry and region match the configured credential.
---
Document: MCP Servers in Kubernetes
Version: v0.28.0
Markdown: https://docs.obot.ai/v0.28.0/configuration/mcp-deployments-in-kubernetes.md
HTML: https://docs.obot.ai/configuration/mcp-deployments-in-kubernetes
# MCP Servers in Kubernetes
This is an overview of how Obot sets up MCP servers in Kubernetes, and how to change some of the configuration values.
## Namespace
Obot will deploy MCP servers into the namespace `{helm-release-name}-mcp`. So if your Helm release name is `obot`,
Obot will deploy servers to the `obot-mcp` namespace.
You can override this namespace and set it to whatever you would like using the Helm value `.mcpNamespace.name`.
## RBAC
In order to set up Deployments, Services, and Secrets, Obot needs a ServiceAccount, Role, and RoleBinding
that give it permissions to do so in the namespace. All of this is included in the Helm chart.
Here is a link to the Role, to view the permissions that Obot will have:
[https://github.com/obot-platform/obot/blob/main/chart/templates/mcp.yaml](https://github.com/obot-platform/obot/blob/main/chart/templates/mcp.yaml)
These permissions are granted only for the namespace where Obot deploys MCP servers.
## K8s objects for each MCP server
Each MCP server will have the following Kubernetes objects created for it:
- A Deployment to run the actual server
- A Service to expose it within the cluster
- Secrets to hold configuration
### Deployment
Obot will set up one Deployment for the MCP server. Most of the configuration for these Deployments is
unchangeable, but some of it can be modified. These are the configuration parameters that **cannot** be changed:
- Replicas: 1
- ImagePullPolicy: `Always`
- SecurityContext: Hardened security settings at both pod and container levels (see [Pod Security Admission](https://docs.obot.ai/v0.28.0/configuration/mcp-deployments-in-kubernetes.md#obot-doc-pod-security-admission) section for details)
- All capabilities are dropped
- Privilege escalation is disabled
- Runs as non-root user (UID 1000)
- Seccomp profile set to RuntimeDefault
- Environment: sourced from a SecretRef containing the configuration values provided by the user, if any
- Volumes and Volume Mounts: any configuration values from the user that were provided as files, will be mounted from Secrets in this way
The values that are configurable, and how to change them, follow.
#### Configurable Values
- Affinity and Tolerations: can be set using the `.mcpServerDefaults.affinity` and `.mcpServerDefaults.tolerations` in Helm, or via the admin UI if not set in Helm values
- Resources: the default value is a CPU request of `10m` and a memory request of `200Mi`, with no limits. Remote/composite servers use a `100Mi` default memory request. If resource maximums are configured and one of these built-in default requests is higher than the maximum, Obot uses the maximum as the default request instead. Resource defaults can be set globally in Helm using the `.mcpServerDefaults.resources` value, or via the Admin UI if not set in Helm values. Individual catalog entries can also override CPU and memory requests and limits with a `resources` field; see [MCP Server GitOps](https://docs.obot.ai/v0.28.0/configuration/mcp-server-gitops.md#obot-doc-resource-requirements).
- Image: the default value is `ghcr.io/obot-platform/mcp-images/stdio-wrapper:v0.26.2` and it can be changed by setting the Helm value `.config.OBOT_SERVER_MCPBASE_IMAGE`.
- RuntimeClassName: can be set using `.mcpServerDefaults.runtimeClassName` in Helm, or via the admin UI if not set in Helm values. See [RuntimeClass](https://docs.obot.ai/v0.28.0/configuration/mcp-deployments-in-kubernetes.md#obot-doc-runtimeclass) for details.
- ImagePullSecrets: private registry credentials can be configured with static Helm `mcpImagePullSecrets` or managed image pull secrets in the admin UI. See [Image Pull Secrets](https://docs.obot.ai/v0.28.0/configuration/image-pull-secrets.md).
#### A note on Affinity, Tolerations, and Resources
The configuration for affinity and tolerations applies to all MCP server Deployments across Obot and cannot be customized for individual MCP server Deployments.
Resource requests and limits can be configured globally, and catalog entries can override individual CPU and memory requests or limits for servers created from that entry.
Administrators can also set maximum allowed resource values for MCP server Deployments. These maximums are enforced when MCP server or catalog entry manifests are created or changed, when Obot creates an MCP server from a catalog entry at connection time, and when Kubernetes settings are updated through the API. Existing MCP servers that already exceed the configured maximums can still be connected to and started, but configuration changes to those servers are blocked until the resources are lowered below the maximums. Maximums also cap Obot's built-in fallback CPU and memory requests when no explicit resource defaults are configured.
When configuration changes, it will only affect new Deployments (or restarted existing Deployments)
from that point forward. The admin can use the UI to manually apply this configuration change to existing MCP server
Deployments as desired.
| Helm value | Environment variable | Description |
| ------------------------------------- | --------------------------------------- | ------------------------------ |
| `.mcpServerDefaults.maxCPURequest` | `OBOT_SERVER_MCPK8S_MAX_CPUREQUEST` | Maximum allowed CPU request |
| `.mcpServerDefaults.maxCPULimit` | `OBOT_SERVER_MCPK8S_MAX_CPULIMIT` | Maximum allowed CPU limit |
| `.mcpServerDefaults.maxMemoryRequest` | `OBOT_SERVER_MCPK8S_MAX_MEMORY_REQUEST` | Maximum allowed memory request |
| `.mcpServerDefaults.maxMemoryLimit` | `OBOT_SERVER_MCPK8S_MAX_MEMORY_LIMIT` | Maximum allowed memory limit |
### RuntimeClass
Obot supports configuring a [RuntimeClass](https://kubernetes.io/docs/concepts/containers/runtime-class/) for MCP server pods. RuntimeClass allows you to select a specific container runtime configuration for enhanced security isolation.
#### Why Use RuntimeClass?
Container runtimes like [gVisor](https://gvisor.dev/) and [Kata Containers](https://katacontainers.io/) provide stronger isolation than the default container runtime by adding an additional security boundary between the container and the host kernel:
- **gVisor** intercepts application system calls and implements them in a user-space kernel, reducing the attack surface exposed to the host.
- **Kata Containers** runs containers inside lightweight virtual machines, providing hardware-level isolation.
Since MCP servers can run third-party code, using a sandboxed runtime can help protect your cluster from potential vulnerabilities or malicious behavior in MCP server containers.
#### Prerequisites
Before configuring RuntimeClass in Obot, you must:
1. **Install a container runtime** that supports sandboxing (e.g., gVisor or Kata Containers) on your Kubernetes nodes
2. **Create a RuntimeClass resource** in your cluster that references your runtime handler
For detailed instructions on setting up RuntimeClass in Kubernetes, see the [Kubernetes RuntimeClass documentation](https://kubernetes.io/docs/concepts/containers/runtime-class/).
Example RuntimeClass for gVisor:
```yaml
apiVersion: node.k8s.io/v1
kind: RuntimeClass
metadata:
name: gvisor
handler: runsc
```
#### Configuration
Once your RuntimeClass is set up in Kubernetes, configure Obot to use it for MCP server pods.
**Via Helm values:**
```yaml
mcpServerDefaults:
runtimeClassName: "gvisor"
```
**Via environment variable:**
| Environment Variable | Description | Default |
| ------------------------------------------------ | ------------------------------------- | ------- |
| `OBOT_SERVER_MCPK8S_SETTINGS_RUNTIME_CLASS_NAME` | RuntimeClass name for MCP server pods | (empty) |
**Via Admin UI:**
If not set in Helm values, administrators can configure the RuntimeClass through the Obot admin UI under Kubernetes settings.
> **TIP**
>
> Security Best Practice
>
> Using a sandboxed container runtime like gVisor or Kata Containers is recommended for production deployments where MCP servers may run untrusted or third-party code. This provides defense-in-depth by adding an extra layer of isolation between MCP server containers and your cluster infrastructure.
> **WARNING**
>
> Performance Considerations
>
> Sandboxed runtimes may have performance overhead compared to the default container runtime. Test your MCP server workloads with your chosen runtime to ensure acceptable performance before deploying to production.
> **WARNING**
>
> Security Considerations
>
> Sandboxed runtimes may have different security profiles and compatability matrixes with the hardware you are running. Check the documentation for your runtime to ensure it meets your needs.
> **INFO**
>
> Node Availability
>
> Not all nodes in your cluster may support the configured RuntimeClass. Ensure that nodes with the required runtime are available and consider using node affinity or tolerations to schedule MCP server pods on appropriate nodes.
### Service
Obot creates one ClusterIP service for each Deployment to expose its MCP server on port 80.
### Network Policy
Obot provides an optional NetworkPolicy to restrict network traffic from MCP server pods for enhanced security. When enabled, this policy limits what MCP servers can access on the network.
For per-MCP-server domain allowlists, see [MCP Server Egress Control](https://docs.obot.ai/v0.28.0/configuration/mcp-server-egress-control.md).
#### Configuration
The NetworkPolicy is enabled by default and can be disabled via Helm values:
```yaml
mcpNamespace:
networkPolicy:
enabled: false
```
#### Security Model
When enabled, the NetworkPolicy implements the following restrictions:
**Ingress (Incoming Traffic)**
- MCP server pods can **only** receive connections from Obot pods in the main Obot namespace
- All other incoming traffic is blocked
**Egress (Outgoing Traffic)**
MCP server pods can communicate with:
1. **DNS resolution** - UDP/TCP port 53 in the configured DNS namespace (default: `kube-system`)
2. **Obot service** - TCP port 8080 to the main Obot service for callbacks and communication
3. **Public internet** - All public IP addresses for external API calls and services
MCP server pods are **blocked** from accessing:
- Private IP ranges: `10.0.0.0/8`, `172.16.0.0/12`, `192.168.0.0/16`
- Loopback addresses: `127.0.0.0/8`
- Link-local addresses: `169.254.0.0/16`
- Multicast ranges: `224.0.0.0/4`
- Reserved ranges: `240.0.0.0/4`
> **TIP**
>
> Security Best Practice
>
> Enabling the NetworkPolicy is recommended for production deployments to prevent MCP servers from accessing internal cluster resources or private network services. This helps contain potential security issues if an MCP server is compromised or misconfigured.
> **WARNING**
>
> Impact on Internal Services
>
> If your MCP servers need to access internal Kubernetes services or private network resources, you will need to either disable the NetworkPolicy or create additional NetworkPolicy rules to allow specific traffic.
> **NOTE**
>
> Scope: MCP server pods only
>
> This NetworkPolicy (`mcp-egress-restrictions`) applies to the **MCP server pods** in the MCP namespace. It does **not** restrict egress from the Obot server pod itself, which makes its own outbound connections as part of normal operation. Restricting the Obot server's own egress is left to the operator; see [Restricting Obot Server Egress](https://docs.obot.ai/v0.28.0/installation/kubernetes-deployment.md#obot-doc-restricting-obot-server-egress).
### Pod Security Admission
Obot supports Pod Security Admission (PSA) configuration for the MCP namespace to enforce Kubernetes Pod Security Standards. PSA provides a way to enforce security policies on pods at the namespace level.
#### Configuration
PSA is configured via Helm values with sensible defaults:
```yaml
mcpNamespace:
podSecurity:
# Enable or disable PSA labels on the MCP namespace
enabled: true
# Enforcement level: privileged, baseline, or restricted
enforce: restricted
enforceVersion: latest
# Audit level: logs policy violations without blocking
audit: restricted
auditVersion: latest
# Warning level: shows warnings for policy violations
warn: restricted
warnVersion: latest
```
To disable Pod Security Admission entirely (not recommended), set `enabled: false`:
```yaml
mcpNamespace:
podSecurity:
enabled: false
```
#### Pod Security Standards Levels
Kubernetes defines three Pod Security Standards levels:
- **privileged**: Unrestricted policy, providing the widest possible level of permissions
- **baseline**: Minimally restrictive policy which prevents known privilege escalations. Allows the default (minimally specified) Pod configuration.
- **restricted** (default): Heavily restricted policy, following current Pod hardening best practices
#### How PSA Works in Obot
The PSA configuration is applied as labels on the MCP namespace:
- `pod-security.kubernetes.io/enforce`: Blocks pod creation if it violates the policy
- `pod-security.kubernetes.io/audit`: Logs violations to the audit log without blocking
- `pod-security.kubernetes.io/warn`: Returns a warning message to the user for violations
> **TIP**
>
> Security-First Default
>
> Obot uses the **restricted** policy by default, providing the highest level of pod security. This policy follows current Pod hardening best practices and is recommended for production environments. If you need more permissive settings for specific use cases, you can configure the policy to **baseline** or **privileged**.
> **INFO**
>
> MCP Pod Security Context
>
> Obot automatically configures MCP pods with secure defaults that comply with the restricted policy:
>
> **Pod-level SecurityContext:**
>
> - `runAsNonRoot: true`
> - `runAsUser: 1000`
> - `runAsGroup: 1000`
> - `fsGroup: 1000`
> - `seccompProfile.type: RuntimeDefault`
>
> **Container-level SecurityContext:**
>
> - `allowPrivilegeEscalation: false`
> - `runAsNonRoot: true`
> - `runAsUser: 1000`
> - `runAsGroup: 1000`
> - `capabilities.drop: ["ALL"]`
> - `seccompProfile.type: RuntimeDefault`
>
> These settings ensure all MCP pods are hardened against common security vulnerabilities and comply with the Kubernetes restricted Pod Security Standard.
#### Environment Variable Configuration
PSA can also be configured via environment variables:
| Environment Variable | Description | Default |
| --------------------------------------------- | ----------------------------------------------------- | ------------ |
| `OBOT_SERVER_MCPPOD_SECURITY_ENABLED` | Enable Pod Security Admission labels on MCP namespace | `true` |
| `OBOT_SERVER_MCPPOD_SECURITY_ENFORCE` | Pod Security Standards level to enforce | `restricted` |
| `OBOT_SERVER_MCPPOD_SECURITY_ENFORCE_VERSION` | Kubernetes version for enforce policy | `latest` |
| `OBOT_SERVER_MCPPOD_SECURITY_AUDIT` | Pod Security Standards level to audit | `restricted` |
| `OBOT_SERVER_MCPPOD_SECURITY_AUDIT_VERSION` | Kubernetes version for audit policy | `latest` |
| `OBOT_SERVER_MCPPOD_SECURITY_WARN` | Pod Security Standards level to warn about | `restricted` |
| `OBOT_SERVER_MCPPOD_SECURITY_WARN_VERSION` | Kubernetes version for warn policy | `latest` |
### Secrets
Obot will create a Secret to contain the user-provided configuration values for the MCP server.
Any configuration values that were marked as files will be in a separate Secret that is mounted in the `/files` directory in the container.
### Image Pull Secrets
Obot can attach Kubernetes image pull secrets to every MCP server Deployment. This is useful when MCP server images are stored in private registries.
There are two modes:
- Static Helm `mcpImagePullSecrets`, where Helm creates the Docker config JSON secrets and Obot uses those secret names.
- Managed image pull secrets, where admins configure registry credentials in Obot and Obot creates the Kubernetes secrets in the MCP namespace.
If static MCP image pull secrets are configured, they remain the source of truth and managed image pull secrets are disabled. For setup instructions, including Amazon ECR OIDC and IAM role configuration, see [Image Pull Secrets](https://docs.obot.ai/v0.28.0/configuration/image-pull-secrets.md).
---
Document: MCP Server Egress Control
Version: v0.28.0
Markdown: https://docs.obot.ai/v0.28.0/configuration/mcp-server-egress-control.md
HTML: https://docs.obot.ai/configuration/mcp-server-egress-control
# MCP Server Egress Control
MCP server egress control restricts which external domains Kubernetes-hosted MCP servers can reach. It is intended for production deployments where MCP servers may run third-party code and should only be allowed to call known external services.
When this feature is enabled, individual MCP servers can be configured with a whitelist of allowed domains. Enforcement is handled by an external controller that Obot deploys using Helm. Currently, the only supported provider for this feature is Aviatrix.
The Aviatrix provider translates the whitelist of domains for an MCP server into an Aviatrix `FirewallPolicy` in the MCP runtime namespace, that targets the pod for that MCP server. Aviatrix Distributed Cloud Firewall (DCF) then enforces the generated policy.
There will be other provider options besides Aviatrix in the future.
## Prerequisites
Before enabling MCP server egress control, make sure:
- Obot is using the Kubernetes MCP runtime backend.
- Aviatrix [Distributed Cloud Firewall for Kubernetes](https://docs.aviatrix.com/documentation/latest/security/dcf-kubernetes.html?expand=true) is already configured for the Kubernetes cluster that runs Obot MCP servers.
- The Aviatrix `FirewallPolicy` CRD is installed in the cluster. The required CRD group is `networking.aviatrix.com`, kind `FirewallPolicy`.
- Aviatrix DCF can discover the cluster and apply Kubernetes firewall policies. See the Aviatrix [DCF overview](https://docs.aviatrix.com/documentation/latest/security/dcf-overview.html) for the broader enforcement model.
> **INFO**
>
> Obot's built-in Kubernetes `NetworkPolicy` is separate from this feature. That policy restricts private and reserved IP ranges, but it is not domain-aware. MCP server egress control adds per-server domain allowlists through Aviatrix.
## Enable the Aviatrix provider
Add the Aviatrix provider chart values to your Obot Helm values:
```yaml
config:
OBOT_SERVER_MCPNETWORK_POLICY_PROVIDER_CHART_REPO: "https://charts.obot.ai"
OBOT_SERVER_MCPNETWORK_POLICY_PROVIDER_CHART_NAME: "aviatrix-network-policy-controller"
OBOT_SERVER_MCPNETWORK_POLICY_PROVIDER_CHART_VERSION: "v0.0.1"
```
Then install or upgrade Obot:
```bash
helm upgrade --install obot obot/obot \
--namespace obot \
--create-namespace \
-f values.yaml
```
When these values are set, Obot installs the Aviatrix provider chart as the Helm release `obot-network-policy-provider` in the namespace where Obot is installed. The chart is configured to manage egress-control resources for the MCP runtime namespace.
## Configure default egress behavior
By default, an MCP server with no egress domains configured is treated as allow all. To make new MCP servers deny all egress unless domains are explicitly configured, set:
```yaml
config:
OBOT_SERVER_MCPDEFAULT_DENY_ALL_EGRESS: "true"
```
With the default set to deny all, admins can still allow unrestricted egress for an individual MCP server by using the server's egress control toggle in the MCP server configuration.
## Configure allowed domains
Configure egress domains on the MCP server runtime configuration. This is supported for `npx`, `uvx`, `containerized`, and `openapi` MCP servers.
This can be configured in the UI when creating or editing an MCP server, or through the API.
See the YAML configuration examples if you manage MCP servers through Git.
### YAML configuration examples
Example `npx` catalog entry:
```yaml
runtime: npx
npxConfig:
package: "" # placeholder: replace with your package name
egressDomains:
- api.example.com
- "*.example-cdn.com"
```
Example `uvx` configuration:
```yaml
runtime: uvx
uvxConfig:
package: "" # placeholder: replace with your package name
egressDomains:
- api.example.com
```
Example containerized configuration:
```yaml
runtime: containerized
containerizedConfig:
image: "ghcr.io/example/mcp-server:latest"
port: 8080
path: "/mcp"
egressDomains:
- api.example.com
- "*.example-cdn.com"
```
Example OpenAPI configuration:
```yaml
runtime: openapi
openAPIConfig:
source:
# Inline schema (1 MiB maximum); Obot imports it and stores a snapshot for running servers.
content: |
openapi: "3.0.3"
info:
title: Example API
version: "1.0.0"
servers:
- url: "https://api.example.com"
- url: "https://staging-api.example.com"
paths: {}
egressDomains:
- api.example.com
```
OpenAPI uses `baseURL` when set, otherwise the first absolute HTTP(S) URL in the schema's `servers`. This example uses only `api.example.com`, so staging needs no egress allowance.
For restricted egress, include the selected destination's hostname in `egressDomains`. Setting `baseURL` does not grant access. If you use `source.url` instead of inline content, Obot fetches the schema separately, so the schema host needs no allowance in the pod's egress policy.
Obot and the wrapper independently validate destinations; wrapper restrictions can cause startup or tool errors even if Obot accepts a destination. Obot requires HTTPS for API destinations and credential forwarding unless development mode is enabled.
To block all external egress for a server, set `denyAllEgress: true` and leave `egressDomains` empty:
```yaml
runtime: npx
npxConfig:
package: "" # placeholder: replace with your package name
denyAllEgress: true
```
Domain values must be hostnames only:
- Use `example.com` or a leading wildcard such as `*.example.com`.
- Do not include a protocol, path, or port.
- Do not use IP addresses.
- Internal and reserved names such as `localhost`, `cluster.local`, `*.svc`, and `metadata.google.internal` are rejected.
## How enforcement works
For each supported MCP server, Obot creates an `MCPNetworkPolicy` with the server name, pod selector, allowed domains, and deny-all setting. The Aviatrix provider watches these objects from Obot storage and creates a corresponding `FirewallPolicy` in the MCP runtime namespace.
The generated Aviatrix policy includes:
- A SmartGroup matching the MCP server pods by their `app` label.
- A destination SmartGroup for `0.0.0.0/0`.
- A WebGroup containing the configured egress domains.
- A permit rule for approved domain egress over TCP port `443`.
- A deny rule that blocks other external egress when domains are configured or deny-all is enabled.
> **WARNING**
>
> Domain allowlists are enforced for HTTPS egress on TCP port `443`. Traffic to all other ports will be blocked. Remote MCP servers are not covered by this feature because they are external endpoints rather than Obot-hosted MCP server workloads.
## Verify the setup
Check that Obot installed the provider:
```bash
helm status obot-network-policy-provider -n
kubectl get pods -n -l app.kubernetes.io/name=aviatrix-network-policy-controller
```
Check that the Aviatrix provider created a `FirewallPolicy`:
```bash
kubectl get firewallpolicies -n
kubectl describe firewallpolicy -n
```
If the expected `FirewallPolicy` does not appear after configuring egress domains on an MCP server, inspect the provider pod logs and confirm that the `FirewallPolicy` CRD is installed:
```bash
kubectl get crd firewallpolicies.networking.aviatrix.com
kubectl logs -n -l app.kubernetes.io/name=aviatrix-network-policy-controller
```
---
Document: MCP Server OAuth Configuration
Version: v0.28.0
Markdown: https://docs.obot.ai/v0.28.0/configuration/mcp-server-oauth-configuration.md
HTML: https://docs.obot.ai/configuration/mcp-server-oauth-configuration
# MCP Server OAuth Configuration
Some remote MCP servers require OAuth authentication with pre-registered client credentials. Unlike servers that support dynamic OAuth registration, these servers need administrators to configure a static set of OAuth credentials (Client ID and Client Secret) that all users share.
## Overview
Static OAuth allows you to:
- Connect to remote MCP servers that require pre-registered OAuth applications
- Configure a single set of OAuth credentials that all users share
- Manage OAuth settings through the Obot admin interface
When static OAuth is configured for a remote MCP server:
1. Administrators register an OAuth application with the provider and enter the credentials in Obot
2. Users can add the MCP server to their projects without needing their own OAuth apps
3. Each user still authenticates individually through the OAuth flow using the shared client credentials
## Configuring static OAuth
### Step 1: Register an OAuth application with the provider
Before configuring Obot, you need to register an OAuth application with the service provider. The specific steps vary by provider, but generally:
1. Go to the provider's developer settings or OAuth application management page
2. Create a new OAuth application
3. Set the callback/redirect URL to: `https:///oauth/mcp/callback`
4. Note the **Client ID** and **Client Secret** provided by the service
### Step 2: Create or edit a remote MCP server
1. Navigate to **MCP Servers** in the Obot admin interface
2. Click **Add MCP Server** and select **Remote Server**, or edit an existing remote server
3. Enter the remote server URL
4. Click **Advanced Configuration** to reveal additional options
### Step 3: Enable static OAuth
1. In the advanced configuration section, toggle **Static OAuth** to enabled
2. Click **Save** to create or update the remote MCP server
### Step 4: Configure OAuth credentials
After saving the remote MCP server with static OAuth enabled:
1. Click **Configure OAuth Credentials** in the Static OAuth section
2. Enter the following information:
- **Client ID**: The client ID from your registered OAuth application
- **Client Secret**: The client secret from your registered OAuth application
3. Click **Save**
Once configured, the MCP server becomes available to users.
## Managing OAuth credentials
### Viewing credential status
The remote MCP server shows whether OAuth credentials are configured. When viewing a remote MCP server with static OAuth:
- If credentials are configured, you'll see the Client ID
- The Client Secret is never displayed after initial configuration
### Changing client credentials
To change the Client ID and Client Secret:
1. Click **Configure OAuth Credentials**
2. Click **Clear Credentials**
3. Confirm the deletion
4. Re-enter OAuth credentials with the new values
Clearing credentials temporarily makes the MCP server unavailable to users until new credentials are configured.
## Example: GitHub MCP Server
This example demonstrates configuring the GitHub remote MCP server.
### Register a GitHub OAuth application
1. Go to [GitHub Developer Settings](https://github.com/settings/developers)
2. Click **OAuth Apps** > **New OAuth App**
3. Fill in the application details:
- **Application name**: A descriptive name (e.g., "Obot MCP Integration")
- **Homepage URL**: Your Obot instance URL
- **Authorization callback URL**: `https:///oauth/mcp/callback`
4. Click **Register application**
5. Copy the **Client ID**
6. Click **Generate a new client secret** and copy the secret
### Configure the remote MCP server in Obot
1. Navigate to **MCP Servers**
2. Click **Add MCP Server** > **Remote Server**
3. Enter the server details:
- **Name**: GitHub MCP
- **Description**: Access GitHub repositories and features
4. Enter the URL: `https://api.githubcopilot.com/mcp`
5. Click **Advanced Configuration**
6. Toggle **Static OAuth** to enabled
7. Click **Save**
### Add OAuth credentials
1. Click **Configure OAuth Credentials**
2. Enter:
- **Client ID**: Your GitHub OAuth app client ID
- **Client Secret**: Your GitHub OAuth app client secret
3. Click **Save**
Users can now add the GitHub MCP server to their projects and authenticate with their GitHub accounts.
## Visibility and access control
Remote MCP servers that require static OAuth but don't have credentials configured are hidden from non-admin users. This prevents users from seeing MCP servers they cannot actually use.
Once an administrator configures the OAuth credentials, the server becomes visible to all users with appropriate access permissions.
## Limitations
- **Composite servers**: Remote servers with static OAuth cannot be included as components in composite servers. This will be addressed in a future release.
---
Document: Product Analytics
Version: v0.28.0
Markdown: https://docs.obot.ai/v0.28.0/configuration/product-analytics.md
HTML: https://docs.obot.ai/configuration/product-analytics
# Product Analytics
When enabled, Obot reports aggregate product usage 30 minutes after startup and then once per day. These reports help the Obot team
understand which capabilities are used and prioritize product improvements. Product analytics
applies to the installation as a whole, not to an individual user.
Obot does not include prompts, messages, credentials, URLs, custom MCP server configuration details, or audit-log content in product-analytics reports.
## Consent
For self-hosted installations, Owners and Admins can choose whether to share product usage data in the **Welcome to Obot** dialog
and change their choice at any time from **Platform > Product Analytics**. No product analytics data
is collected without explicit consent.
Set `OBOT_SERVER_PRODUCT_ANALYTICS_MODE` to control analytics for the installation:
- `consent` (default): Owners and Admins choose whether to share usage data.
- `on`: Always share usage data and hide the consent prompt and settings controls.
- `off`: Never share usage data and hide the consent prompt and settings controls.
Obot Cloud deployments are always opted in to product analytics.
## Data included
Every report contains these operational fields:
| Field | Definition |
| ------------------ | ---------------------------------------------------------------------------------- |
| Installation ID | A stable identifier for the Obot installation. |
| License machine ID | The installation's persisted license machine identifier. |
| Report timestamp | The time at which the report was produced. |
| Distribution | The installation category: `Unregistered`, `Registered`, `Enterprise`, or `Cloud`. |
| Engine | The normalized runtime engine used by the installation. |
| Current version | The running Obot version. |
When available, reports also contain these aggregate usage fields:
| Field | Definition |
| ------------------------------ | ------------------------------------------------------------------------------------------------------------------------- |
| Total users | Snapshot count of users known to the installation. |
| Active users | Distinct users active during the previous complete UTC day. |
| Deployed MCP servers | Snapshot count of deployed MCP servers. |
| Custom MCP entries | Snapshot count of MCP catalog entries that are not built in. |
| Custom vMCPs | Snapshot count of vMCPs explicitly created by a person. Edited catalog defaults are not included. |
| vMCP instances | Snapshot count of user connection instances. |
| Built-in MCP servers | Per-server aggregates containing the built-in server ID and name, plus its deployment count and distinct user count. |
| Authentication-provider type | The configured authentication-provider type, without provider configuration values. |
| MCP tool-call count | Number of MCP tool calls during the previous complete UTC day. |
| vMCP tool-call count | Number of vMCP tool calls during the previous complete UTC day. These calls are also included in the MCP tool-call count. |
| LLM audit-log count | Number of LLM audit-log records created during the previous complete UTC day. Audit-log content is not included. |
| Sentry scan count | Number of Obot Sentry device scans recorded during the previous complete UTC day. |
| Sentry enforcement-event count | Number of Obot Sentry enforcement events recorded during the previous complete UTC day. |
| Managed skill count | Snapshot count of managed skills. |
## Upgrade checks are separate
The software upgrade check is independent of product-analytics consent. It sends the installation ID
and current version 30 minutes after startup and then every 24 hours, even when analytics consent is undecided or
disabled. Set `OBOT_SERVER_DISABLE_UPDATE_CHECK=true` to disable upgrade checks.
---
Document: User Roles
Version: v0.28.0
Markdown: https://docs.obot.ai/v0.28.0/configuration/user-roles.md
HTML: https://docs.obot.ai/configuration/user-roles
# User Roles
For the current task-based instructions, see [Roles, permissions, and policy coverage](https://docs.obot.ai/v0.28.0/security/policy-coverage.md). This page preserves existing bookmarks.
## Available Roles
Continue to [Available Roles](https://docs.obot.ai/v0.28.0/security/policy-coverage.md#obot-doc-user-roles-available-roles).
### Owner
Continue to [Owner](https://docs.obot.ai/v0.28.0/security/policy-coverage.md#obot-doc-user-roles-owner).
### Admin
Continue to [Admin](https://docs.obot.ai/v0.28.0/security/policy-coverage.md#obot-doc-user-roles-admin).
### Power User+
Continue to [Power User+](https://docs.obot.ai/v0.28.0/security/policy-coverage.md#obot-doc-user-roles-power-user).
### Power User
Continue to [Power User](https://docs.obot.ai/v0.28.0/security/policy-coverage.md#obot-doc-user-roles-power-user-1).
### Standard User
Continue to [Standard User](https://docs.obot.ai/v0.28.0/security/policy-coverage.md#obot-doc-user-roles-standard-user).
### Auditor
Continue to [Auditor](https://docs.obot.ai/v0.28.0/security/policy-coverage.md#obot-doc-user-roles-auditor).
## Role Comparison
Continue to [Role Comparison](https://docs.obot.ai/v0.28.0/security/policy-coverage.md#obot-doc-user-roles-role-comparison).
## Security Model
Continue to [Security Model](https://docs.obot.ai/v0.28.0/security/policy-coverage.md#obot-doc-user-roles-security-model).
## Managing User Roles
Continue to [Managing User Roles](https://docs.obot.ai/v0.28.0/security/policy-coverage.md#obot-doc-user-roles-managing-user-roles).
### Updating a User's Role
Continue to [Updating a User's Role](https://docs.obot.ai/v0.28.0/security/policy-coverage.md#obot-doc-user-roles-updating-a-users-role).
### Default Role for New Users
Continue to [Default Role for New Users](https://docs.obot.ai/v0.28.0/security/policy-coverage.md#obot-doc-user-roles-default-role-for-new-users).
### Pre-Assigning Roles
Continue to [Pre-Assigning Roles](https://docs.obot.ai/v0.28.0/security/policy-coverage.md#obot-doc-user-roles-pre-assigning-roles).
---
Document: FAQ
Version: v0.28.0
Markdown: https://docs.obot.ai/v0.28.0/faq.md
HTML: https://docs.obot.ai/faq
# FAQ
## Onboarding & Setup
### Should I use Docker or Kubernetes for production?
Docker is suitable for local testing and small-scale deployments. For production, especially in enterprise settings, Kubernetes is recommended for high availability, resource management, and upgrades.
### Why can’t I see user management controls?
User management controls are under **Identity & Access**. Administrative controls require an Admin or Owner account; enable authentication before configuring user access. Make sure you start Obot with `OBOT_SERVER_ENABLE_AUTHENTICATION=true`. If you don't see the bootstrap token prompt, the environment variable may not be set correctly. Follow the [installation guide](https://docs.obot.ai/v0.28.0/security/authentication.md).
### How do I assign roles to users before they log in?
Users must log in at least once before their own role can be changed. To give users a role before they log in, assign the role in Obot to a group that your identity provider supplies, on the **Identity & Access > Groups** page. See [Pre-Assigning Roles](https://docs.obot.ai/v0.28.0/security/policy-coverage.md#obot-doc-user-roles-pre-assigning-roles).
### What are the differences between the open source and enterprise versions of Obot?
There isn't an open source version separate from an enterprise version. Obot is fully open source under the MIT License, and every self-hosted edition, including Obot Enterprise, runs the same code from the same container image. The license key decides what applies. Obot Community is free, supports up to 100 users and 100 devices, and includes all LLM gateway providers plus Local, GitHub, and Google authentication. Registering Obot Community is free and adds Entra, Okta, OneLogin, JumpCloud, Keycloak, and Auth0 authentication. Obot Enterprise removes the user and device limits and adds enterprise support. See [Editions and licensing](https://docs.obot.ai/v0.28.0/enterprise/overview.md).
### What happens if Obot can't validate its license?
If the license service can't be reached, Obot keeps using the entitlements from the last successful check until the license's last known expiration date. If the license is rejected, for example because it expired, Obot falls back to the limits of unregistered Obot Community at the next check. See [License compliance](https://docs.obot.ai/v0.28.0/enterprise/overview.md#obot-doc-license-compliance).
## Integration & Troubleshooting
### How do I connect my IDE or MCP client to an Obot hosted MCP server?
Step-by-step instructions
1. Go to the **MCP Servers** page in the left navigation
2. Click on the server you want to connect to
3. Click **Connect to Server**
4. If the server requires configuration or authentication, fill that out and click **Launch**
5. A connection modal will appear with the connection URL and configuration snippets for popular MCP clients
### Why does my IDE/client (e.g., Cline) fail to connect to Obot with a "Session ID is required" error?
Some clients do not support the required OAuth flows. As a workaround, use the `mcp-remote` package as a proxy, or check for client updates that add OAuth support.
### Why do I get a "cannot determine MCP server, resource parameter required" error when my MCP client connects?
This error means your MCP client did not include the OAuth `resource` parameter when authorizing the connection. Obot requires this parameter because it identifies which MCP server the user is trying to connect to. Without it, Obot cannot determine the target server or enforce access control, so the OAuth flow will not work.
For Codex, you can specify the OAuth `resource` parameter by passing the `--oauth-resource` flag, set to the same value as your MCP server URL:
```
codex mcp add --url --oauth-resource
```
Make sure the `--oauth-resource` value matches the `--url` value exactly.
For other clients that don't support specifying the OAuth `resource` parameter, you can create an [agent authorization scope](https://docs.obot.ai/v0.28.0/functionality/agent-auth-scopes.md) and use its API key instead of the OAuth flow. For more context, see the related [Codex CLI issue](https://github.com/openai/codex/issues/13891).
## Enterprise Access
### How do I request an enterprise trial or proof-of-concept?
- Contact the Obot team directly on Discord, Website, or email.
## Miscellaneous
### How do I pass user-specific parameters (e.g., Jira PAT tokens) to a remote MCP server?
As an admin, you can configure the server in the MCP Servers section. See [MCP Servers](https://docs.obot.ai/v0.28.0/functionality/mcp-servers.md) for details.
### How do I get started with AKS/GKE/AWS deployment?
See the reference architecture guide for your cloud provider, and follow the Kubernetes installation.
- [AKS](https://docs.obot.ai/v0.28.0/installation/reference-architectures/azure-aks.md)
- [GKE](https://docs.obot.ai/v0.28.0/installation/reference-architectures/gcp-gke.md)
- [AWS](https://docs.obot.ai/v0.28.0/installation/reference-architectures/aws-eks.md)
---
Document: Agent Authorization Scopes
Version: v0.28.0
Markdown: https://docs.obot.ai/v0.28.0/functionality/agent-auth-scopes.md
HTML: https://docs.obot.ai/functionality/agent-auth-scopes
# Agent Authorization Scopes
For the current task-based instructions, see [Credentials and encryption](https://docs.obot.ai/v0.28.0/security/credentials.md). This page preserves existing bookmarks and specialized reference material.
Agent authorization scopes provide programmatic access to Obot from scripts, automation tools, external MCP clients, and compatible LLM clients. Instead of using interactive browser-based OAuth authentication, you can create scopes that generate API keys with only the capabilities each integration needs.
## Overview
API keys for agent authorization scopes are designed for machine-to-machine access to Obot. Each scope:
- Can be scoped to specific MCP servers (or all servers)
- Can include optional capabilities for Obot API access, LLM proxy access, skill access, and device scan access
- Can have an optional expiration date
- Is still limited by the owning user's permissions and access policies
The API keys generated for a scope use the format `ok1---` and are passed as Bearer tokens in the Authorization header.
## Creating an Agent Authorization Scope
Continue to [Creating an Agent Authorization Scope](https://docs.obot.ai/v0.28.0/security/credentials.md#obot-doc-agent-auth-scopes-creating-an-agent-authorization-scope).
## Using an API Key
Include the API key in the Authorization header when connecting to MCP servers or Obot API endpoints:
```bash
Authorization: Bearer ok1-123-456-abcdefghijklmnopqrstuvwxyz
```
API keys can grant access to:
| Capability | Access granted |
| -------------------- | -------------------------------------------------------------------------------------------------------------------------------------------- |
| Selected MCP servers | MCP server connections via the `/mcp-connect/` endpoints |
| API access | Obot API endpoints allowed by your user role |
| LLM proxy access | The [LLM gateway](https://docs.obot.ai/v0.28.0/llm-gateway/connect-clients.md) endpoints under `/api/llm-proxy`, such as `/api/llm-proxy/v1` |
| Skill access | Skill discovery and downloads |
| Device scan access | Device scan submission and retrieval |
All keys can use `/api/me` to verify authentication.
### Testing an API Key
To test an API key, you can use the `/api/me` endpoint:
```bash
curl -H "Authorization: Bearer " /api/me
```
If the key is valid, you should receive a response with your user information.
### Configuring MCP Clients
Once you have an API key, you can configure various MCP clients to connect to your Obot MCP servers. The MCP endpoint URL follows this pattern:
```
https:///mcp-connect/
```
Copy the vMCP's **Connection URL** from Obot. A catalog entry ID is not a connection identifier.
#### VS Code
Configure your `.vscode/mcp.json` file to connect to Obot MCP servers using HTTP transport with Bearer token authentication:
```json
{
"inputs": [
{
"type": "promptString",
"id": "obot-api-key",
"description": "Obot API Key",
"password": true
}
],
"servers": {
"my-obot-server": {
"type": "http",
"url": "",
"headers": {
"Authorization": "Bearer ${input:obot-api-key}"
}
}
}
}
```
VS Code will prompt you to enter your API key when connecting. To configure servers globally across all workspaces, add the configuration to your user settings instead.
#### Agno
[Agno](https://www.agno.com/) is a Python agent framework that supports MCP integration. Use `StreamableHTTPClientParams` to configure authorization headers:
```python
from agno.agent import Agent
from agno.models.openai import OpenAIChat
from agno.tools.mcp import MCPTools
from agno.tools.mcp.params import StreamableHTTPClientParams
from os import getenv
# Configure the MCP server connection with authorization
server_params = StreamableHTTPClientParams(
url="",
headers={
"Authorization": f"Bearer {getenv('OBOT_API_KEY')}",
},
)
async def main():
async with MCPTools(
transport="streamable-http",
server_params=server_params
) as mcp_tools:
agent = Agent(
model=OpenAIChat(id="gpt-4o"),
tools=[mcp_tools],
markdown=True,
)
await agent.aprint_response("Your prompt here", stream=True)
if __name__ == "__main__":
import asyncio
asyncio.run(main())
```
#### LangChain
[LangChain MCP Adapters](https://github.com/langchain-ai/langchain-mcp-adapters) enable connecting LangChain agents to MCP servers. Configure the `MultiServerMCPClient` with HTTP transport and authorization headers:
```python
from os import getenv
from langchain_mcp_adapters.client import MultiServerMCPClient
from langchain.agents import create_agent
# Configure the MCP client with authorization
client = MultiServerMCPClient(
{
"obot-server": {
"transport": "http",
"url": "",
"headers": {
"Authorization": f"Bearer {getenv('OBOT_API_KEY')}",
},
}
}
)
tools = await client.get_tools()
agent = create_agent("openai:gpt-4.1", tools)
response = await agent.ainvoke({"messages": "your message here"})
```
## Managing Agent Authorization Scopes
Continue to [Managing Agent Authorization Scopes](https://docs.obot.ai/v0.28.0/security/credentials.md#obot-doc-agent-auth-scopes-managing-agent-authorization-scopes).
### Viewing Your Agent Authorization Scopes
Continue to [Viewing Your Agent Authorization Scopes](https://docs.obot.ai/v0.28.0/security/credentials.md#obot-doc-agent-auth-scopes-viewing-your-agent-authorization-scopes).
### Deleting an Agent Authorization Scope
Continue to [Deleting an Agent Authorization Scope](https://docs.obot.ai/v0.28.0/security/credentials.md#obot-doc-agent-auth-scopes-deleting-an-agent-authorization-scope).
## MCP Server Access
When you create an agent authorization scope with specific MCP servers, its API keys can connect only to those servers. If you select **All MCP Servers**, its API keys can access:
- All MCP servers you currently have access to
- Any servers you gain access to in the future
Access is still subject to your user permissions. If you lose access to an MCP server (for example, if it's removed from a registry you can access), API keys generated for the authorization scope can no longer connect to that server, even if it was explicitly included when the scope was created.
MCP server access is independent of the optional capabilities. For example, you can create an authorization scope that grants access only to MCP servers, only to the LLM proxy, or to MCP servers and other capabilities.
## Creating an Agent Authorization Scope with the CLI
The `obot login` command creates an agent authorization scope through the browser-based login flow and stores its API key. By default, it requests the `llm`, `skills`, and `device-scans` scopes. The generated key therefore cannot call general Obot API endpoints unless you request the `api` scope explicitly:
```bash
obot login --url https://obot.example.com
```
Use `--scope` to request narrower or additional capabilities:
```bash
obot login --url https://obot.example.com --scope llm --print-token
obot login --url https://obot.example.com --scope all-mcp --scope skills --print-token
```
Valid values for `--scope` are `api`, `llm`, `skills`, `device-scans`, and `all-mcp`. Passing `--scope` replaces the defaults rather than adding to them, so list every scope the key needs. You can also set a recognizable name and description for the generated authorization scope:
```bash
obot login \
--url https://obot.example.com \
--token-name "CI gateway scope" \
--token-description "Used by nightly automation" \
--scope llm \
--print-token
```
## Admin Management
Administrators can manage agent authorization scopes across all users.
### Viewing All Agent Authorization Scopes
1. Navigate to **Identity & Access > Agents** in the admin sidebar.
2. View all agent authorization scopes in the system with their associated users.
The admin view includes the same information as the user view, plus a **Created By** column showing which user owns each scope.
### Deleting Any Agent Authorization Scope
Administrators can delete any user's agent authorization scope:
1. Navigate to **Identity & Access > Agents**.
2. Click the three-dot menu for the authorization scope.
3. Select **Delete**.
4. Confirm the deletion.
## Security Best Practices
- **Use descriptive names**: Name authorization scopes based on their purpose (e.g., "CI/CD Pipeline", "Monitoring Script") to easily identify and manage them
- **Set expiration dates**: For temporary use cases, always set an expiration date
- **Use least privilege**: Enable only the capabilities each authorization scope needs
- **Scope to specific servers**: When possible, limit authorization scopes to only the MCP servers they need rather than using "All MCP Servers"
- **Rotate keys regularly**: Delete old keys and create new ones periodically
- **Never share keys**: Each integration should have its own API key
- **Delete unused keys**: Remove keys that are no longer needed
- **Store securely**: Treat API keys like passwords — never commit them to version control or share them in plain text
---
Document: AI Judge Policies
Version: v0.28.0
Markdown: https://docs.obot.ai/v0.28.0/functionality/ai-judge-policies.md
HTML: https://docs.obot.ai/functionality/ai-judge-policies
# AI Judge Policies
Message policies, later called AI judge policies, are now part of [Guardrails](https://docs.obot.ai/v0.28.0/functionality/guardrails.md). A message policy is an **LLM Judge Policy** guardrail used by a blocking guardrail policy, and guardrails can apply it to MCP tool calls as well as to LLM traffic.
When Obot starts, it converts each existing message policy into guardrails, once:
| Message policy | Guardrail |
| ------------------------------------------------ | ------------------------------------------------------------------------------------------------------------------------------------------------------------------------------------------------------------------------------------------------------------------ |
| Display name and definition | An **LLM Judge Policy** guardrail with the same name and policy |
| Applies to *User Messages* | A guardrail policy that blocks on **input** |
| Applies to *Tool Calls* | A guardrail policy that blocks on **output** |
| Applies to *Both* | A guardrail policy that blocks on input and output |
| Subjects (users, groups, Obot groups, all users) | The guardrail policy's [profile](https://docs.obot.ai/v0.28.0/functionality/model-access-policies.md): the profile for everyone if the policy applied to all users, otherwise a new profile named ` (message policy)` with its subjects and no models |
The converted guardrail policies start **disabled**. To enable one, open its profile under **LLM Gateway** → **Profiles**, click the converted applied guardrail, turn on **Enabled** at the top of the dialog, click **Apply**, then **Save** the profile. A profile converted from a policy that applied to no one needs users or groups before it can be saved. Once enabled, they fail closed, as message policies did: when the judge's model is unavailable, the request is blocked.
The original MessagePolicy resources are kept for the conversion but no longer enforced, and the message policy and violation APIs were removed. Earlier violation records stay in the database but are not carried over to the new UI or API. New findings are recorded in the [LLM audit log](https://docs.obot.ai/v0.28.0/functionality/guardrails.md#obot-doc-events).
The `OBOT_SERVER_ENABLE_MESSAGE_POLICIES` setting is removed. Guardrails are always available.
## How LLM judge policies are evaluated
Each policy is evaluated in two stages:
1. A fast screening pass using the `Chat - Fast` default model returns only `yes` or `no`.
2. If the first pass says the content should be blocked, the full `Chat` default model confirms or overturns that result and writes the explanation.
Input policies judge the latest user message in the context of the conversation. Output policies judge the tool calls the model makes. On MCP tool calls, they judge the tool's arguments and results.
Policy evaluation consumes tokens and adds latency. The tokens don't count against users' budgets.
## Writing effective policies
- Be specific about what is disallowed or required.
- Write the rule as a natural language instruction, not as implementation notes.
- Prefer separate policies for distinct concerns instead of one broad policy.
- Use output (tool call) policies for operational constraints, such as limits on purchases, bookings or outbound actions.
- Use input policies for input restrictions, such as prohibited data sharing or disallowed requests.
---
Document: Audit Logs & Usage
Version: v0.28.0
Markdown: https://docs.obot.ai/v0.28.0/functionality/audit-logs-and-usage.md
HTML: https://docs.obot.ai/functionality/audit-logs-and-usage
# Audit Logs & Usage
For the current task-based instructions, see [Audit data, privacy, and retention](https://docs.obot.ai/v0.28.0/security/audit-data.md). This page preserves existing bookmarks.
## MCP Audit Logs
Continue to [MCP Audit Logs](https://docs.obot.ai/v0.28.0/security/audit-data.md#obot-doc-audit-logs-and-usage-mcp-audit-logs).
### What's Logged
Continue to [What's Logged](https://docs.obot.ai/v0.28.0/security/audit-data.md#obot-doc-audit-logs-and-usage-whats-logged).
### Viewing Audit Logs
Continue to [Viewing Audit Logs](https://docs.obot.ai/v0.28.0/security/audit-data.md#obot-doc-audit-logs-and-usage-viewing-audit-logs).
### Detailed View
Continue to [Detailed View](https://docs.obot.ai/v0.28.0/security/audit-data.md#obot-doc-audit-logs-and-usage-detailed-view).
### Filtering
Continue to [Filtering](https://docs.obot.ai/v0.28.0/security/audit-data.md#obot-doc-audit-logs-and-usage-filtering).
### Retention
Continue to [Retention](https://docs.obot.ai/v0.28.0/security/audit-data.md#obot-doc-audit-logs-and-usage-retention).
### Exporting Audit Logs
Continue to [Exporting Audit Logs](https://docs.obot.ai/v0.28.0/security/audit-data.md#obot-doc-audit-logs-and-usage-exporting-audit-logs).
## LLM Gateway Audit Logs
Continue to [LLM Gateway Audit Logs](https://docs.obot.ai/v0.28.0/llm-gateway/audit.md#obot-doc-audit-logs-and-usage-llm-gateway-audit-logs).
### What's Logged
Continue to [What's Logged](https://docs.obot.ai/v0.28.0/llm-gateway/audit.md#obot-doc-audit-logs-and-usage-whats-logged-1).
### Viewing LLM Audit Logs
Continue to [Viewing LLM Audit Logs](https://docs.obot.ai/v0.28.0/llm-gateway/audit.md#obot-doc-audit-logs-and-usage-viewing-llm-audit-logs).
### Filtering LLM Audit Logs
Continue to [Filtering LLM Audit Logs](https://docs.obot.ai/v0.28.0/llm-gateway/audit.md#obot-doc-audit-logs-and-usage-filtering-llm-audit-logs).
### Exporting LLM Audit Logs
Continue to [Exporting LLM Audit Logs](https://docs.obot.ai/v0.28.0/llm-gateway/audit.md#obot-doc-audit-logs-and-usage-exporting-llm-audit-logs).
## Usage
Continue to [Usage](https://docs.obot.ai/v0.28.0/security/audit-data.md#obot-doc-audit-logs-and-usage-usage).
### Metrics Available
Continue to [Metrics Available](https://docs.obot.ai/v0.28.0/security/audit-data.md#obot-doc-audit-logs-and-usage-metrics-available).
### Viewing Usage
Continue to [Viewing Usage](https://docs.obot.ai/v0.28.0/security/audit-data.md#obot-doc-audit-logs-and-usage-viewing-usage).
### Use Cases
Continue to [Use Cases](https://docs.obot.ai/v0.28.0/security/audit-data.md#obot-doc-audit-logs-and-usage-use-cases).
## Access by Role
Continue to [Access by Role](https://docs.obot.ai/v0.28.0/security/audit-data.md#obot-doc-audit-logs-and-usage-access-by-role).
## Privacy Considerations
Continue to [Privacy Considerations](https://docs.obot.ai/v0.28.0/security/audit-data.md#obot-doc-audit-logs-and-usage-privacy-considerations).
---
Document: Device Management
Version: v0.28.0
Markdown: https://docs.obot.ai/v0.28.0/functionality/device-management.md
HTML: https://docs.obot.ai/functionality/device-management
# Device Management
This guide is now organized into focused pages. Existing section links remain available below.
- [How Sentry works](https://docs.obot.ai/v0.28.0/device-management/how-sentry-works.md)
- [Enroll and deploy](https://docs.obot.ai/v0.28.0/device-management/enroll.md)
- [Enforcement and limitations](https://docs.obot.ai/v0.28.0/device-management/enforcement.md)
- [Inventory and local auditing](https://docs.obot.ai/v0.28.0/device-management/inventory.md)
## What it does
See [How Sentry works](https://docs.obot.ai/v0.28.0/device-management/how-sentry-works.md#obot-doc-what-it-does).
## Devices
See [How Sentry works](https://docs.obot.ai/v0.28.0/device-management/how-sentry-works.md#obot-doc-devices).
## Configuration
See [Enroll and deploy](https://docs.obot.ai/v0.28.0/device-management/enroll.md#obot-doc-configuration).
## Installation methods
See [Enroll and deploy](https://docs.obot.ai/v0.28.0/device-management/enroll.md#obot-doc-installation-methods).
## Enrollment keys
See [Enroll and deploy](https://docs.obot.ai/v0.28.0/device-management/enroll.md#obot-doc-enrollment-keys).
## Settings and updates
See [Enroll and deploy](https://docs.obot.ai/v0.28.0/device-management/enroll.md#obot-doc-settings-and-updates).
## Tool call enforcement
See [Enforcement and limitations](https://docs.obot.ai/v0.28.0/device-management/enforcement.md#obot-doc-tool-call-enforcement).
## Configure enforcement
See [Enforcement and limitations](https://docs.obot.ai/v0.28.0/device-management/enforcement.md#obot-doc-configure-enforcement).
## Allow rules
See [Enforcement and limitations](https://docs.obot.ai/v0.28.0/device-management/enforcement.md#obot-doc-allow-rules).
## Review enforcement decisions
See [Enforcement and limitations](https://docs.obot.ai/v0.28.0/device-management/enforcement.md#obot-doc-review-enforcement-decisions).
## Overview
See [Inventory and local auditing](https://docs.obot.ai/v0.28.0/device-management/inventory.md#obot-doc-overview).
## Devices
See [Inventory and local auditing](https://docs.obot.ai/v0.28.0/device-management/inventory.md#obot-doc-devices-1).
## MCP Server inventory
See [Inventory and local auditing](https://docs.obot.ai/v0.28.0/device-management/inventory.md#obot-doc-mcp-server-inventory).
## Skill inventory
See [Inventory and local auditing](https://docs.obot.ai/v0.28.0/device-management/inventory.md#obot-doc-skill-inventory).
## Client inventory
See [Inventory and local auditing](https://docs.obot.ai/v0.28.0/device-management/inventory.md#obot-doc-client-inventory).
## Scan item details
See [Inventory and local auditing](https://docs.obot.ai/v0.28.0/device-management/inventory.md#obot-doc-scan-item-details).
## Supported local clients
See [Inventory and local auditing](https://docs.obot.ai/v0.28.0/device-management/inventory.md#obot-doc-supported-local-clients).
## What scans include
See [Inventory and local auditing](https://docs.obot.ai/v0.28.0/device-management/inventory.md#obot-doc-what-scans-include).
## Access and permissions
See [Inventory and local auditing](https://docs.obot.ai/v0.28.0/device-management/inventory.md#obot-doc-access-and-permissions).
## Troubleshooting
See [Inventory and local auditing](https://docs.obot.ai/v0.28.0/device-management/inventory.md#obot-doc-troubleshooting).
## Server submission fails
See [Inventory and local auditing](https://docs.obot.ai/v0.28.0/device-management/inventory.md#obot-doc-server-submission-fails).
## A tool call is unexpectedly blocked
See [Inventory and local auditing](https://docs.obot.ai/v0.28.0/device-management/inventory.md#obot-doc-a-tool-call-is-unexpectedly-blocked).
---
Document: LLM Gateway
Version: v0.28.0
Markdown: https://docs.obot.ai/v0.28.0/functionality/llm-gateway.md
HTML: https://docs.obot.ai/functionality/llm-gateway
# LLM Gateway
This guide is now organized into focused pages. Existing section links remain available below.
- [LLM Gateway overview](https://docs.obot.ai/v0.28.0/llm-gateway/how-it-works.md)
- [Configure providers and models](https://docs.obot.ai/v0.28.0/configuration/model-providers.md)
- [Connect clients and applications](https://docs.obot.ai/v0.28.0/llm-gateway/connect-clients.md)
- [API compatibility](https://docs.obot.ai/v0.28.0/llm-gateway/compatibility.md)
- [Upgrading from model providers](https://docs.obot.ai/v0.28.0/llm-gateway/upgrade.md)
## Overview
See [LLM Gateway overview](https://docs.obot.ai/v0.28.0/llm-gateway/how-it-works.md#obot-doc-overview).
## Unified gateway
See [LLM Gateway overview](https://docs.obot.ai/v0.28.0/llm-gateway/how-it-works.md#obot-doc-unified-gateway).
## The LLM Gateway page
See [LLM Gateway overview](https://docs.obot.ai/v0.28.0/llm-gateway/how-it-works.md#obot-doc-the-models-page).
## Administering the gateway
See [LLM Gateway overview](https://docs.obot.ai/v0.28.0/llm-gateway/how-it-works.md#obot-doc-administering-the-gateway).
## Default models
See [LLM Gateway overview](https://docs.obot.ai/v0.28.0/llm-gateway/how-it-works.md#obot-doc-default-models).
## Provider notes
See [Configure providers and models](https://docs.obot.ai/v0.28.0/configuration/model-providers.md#obot-doc-provider-notes).
## Server configuration
See [Configure providers and models](https://docs.obot.ai/v0.28.0/configuration/model-providers.md#obot-doc-server-configuration).
## Routing rules and fallbacks
See [LLM Gateway overview](https://docs.obot.ai/v0.28.0/llm-gateway/how-it-works.md#obot-doc-routing-rules-and-fallbacks).
## Before you begin
See [LLM Gateway overview](https://docs.obot.ai/v0.28.0/llm-gateway/how-it-works.md#obot-doc-before-you-begin).
## Getting your API key
See [Connect clients and applications](https://docs.obot.ai/v0.28.0/llm-gateway/connect-clients.md#obot-doc-getting-your-api-key).
## Quick start with curl
See [Connect clients and applications](https://docs.obot.ai/v0.28.0/llm-gateway/connect-clients.md#obot-doc-quick-start-with-curl).
## Anthropic
See [Connect clients and applications](https://docs.obot.ai/v0.28.0/llm-gateway/connect-clients.md#obot-doc-quick-start-with-curl).
## OpenAI
See [Connect clients and applications](https://docs.obot.ai/v0.28.0/llm-gateway/connect-clients.md#obot-doc-quick-start-with-curl).
## Generic Responses Compatible
See [Connect clients and applications](https://docs.obot.ai/v0.28.0/llm-gateway/connect-clients.md#obot-doc-quick-start-with-curl).
## Amazon Bedrock
See [Connect clients and applications](https://docs.obot.ai/v0.28.0/llm-gateway/connect-clients.md#obot-doc-quick-start-with-curl).
## Azure
See [Connect clients and applications](https://docs.obot.ai/v0.28.0/llm-gateway/connect-clients.md#obot-doc-quick-start-with-curl).
## Provider setup
See [Configure providers and models](https://docs.obot.ai/v0.28.0/configuration/model-providers.md).
## Using with Claude Code
See [Connect clients and applications](https://docs.obot.ai/v0.28.0/llm-gateway/connect-clients.md#obot-doc-using-with-claude-code).
## Claude Code with a Claude subscription
See [Connect clients and applications](https://docs.obot.ai/v0.28.0/llm-gateway/connect-clients.md#obot-doc-claude-code-with-a-claude-subscription).
## Claude Code with Amazon Bedrock Mantle
See [Connect clients and applications](https://docs.obot.ai/v0.28.0/llm-gateway/connect-clients.md#obot-doc-using-with-claude-code).
## Claude Code with Azure
See [Connect clients and applications](https://docs.obot.ai/v0.28.0/llm-gateway/connect-clients.md#obot-doc-using-with-claude-code).
## Using with Codex
See [Connect clients and applications](https://docs.obot.ai/v0.28.0/llm-gateway/connect-clients.md#obot-doc-using-with-codex).
## Codex with Amazon Bedrock
See [Connect clients and applications](https://docs.obot.ai/v0.28.0/llm-gateway/connect-clients.md#obot-doc-using-with-codex).
## Codex with Azure
See [Connect clients and applications](https://docs.obot.ai/v0.28.0/llm-gateway/connect-clients.md#obot-doc-using-with-codex).
## Upgrading from model providers
See [Upgrading from model providers](https://docs.obot.ai/v0.28.0/llm-gateway/upgrade.md).
## What happens on upgrade
See [Upgrading from model providers](https://docs.obot.ai/v0.28.0/llm-gateway/upgrade.md#obot-doc-what-happens-on-upgrade).
## Client routes
See [Upgrading from model providers](https://docs.obot.ai/v0.28.0/llm-gateway/upgrade.md#obot-doc-client-routes).
## Other changes
See [Upgrading from model providers](https://docs.obot.ai/v0.28.0/llm-gateway/upgrade.md#obot-doc-other-changes).
## Limitations
See [API compatibility](https://docs.obot.ai/v0.28.0/llm-gateway/compatibility.md#obot-doc-limitations).
## Related topics
See [API compatibility](https://docs.obot.ai/v0.28.0/llm-gateway/compatibility.md#obot-doc-related-topics).
---
Document: MCP Access Policies
Version: v0.28.0
Markdown: https://docs.obot.ai/v0.28.0/functionality/mcp-access-policies.md
HTML: https://docs.obot.ai/functionality/mcp-access-policies
# MCP Access Policies
For the current task-based instructions, see [Control server and tool access](https://docs.obot.ai/v0.28.0/mcp-gateway/access.md). This page preserves existing bookmarks.
## Overview
Continue to [Overview](https://docs.obot.ai/v0.28.0/mcp-gateway/access.md#obot-doc-mcp-access-policies-overview).
## Default Access
Continue to [Default Access](https://docs.obot.ai/v0.28.0/mcp-gateway/access.md#obot-doc-mcp-access-policies-default-access).
## Creating an Access Policy
Continue to [Creating an Access Policy](https://docs.obot.ai/v0.28.0/mcp-gateway/access.md#obot-doc-mcp-access-policies-creating-an-access-policy).
## Example: Marketing Team Access Policy
Continue to [Example: Marketing Team Access Policy](https://docs.obot.ai/v0.28.0/mcp-gateway/access.md#obot-doc-mcp-access-policies-example-marketing-team-access-policy).
## Related
Continue to [Related](https://docs.obot.ai/v0.28.0/mcp-gateway/access.md#obot-doc-mcp-access-policies-related).
---
Document: MCP Registry API
Version: v0.28.0
Markdown: https://docs.obot.ai/v0.28.0/functionality/mcp-registry-api.md
HTML: https://docs.obot.ai/functionality/mcp-registry-api
# MCP Registry API
## Overview
Obot implements the [MCP Registry specification](https://github.com/modelcontextprotocol/registry/blob/main/docs/reference/api/generic-registry-api.md), enabling MCP clients such as VS Code to discover and connect to vMCPs.
Each discoverable vMCP appears once with its display name, description, icon, and canonical connection URL. vMCPs must contain at least one component to appear in discovery; empty drafts are excluded from both listing and detail requests. Catalog templates, individual user connections, and backing component servers are not registry entries.
## API Endpoint
The registry is exposed at `/v0.1/servers` and supports:
- **List servers**: Get all vMCPs visible to the requester
- **Get server details**: Retrieve a specific vMCP's metadata and connection URL
- **Search**: Filter vMCPs by name, title, or description using the `search` query parameter
- **Pagination**: Use the `limit` and `cursor` query parameters for large result sets
`GET /v0.1/servers/{serverName}/versions` lists the single supported version, `latest`. `GET /v0.1/servers/{serverName}/versions/latest` returns its details. URL-encode the complete registry name, including its slash, when using it as `{serverName}`.
## Discovery access
Admins and owners manage discovery under **Platform → Settings → MCP Registry API**.
- **Authenticated access (default):** Users must authenticate to discover vMCPs they own or can access through matching profiles, including Obot and identity-provider groups. Administrator management privileges alone do not grant discovery access.
- **Authenticated and anonymous access:** Enable **Allow anonymous registry discovery** and click **Save**. Anonymous requests discover only shared vMCPs whose profiles explicitly grant access to **All Obot Users** (`type: selector`, `id: "*"`). Personal vMCPs and vMCPs restricted to specific users or groups remain excluded.
Authenticated requests receive their personalized view in both modes, including accessible private vMCPs. Registry OAuth discovery metadata remains available in both modes. Connecting to a vMCP still requires authentication and the user's current vMCP permissions. Catalog access policies do not determine registry visibility; shared vMCP access comes from [vMCP profiles](https://docs.obot.ai/v0.28.0/mcp-gateway/access.md).
### Risks of anonymous discovery
> **WARNING**
>
> Public metadata exposure
>
> Anyone who can reach the registry endpoints can read eligible vMCPs' names, **full descriptions**, icons, and connection URLs without signing in. The response description is limited to 100 characters, but the full description is included in publisher-provided metadata.
>
> Review descriptions, icons, and URLs for sensitive information before enabling anonymous discovery. This publishes metadata for all eligible shared vMCPs, including new vMCPs that later receive wildcard profile access. Disabling discovery cannot remove copies already collected by clients.
Clients that cannot authenticate registry discovery, including VS Code, need anonymous discovery enabled. Installation and connection still use Obot's authentication and setup flow.
### Upgrading
Deployments that previously relied on anonymous discovery must enable it in **Platform → Settings → MCP Registry API** after upgrading. Neither `OBOT_SERVER_ENABLE_REGISTRY_AUTH` nor `OBOT_SERVER_ENABLE_ANONYMOUS_REGISTRY_ACCESS` controls discovery anymore, and the corresponding CLI flags and Helm chart settings have been removed. Existing environment values are not imported; anonymous discovery stays disabled until an admin or owner enables it in the app.
## Server Naming
Obot uses a reverse DNS naming scheme for global uniqueness:
```
{reverse-dns}/{vmcp-id}
```
Examples:
- `com.example.obot/vmcp1example` for `https://obot.example.com`
- `local.localhost/vmcp1example` for `http://localhost:8080`
Names identify vMCP definitions rather than a user's connection. Migrated aliases that identify a vMCP definition remain usable for detail requests and return the canonical vMCP name and URL. Instance IDs and aliases that identify individual user connections are not registry entries. Inaccessible or missing entries return 404.
## Contributing to the Default Server Set
To add your MCP server to Obot's default server set, submit a PR to the [mcp-catalog](https://github.com/obot-platform/mcp-catalog) repository. This adds a catalog template; expose it through a vMCP with the appropriate profiles to make it discoverable through the MCP Registry API.
### Submission Requirements
1. **Remote HTTP servers**: Submit only a server entry YAML file
2. **Containerized/STDIO servers**: First submit to [mcp-images](https://github.com/obot-platform/mcp-images) for repackaging, then submit the server entry
### Server Entry Format
```yaml
name: Your Server Name
description: |
One-line summary of what this server does.
## Features
- Key capability 1
- Key capability 2
## What you'll need to connect
- API key from https://example.com/api-keys
metadata:
categories: category-a, category-b
icon: https://example.com/icon.png
repoURL: https://github.com/your-org/your-mcp-repo
env:
- key: API_KEY
name: API Key
required: true
sensitive: true
description: Your API key from the developer dashboard
runtime: remote # or containerized
remoteConfig:
fixedURL: https://api.example.com/v1/mcp
```
See the [mcp-catalog repository](https://github.com/obot-platform/mcp-catalog) for complete examples and documentation.
---
Document: MCP Servers
Version: v0.28.0
Markdown: https://docs.obot.ai/v0.28.0/functionality/mcp-servers.md
HTML: https://docs.obot.ai/functionality/mcp-servers
# MCP Servers
For the current task-based instructions, see [Hosted MCP servers](https://docs.obot.ai/v0.28.0/concepts/mcp-hosting.md). This page preserves existing bookmarks and specialized reference material.
## Overview
Managing MCP servers in Obot starts with adding them to the platform. Administrators can control which servers are available to users and how they are configured. Servers may be added individually through the UI, or managed via a Git repository.
Create a catalog entry as a **Hosted Server** when Obot will run it, or a **Remote Server** when it already runs elsewhere. The entry defines its runtime or URL and configuration fields. Add it to a vMCP to choose which values are **Preconfigured** for its connections and which are **Provided at connection** by each user. See [Configure servers in a vMCP](https://docs.obot.ai/v0.28.0/mcp-gateway/server-types.md).
> **WARNING**
>
> Migrate to virtual MCPs
>
> Virtual MCPs (vMCPs) replace the existing MCP server model and are now the recommended way to connect through the Obot Gateway. Create all new connection endpoints as [vMCPs](https://docs.obot.ai/v0.28.0/mcp-gateway/server-types.md).
>
> Existing MCP servers remain operational in this release. Obot will automatically migrate any remaining servers to vMCPs in a future update.
## Server types
New catalog entries use **Hosted Server** or **Remote Server**. Shared values and user-provided values are configured on the vMCP component. The single-user and multi-user terminology below describes existing legacy deployments, which remain available during the vMCP transition.
### Single-user server (legacy)
Single-user servers establish a one-to-one mapping between users and server instances. Each user has their own server instance deployed and provides their own individual credentials (such as personal API keys). Most `stdio` servers were designed with this model in mind. The intended use was to run on the individual's laptop.
This model provides maximum isolation and is ideal when:
- Users need to connect with their personal accounts (e.g., individual GitHub tokens)
- Security policies require user-level credential isolation
- Different users need different configurations or permissions
Keep in mind the gateway will deploy these servers in their own environment on a hosted platform. MCP servers that expect local access to the users filesystem, run local executables, or write output to the local disk will not work as expected.
By default, Obot also blocks MCP servers from connecting to `localhost` addresses, private IP addresses, or link-local addresses. Administrators can opt out with `OBOT_SERVER_DISALLOW_LOCALHOST_MCP=false`, `OBOT_SERVER_DISALLOW_PRIVATE_IPMCP=false`, or `OBOT_SERVER_DISALLOW_LINK_LOCAL_MCP=false`, but should only do so when the server is expected to reach services inside the Obot runtime environment.
**Configuration**: Define parameters that users must provide when enabling the server (e.g., API keys). For each parameter, specify a user-friendly name, description, environment variable name, and whether it's required or sensitive. Values are passed as environment variables to the server process.
### Multi-user server (legacy)
Multi-user servers address organizational deployment patterns through two primary configurations:
1. **Shared credentials**: Organizations provide centralized credentials (e.g., a weather API key) that all users can leverage
2. **Self-authenticating servers**: Servers that handle OAuth or multi-tenancy internally, enabling secure multi-user access
This approach is optimal when:
- The organization owns shared service accounts or API keys
- You want to simplify user onboarding by eliminating individual setup
- The service supports organizational or tenant-based access
- Usage monitoring and control at the organizational level is important
Multi-user servers still require the user to authenticate to the gateway's configured identity provider.
**Configuration**: Pre-configure any required API keys or environment variables. These values are deployed with the server instance. Users connect without being prompted for configuration and authenticate using the built-in authentication or OAuth per the MCP specification.
### Multi-user catalog entry (legacy)
A multi-user catalog entry can be deployed as a shared multi-user server. Instead of creating one server per user when users connect, Obot creates a shared deployment from the catalog entry and then creates per-user MCP server instances for the users who connect to that deployment.
Use a multi-user catalog entry when:
- Administrators or Power User+ users should publish an approved multi-user server configuration before it is deployed
- Different workspaces or catalogs need their own shared deployment from the same catalog entry
- The shared server may need deployment-level configuration, such as a URL, shared API key, or environment variables
- Individual users still need per-user headers or authentication after connecting to the shared deployment
Multi-user catalog entries are configured with `serverUserType: multiUser`. Admin and Power User+ users can deploy them as multi-user servers.
Catalog entry updates are tracked against deployed servers. When a catalog entry changes, affected deployments show an update action and a diff of the current deployed manifest versus the updated catalog entry. Applying the update refreshes the shared deployment from the catalog entry. Users may need to reconfigure their own instance if the update introduces new required per-user configuration.
### Remote server
Continue to [Remote server](https://docs.obot.ai/v0.28.0/mcp-gateway/register-remote.md#obot-doc-mcp-servers-remote-server).
## Adding a server
Continue to [Adding a server](https://docs.obot.ai/v0.28.0/concepts/mcp-hosting.md#obot-doc-mcp-servers-adding-a-server).
## Basic configuration
Continue to [Basic configuration](https://docs.obot.ai/v0.28.0/concepts/mcp-hosting.md#obot-doc-mcp-servers-basic-configuration).
## Runtime selection
Continue to [Runtime selection](https://docs.obot.ai/v0.28.0/concepts/mcp-hosting.md#obot-doc-mcp-servers-runtime-selection).
### NPX: Node/Typescript Based MCP Servers
Continue to [NPX: Node/Typescript Based MCP Servers](https://docs.obot.ai/v0.28.0/concepts/mcp-hosting.md#obot-doc-mcp-servers-npx-nodetypescript-based-mcp-servers).
### UVX: For Python-based packages
Continue to [UVX: For Python-based packages](https://docs.obot.ai/v0.28.0/concepts/mcp-hosting.md#obot-doc-mcp-servers-uvx-for-python-based-packages).
### Containerized: For Docker-based deployments
Continue to [Containerized: For Docker-based deployments](https://docs.obot.ai/v0.28.0/concepts/mcp-hosting.md#obot-doc-mcp-servers-containerized-for-docker-based-deployments).
## Kubernetes Secret Bindings
Continue to [Kubernetes Secret Bindings](https://docs.obot.ai/v0.28.0/concepts/mcp-hosting.md#obot-doc-mcp-servers-kubernetes-secret-bindings).
### Required Kubernetes Secret Label
Continue to [Required Kubernetes Secret Label](https://docs.obot.ai/v0.28.0/concepts/mcp-hosting.md#obot-doc-mcp-servers-required-kubernetes-secret-label).
### Configure a Binding in the Admin UI
Continue to [Configure a Binding in the Admin UI](https://docs.obot.ai/v0.28.0/concepts/mcp-hosting.md#obot-doc-mcp-servers-configure-a-binding-in-the-admin-ui).
#### New Catalog Entry
Continue to [New Catalog Entry](https://docs.obot.ai/v0.28.0/concepts/mcp-hosting.md#obot-doc-mcp-servers-new-catalog-entry).
#### Git-ops Managed Template
Continue to [Git-ops Managed Template](https://docs.obot.ai/v0.28.0/concepts/mcp-hosting.md#obot-doc-mcp-servers-git-ops-managed-template).
## Post-deployment management
After successfully adding a server:
- The server appears in the available servers list for authorized users
- Server entries can now be added to authorization groups for different teams
- Users can integrate the server into their clients to access tools in conversations and tasks
- Administrative monitoring of usage and auditing is available through the MCP Platform
---
Document: Overview
Version: v0.28.0
Markdown: https://docs.obot.ai/v0.28.0/functionality/overview.md
HTML: https://docs.obot.ai/functionality/overview
# Overview
For the current task-based instructions, see [Security model](https://docs.obot.ai/v0.28.0/security/model.md). This page preserves existing bookmarks.
## Roles and Capabilities
Continue to [Roles and Capabilities](https://docs.obot.ai/v0.28.0/security/model.md#obot-doc-overview-roles-and-capabilities).
### Standard User
Continue to [Standard User](https://docs.obot.ai/v0.28.0/security/model.md#obot-doc-overview-standard-user).
### Power User
Continue to [Power User](https://docs.obot.ai/v0.28.0/security/model.md#obot-doc-overview-power-user).
### Power User+
Continue to [Power User+](https://docs.obot.ai/v0.28.0/security/model.md#obot-doc-overview-power-user-1).
### Admin / Owner
Continue to [Admin / Owner](https://docs.obot.ai/v0.28.0/security/model.md#obot-doc-overview-admin--owner).
## Learn More
Continue to [Learn More](https://docs.obot.ai/v0.28.0/security/model.md#obot-doc-overview-learn-more).
---
Document: Server Scheduling
Version: v0.28.0
Markdown: https://docs.obot.ai/v0.28.0/functionality/server-scheduling.md
HTML: https://docs.obot.ai/functionality/server-scheduling
# Server Scheduling
For the current task-based instructions, see [Capacity and high availability](https://docs.obot.ai/v0.28.0/operations/capacity.md). This page preserves existing bookmarks.
## Configuration
Continue to [Configuration](https://docs.obot.ai/v0.28.0/operations/capacity.md#obot-doc-server-scheduling-configuration).
### Affinity
Continue to [Affinity](https://docs.obot.ai/v0.28.0/operations/capacity.md#obot-doc-server-scheduling-affinity).
### Tolerations
Continue to [Tolerations](https://docs.obot.ai/v0.28.0/operations/capacity.md#obot-doc-server-scheduling-tolerations).
### Resource Limits & Requests
Continue to [Resource Limits & Requests](https://docs.obot.ai/v0.28.0/operations/capacity.md#obot-doc-server-scheduling-resource-limits--requests).
---
Document: Skill Access Policies
Version: v0.28.0
Markdown: https://docs.obot.ai/v0.28.0/functionality/skill-access-policies.md
HTML: https://docs.obot.ai/functionality/skill-access-policies
# Skill Access Policies
For the current task-based instructions, see [Publish and distribute skills](https://docs.obot.ai/v0.28.0/registries/publish-skills.md). This page preserves existing bookmarks.
## Overview
Continue to [Overview](https://docs.obot.ai/v0.28.0/registries/publish-skills.md#obot-doc-skill-access-policies-overview).
## How Policies Work
Continue to [How Policies Work](https://docs.obot.ai/v0.28.0/registries/publish-skills.md#obot-doc-skill-access-policies-how-policies-work).
### Users and Groups
Continue to [Users and Groups](https://docs.obot.ai/v0.28.0/registries/publish-skills.md#obot-doc-skill-access-policies-users-and-groups).
### Skills
Continue to [Skills](https://docs.obot.ai/v0.28.0/registries/publish-skills.md#obot-doc-skill-access-policies-skills).
## Managing Policies
Continue to [Managing Policies](https://docs.obot.ai/v0.28.0/registries/publish-skills.md#obot-doc-skill-access-policies-managing-policies).
### Creating a Policy
Continue to [Creating a Policy](https://docs.obot.ai/v0.28.0/registries/publish-skills.md#obot-doc-skill-access-policies-creating-a-policy).
### Editing a Policy
Continue to [Editing a Policy](https://docs.obot.ai/v0.28.0/registries/publish-skills.md#obot-doc-skill-access-policies-editing-a-policy).
### Deleting a Policy
Continue to [Deleting a Policy](https://docs.obot.ai/v0.28.0/registries/publish-skills.md#obot-doc-skill-access-policies-deleting-a-policy).
## Example: Data Science Team
Continue to [Example: Data Science Team](https://docs.obot.ai/v0.28.0/registries/publish-skills.md#obot-doc-skill-access-policies-example-data-science-team).
## Multiple Policies
Continue to [Multiple Policies](https://docs.obot.ai/v0.28.0/registries/publish-skills.md#obot-doc-skill-access-policies-multiple-policies).
## Related Topics
Continue to [Related Topics](https://docs.obot.ai/v0.28.0/registries/publish-skills.md#obot-doc-skill-access-policies-related-topics).
---
Document: Skills
Version: v0.28.0
Markdown: https://docs.obot.ai/v0.28.0/functionality/skills.md
HTML: https://docs.obot.ai/functionality/skills
# Skills
For the current task-based instructions, see [Publish and distribute skills](https://docs.obot.ai/v0.28.0/registries/publish-skills.md). This page preserves existing bookmarks.
## Overview
Continue to [Overview](https://docs.obot.ai/v0.28.0/registries/publish-skills.md#obot-doc-skills-overview).
## What Is a Skill?
Continue to [What Is a Skill?](https://docs.obot.ai/v0.28.0/registries/publish-skills.md#obot-doc-skills-what-is-a-skill).
## Skill Sources
Continue to [Skill Sources](https://docs.obot.ai/v0.28.0/registries/publish-skills.md#obot-doc-skills-skill-sources).
### Adding a Source
Continue to [Adding a Source](https://docs.obot.ai/v0.28.0/registries/publish-skills.md#obot-doc-skills-adding-a-source).
### Refreshing a Source
Continue to [Refreshing a Source](https://docs.obot.ai/v0.28.0/registries/publish-skills.md#obot-doc-skills-refreshing-a-source).
### Removing a Source
Continue to [Removing a Source](https://docs.obot.ai/v0.28.0/registries/publish-skills.md#obot-doc-skills-removing-a-source).
## Browsing Skills
Continue to [Browsing Skills](https://docs.obot.ai/v0.28.0/registries/publish-skills.md#obot-doc-skills-browsing-skills).
## Use skills in an AI client
Continue to [Use skills in an AI client](https://docs.obot.ai/v0.28.0/registries/publish-skills.md#obot-doc-skills-how-agents-use-skills).
### Example Interaction
Continue to [Example Interaction](https://docs.obot.ai/v0.28.0/registries/publish-skills.md#obot-doc-skills-example-interaction).
## Access Control
Continue to [Access Control](https://docs.obot.ai/v0.28.0/registries/publish-skills.md#obot-doc-skills-access-control).
---
Document: User Management
Version: v0.28.0
Markdown: https://docs.obot.ai/v0.28.0/functionality/user-management.md
HTML: https://docs.obot.ai/functionality/user-management
# User Management
For the current task-based instructions, see [Authentication and identity](https://docs.obot.ai/v0.28.0/security/authentication.md). This page preserves existing bookmarks.
## Users
Continue to [Users](https://docs.obot.ai/v0.28.0/security/authentication.md#obot-doc-user-management-users).
## User Roles
Continue to [User Roles](https://docs.obot.ai/v0.28.0/security/authentication.md#obot-doc-user-management-user-roles).
## Agent Authorization Scopes
Continue to [Agent Authorization Scopes](https://docs.obot.ai/v0.28.0/security/authentication.md#obot-doc-user-management-agent-authorization-scopes).
## Auth Providers
Continue to [Auth Providers](https://docs.obot.ai/v0.28.0/security/authentication.md#obot-doc-user-management-auth-providers).
---
Document: Virtual MCPs (vMCPs)
Version: v0.28.0
Markdown: https://docs.obot.ai/v0.28.0/functionality/virtual-mcps.md
HTML: https://docs.obot.ai/functionality/virtual-mcps
# Virtual MCPs (vMCPs)
For the current task-based instructions, see [Configure servers in a vMCP](https://docs.obot.ai/v0.28.0/mcp-gateway/server-types.md). This page preserves existing bookmarks.
## How vMCPs work
Continue to [How vMCPs work](https://docs.obot.ai/v0.28.0/mcp-gateway/server-types.md#obot-doc-virtual-mcps-how-vmcps-work).
## Shared and personal vMCPs
Continue to [Shared and personal vMCPs](https://docs.obot.ai/v0.28.0/mcp-gateway/server-types.md#obot-doc-virtual-mcps-shared-and-personal-vmcps).
### Create a shared vMCP as an administrator
Continue to [Create a shared vMCP as an administrator](https://docs.obot.ai/v0.28.0/mcp-gateway/server-types.md#obot-doc-virtual-mcps-create-a-shared-vmcp-as-an-administrator).
### Create a personal vMCP as a user
Continue to [Create a personal vMCP as a user](https://docs.obot.ai/v0.28.0/mcp-gateway/server-types.md#obot-doc-virtual-mcps-create-a-personal-vmcp-as-a-user).
## Configuration policies
Continue to [Configuration policies](https://docs.obot.ai/v0.28.0/mcp-gateway/server-types.md#obot-doc-virtual-mcps-configuration-policies).
## Tools and profiles
Continue to [Tools and profiles](https://docs.obot.ai/v0.28.0/mcp-gateway/access.md#obot-doc-virtual-mcps-tools-and-profiles).
## Connect to a vMCP
Continue to [Connect to a vMCP](https://docs.obot.ai/v0.28.0/mcp-gateway/connect-clients.md#obot-doc-virtual-mcps-connect-to-a-vmcp).
## Snapshots and updates
Continue to [Snapshots and updates](https://docs.obot.ai/v0.28.0/mcp-gateway/publish.md#obot-doc-virtual-mcps-snapshots-and-updates).
## GitOps and migration
Continue to [GitOps and migration](https://docs.obot.ai/v0.28.0/mcp-gateway/publish.md#obot-doc-virtual-mcps-gitops-and-migration).
---
Document: Obot CLI Setup
Version: v0.28.0
Markdown: https://docs.obot.ai/v0.28.0/installation/cli-setup.md
HTML: https://docs.obot.ai/installation/cli-setup
# Obot CLI Setup
For the current task-based instructions, see [CLI and APIs](https://docs.obot.ai/v0.28.0/reference/cli-api.md). This page preserves existing bookmarks.
## What it does
Continue to [What it does](https://docs.obot.ai/v0.28.0/reference/cli-api.md#obot-doc-cli-setup-what-it-does).
## Prerequisites
Continue to [Prerequisites](https://docs.obot.ai/v0.28.0/reference/cli-api.md#obot-doc-cli-setup-prerequisites).
## Basic usage
Continue to [Basic usage](https://docs.obot.ai/v0.28.0/reference/cli-api.md#obot-doc-cli-setup-basic-usage).
## Choosing local client targets
Continue to [Choosing local client targets](https://docs.obot.ai/v0.28.0/reference/cli-api.md#obot-doc-cli-setup-choosing-local-client-targets).
## Non-interactive setup
Continue to [Non-interactive setup](https://docs.obot.ai/v0.28.0/reference/cli-api.md#obot-doc-cli-setup-non-interactive-setup).
## Check setup status
Continue to [Check setup status](https://docs.obot.ai/v0.28.0/reference/cli-api.md#obot-doc-cli-setup-check-setup-status).
## What setup writes locally
Continue to [What setup writes locally](https://docs.obot.ai/v0.28.0/reference/cli-api.md#obot-doc-cli-setup-what-setup-writes-locally).
## Troubleshooting
Continue to [Troubleshooting](https://docs.obot.ai/v0.28.0/reference/cli-api.md#obot-doc-cli-setup-troubleshooting).
### `auth_unavailable`
Continue to [`auth_unavailable`](https://docs.obot.ai/v0.28.0/reference/cli-api.md#obot-doc-cli-setup-auth_unavailable).
### `server_unreachable`
Continue to [`server_unreachable`](https://docs.obot.ai/v0.28.0/reference/cli-api.md#obot-doc-cli-setup-server_unreachable).
### Missing `--url` in non-interactive mode
Continue to [Missing `--url` in non-interactive mode](https://docs.obot.ai/v0.28.0/reference/cli-api.md#obot-doc-cli-setup-missing---url-in-non-interactive-mode).
### `--clients is required in non-interactive mode`
Continue to [`--clients is required in non-interactive mode`](https://docs.obot.ai/v0.28.0/reference/cli-api.md#obot-doc-cli-setup---clients-is-required-in-non-interactive-mode).
### Existing URL mismatch
Continue to [Existing URL mismatch](https://docs.obot.ai/v0.28.0/reference/cli-api.md#obot-doc-cli-setup-existing-url-mismatch).
## Authenticate providers that require localhost callbacks
Continue to [MCP localhost OAuth sign-in](https://docs.obot.ai/v0.28.0/reference/cli-api.md#obot-doc-mcp-localhost-oauth-sign-in).
---
Document: Enabling Authentication
Version: v0.28.0
Markdown: https://docs.obot.ai/v0.28.0/installation/enabling-authentication.md
HTML: https://docs.obot.ai/installation/enabling-authentication
# Enabling Authentication
For the current task-based instructions, see [Authentication and identity](https://docs.obot.ai/v0.28.0/security/authentication.md). This page preserves existing bookmarks.
## Step 1: Set Environment Variables
Continue to [Step 1: Set Environment Variables](https://docs.obot.ai/v0.28.0/configuration/auth-providers.md#obot-doc-enabling-authentication-step-1-set-environment-variables).
## Step 2: Start Obot and Login
Continue to [Step 2: Start Obot and Login](https://docs.obot.ai/v0.28.0/configuration/auth-providers.md#obot-doc-enabling-authentication-step-2-start-obot-and-login).
## Step 3: Configure Authentication Provider
Continue to [Step 3: Configure Authentication Provider](https://docs.obot.ai/v0.28.0/configuration/auth-providers.md#obot-doc-enabling-authentication-step-3-configure-authentication-provider).
## Post-Setup
Continue to [Post-Setup](https://docs.obot.ai/v0.28.0/configuration/auth-providers.md#obot-doc-enabling-authentication-post-setup).
## Troubleshooting
Continue to [Troubleshooting](https://docs.obot.ai/v0.28.0/configuration/auth-providers.md#obot-doc-enabling-authentication-troubleshooting).
### Bootstrap Token Not Working
Continue to [Bootstrap Token Not Working](https://docs.obot.ai/v0.28.0/configuration/auth-providers.md#obot-doc-enabling-authentication-bootstrap-token-not-working).
### Authentication Provider Issues
Continue to [Authentication Provider Issues](https://docs.obot.ai/v0.28.0/configuration/auth-providers.md#obot-doc-enabling-authentication-authentication-provider-issues).
## Next Steps
Continue to [Next Steps](https://docs.obot.ai/v0.28.0/configuration/auth-providers.md#obot-doc-enabling-authentication-next-steps).
---
Document: Persistent Storage in Kubernetes
Version: v0.28.0
Markdown: https://docs.obot.ai/v0.28.0/installation/kubernetes-persistent-storage.md
HTML: https://docs.obot.ai/installation/kubernetes-persistent-storage
# Persistent Storage in Kubernetes
The Helm chart can mount a persistent volume at `/data` in the Obot server container. Enable it when your configured features need local files to survive pod replacement. Use an external PostgreSQL database for production; a server data volume does not replace database backups.
## Storage Options
Any Kubernetes `StorageClass` can be used, including cloud block storage and shared filesystem-backed classes. Some examples:
- **AWS**: EBS-backed StorageClasses
- **GCP**: Hyperdisk-backed StorageClasses
- **Self-managed clusters**: NFS or other CSI-backed StorageClasses
Choose a `StorageClass` that matches your durability, performance, and cost requirements.
## Configure the Obot data volume
### Single Replica with ReadWriteOnce
For `replicaCount: 1`, a `ReadWriteOnce` PVC is sufficient:
```yaml
apiVersion: v1
kind: PersistentVolumeClaim
metadata:
name: obot-data
spec:
accessModes:
- ReadWriteOnce
storageClassName:
resources:
requests:
storage: 10Gi
```
Mount it into Obot with:
```yaml
replicaCount: 1
persistence:
enabled: true
existingClaim: obot-data
```
This is the common setup when using a single Obot pod with a block-storage-backed `StorageClass`. It persists files stored under `/data`.
### Multiple Replicas with ReadWriteMany
If multiple Obot replicas need to share files under `/data`, configure a `ReadWriteMany` volume:
```yaml
apiVersion: v1
kind: PersistentVolumeClaim
metadata:
name: obot-data-rwx
spec:
accessModes:
- ReadWriteMany
storageClassName:
resources:
requests:
storage: 10Gi
```
Mount it into Obot with:
```yaml
replicaCount: 2
persistence:
enabled: true
existingClaim: obot-data-rwx
```
Use a `StorageClass` backed by a shared filesystem such as NFS. A single shared `ReadWriteOnce` claim is not suitable for multi-replica Obot deployments.
### Use an Existing Claim
If you already have a PVC, point the chart at it:
```yaml
persistence:
enabled: true
existingClaim: obot-data
```
When enabled, the chart mounts that claim into the Obot container at `/data`, preserving files stored there.
### Let Helm Create the Claim
If you prefer Helm-managed PVCs instead of creating them yourself, set the storage class, access mode, and size directly:
```yaml
persistence:
enabled: true
storageClass:
accessModes:
- ReadWriteOnce
size: 10Gi
```
## Example: nfs-subdir-external-provisioner
If you do not have a cloud-managed dynamic provisioner, you can use [nfs-subdir-external-provisioner](https://github.com/kubernetes-sigs/nfs-subdir-external-provisioner) to provide dynamic PVC provisioning backed by an NFS server.
After installing the provisioner and creating its `StorageClass`, set that class in your Obot values file:
```yaml
persistence:
enabled: true
storageClass: nfs-client
accessModes:
- ReadWriteOnce
size: 10Gi
```
Then install or upgrade Obot:
```bash
helm upgrade --install obot obot/obot -f values.yaml
```
## Validation
After deployment, verify that the Obot data PVC is created and bound:
```bash
kubectl get pvc -A
kubectl get storageclass
```
If PVCs remain `Pending`, confirm that:
- The configured `storageClassName` exists
- A provisioner is running and healthy
- The cluster can reach the backing storage service
---
Document: Filters and private-network tunnels
Version: v0.28.0
Markdown: https://docs.obot.ai/v0.28.0/mcp-gateway/filters-tunnels.md
HTML: https://docs.obot.ai/mcp-gateway/filters-tunnels
# Filters and private-network tunnels
Use [Filter MCP traffic](https://docs.obot.ai/v0.28.0/functionality/filters.md) to inspect messages, or [Connect private-network servers](https://docs.obot.ai/v0.28.0/functionality/mcp-tunnels.md) to reach a remote service.
## Filters
Continue to [Filters](https://docs.obot.ai/v0.28.0/functionality/filters.md#obot-doc-overview).
### Filter implementations
Continue to [Filter implementations](https://docs.obot.ai/v0.28.0/functionality/filters.md#obot-doc-overview).
### How Filters Work
Continue to [How Filters Work](https://docs.obot.ai/v0.28.0/functionality/filters.md#obot-doc-how-filters-work).
### Gateway Configuration
Continue to [Gateway Configuration](https://docs.obot.ai/v0.28.0/functionality/filters.md#obot-doc-gateway-configuration).
#### Selectors
Continue to [Selectors](https://docs.obot.ai/v0.28.0/functionality/filters.md#obot-doc-selectors).
## Tunnels
Continue to [Tunnels](https://docs.obot.ai/v0.28.0/functionality/mcp-tunnels.md#obot-doc-overview).
### Prerequisites
Continue to [Prerequisites](https://docs.obot.ai/v0.28.0/functionality/mcp-tunnels.md#obot-doc-prerequisites).
### Create an MCP tunnel
Continue to [Create an MCP tunnel](https://docs.obot.ai/v0.28.0/functionality/mcp-tunnels.md#obot-doc-create-an-mcp-tunnel).
### Configure allowed URLs
Continue to [Configure allowed URLs](https://docs.obot.ai/v0.28.0/functionality/mcp-tunnels.md#obot-doc-configure-allowed-urls).
### Run the tunnel client
Continue to [Run the tunnel client](https://docs.obot.ai/v0.28.0/functionality/mcp-tunnels.md#obot-doc-connect-the-tunnel).
### Configure a remote MCP catalog entry
Continue to [Configure a remote MCP catalog entry](https://docs.obot.ai/v0.28.0/functionality/mcp-tunnels.md#obot-doc-configure-a-remote-mcp-catalog-entry).
---
Document: AWS / Azure / GCP
Version: v0.28.0
Markdown: https://docs.obot.ai/v0.28.0/operations/cloud.md
HTML: https://docs.obot.ai/operations/cloud
# AWS / Azure / GCP
Use the standard [Kubernetes deployment](https://docs.obot.ai/v0.28.0/installation/kubernetes-deployment.md) with your cloud's identity, networking, database, and storage services.
| Platform | Deployment guide | Encryption guide |
| -------- | ------------------------------------------------------------------------------------------- | ------------------------------------------------------------------------------------------------------- |
| AWS | [Amazon EKS](https://docs.obot.ai/v0.28.0/installation/reference-architectures/aws-eks.md) | [AWS KMS](https://docs.obot.ai/v0.28.0/configuration/encryption-providers/aws-kms.md) |
| Azure | [Azure AKS](https://docs.obot.ai/v0.28.0/installation/reference-architectures/azure-aks.md) | [Azure Key Vault](https://docs.obot.ai/v0.28.0/configuration/encryption-providers/azure-key-vault.md) |
| GCP | [Google GKE](https://docs.obot.ai/v0.28.0/installation/reference-architectures/gcp-gke.md) | [Google Cloud KMS](https://docs.obot.ai/v0.28.0/configuration/encryption-providers/google-cloud-kms.md) |
Prepare PostgreSQL, TLS ingress, cloud identity permissions, and the required StorageClasses before installation. Use [Data storage and lifecycle](https://docs.obot.ai/v0.28.0/architecture/data-lifecycle.md) to identify the database and file storage your deployment needs.
---
Document: Catalog and filter schemas
Version: v0.28.0
Markdown: https://docs.obot.ai/v0.28.0/reference/schemas.md
HTML: https://docs.obot.ai/reference/schemas
# Catalog and filter schemas
The references are now separate:
- [Catalog schemas](https://docs.obot.ai/v0.28.0/reference/catalog-schemas.md): server definitions, runtime fields, and validation.
- [Filter schemas](https://docs.obot.ai/v0.28.0/reference/filter-schemas.md): MCP filter tool and HTTP webhook contracts.